The PS Challenge continues in my backyard. Gotta love the bees!
Enjoy – PHOTOROGR
The PS Challenge continues in my backyard. Gotta love the bees!
Enjoy – PHOTOROGR
As my followers know, I have rules for my ‘view from the office’ posts. The big one is that VFTO pictures are taken with and posted from my mobile phone.
I’ve decided that the format for the PS Challenge is the ‘something new’ I introduced yesterday. All images will be made with the PowerShot camera and processed like images from the big cameras, since they all start in RAW format. The PowerShot is fun and full of surprising capabilities, and becoming a powerful tool in my camera bag.
That said, here’s today’s edition of the PS Challenge! The pollenators are out in force, and working the trees in the yard pretty hard!
Happy Spring and enjoy – PHOTOROGR
I think I’ll change up my sharing on social media. Except for the view from the office, I’ll post my images on my blog. Sometimes I’ll have a little commentary, and sometimes I’ll just post a picture for the day.
Here’s a shot from my backyard yesterday. It’s similar to the view from the office, but a better image (and made with the PowerShot!).
Enjoy – PHOTOROGR
My apologies for the long break between posts. I’ve been busy shooting, but I took a little break when my friend and photo buddy, Richard Hawkins, lost his battle with cancer. Many of you are familiar with one of Rich’s best pictures.

Richard and I were out with the wild horses a couple years ago. I had just made a few images and turned around when he grabbed this shot of me. Shooting with him was always fun – he had a great eye for images and helped me look at things a little differently. Rich bought a 1964 Olds 442 just before he received his cancer diagnosis. He dated his wife in a car just like it many years ago. At his first car show, he won the ‘under construction’ category. He also asked me to take his picture in the same pose he was in when he had his original 442. I was very happy to do so. God Bless You, Rich – my cameras and I miss you.
On to the images from this month. I picked up a point and shoot camera, a Canon PowerShot G9 X Mark II, to enhance my camera bag. I’m learning the capabilities and limitations of this tiny little camera (it’s only 3.75″ wide, 2.5″ tall, and a narrow 1.25″ thick), but it makes marvelous images. I’m getting very nice landscape images, as you can see, and there’s potential for close up and macro photography, once I learn the camera a lot better. The PS challenge can be either ‘point n shoot’ or PowerShot, depending on my feeling that day.

I made this image just south of Woodfords CA. That’s CA 89 on the left. I made this image with the PowerShot.
I’ve driven by this section of the East Fork of the Carson River several times, and finally stopped to make the image. Great sky and great light!

The beauty of the PowerShot is the ability to stop and jump out for the quick shot. This image was made from the side of CA 89 (the Carson River is just behind and downhill from these trees) in an area where a wildfire burned a couple years ago. The tree on the left was completely burned but the other two were only burned on the bottom half. I hope they survive.

The last PowerShot image for this post – the West Fork of the Carson River in the middle of the Carson Valley. The Town of Genoa is visible at the base of the mountains, and Duane Bliss Peak is reflected in the river.
As much as I love my PowerShot, it will never replace the big camera for many things. The PowerShot will bracket exposures and focal length, but the big camera does it much better.

This is an HDR combined from an exposure bracket of the West Fork of the Carson River, in the mountains. There’s lots of ice in the stream still, as this section of the river gets very little direct sunlight in the winter months.

Another HDR of a usually dry wash feeding the East Fork of the Carson River.
This is the Bower’s Mansion, an historic structure on the west side of Washoe Lake, just south of Reno.
The Eagles are long gone, except for the nesting pairs, and the other Raptors are slowly leaving the area as spring approaches. Smaller birds are returning, so we have subjects to shoot and new challenges in shooting. Small birds are more likely to move as you approach, so a long lens and quick reaction to spotting them is critical.

I found this Western Meadowlark on a fence post in the wildlife viewing area on the south end of Washoe Lake. Chilly morning, so it was trying to fluff up and stay warm.
This Western Meadowlark landed on a branch near me, and posed nicely.
These Black Tail Deer are part of the Town of Genoa herds, although these 4 can be found a couple miles north of town on Foothill Road.
I’m not sure they were more worried about me or something to the right, but they held still long enough for me to make this image.
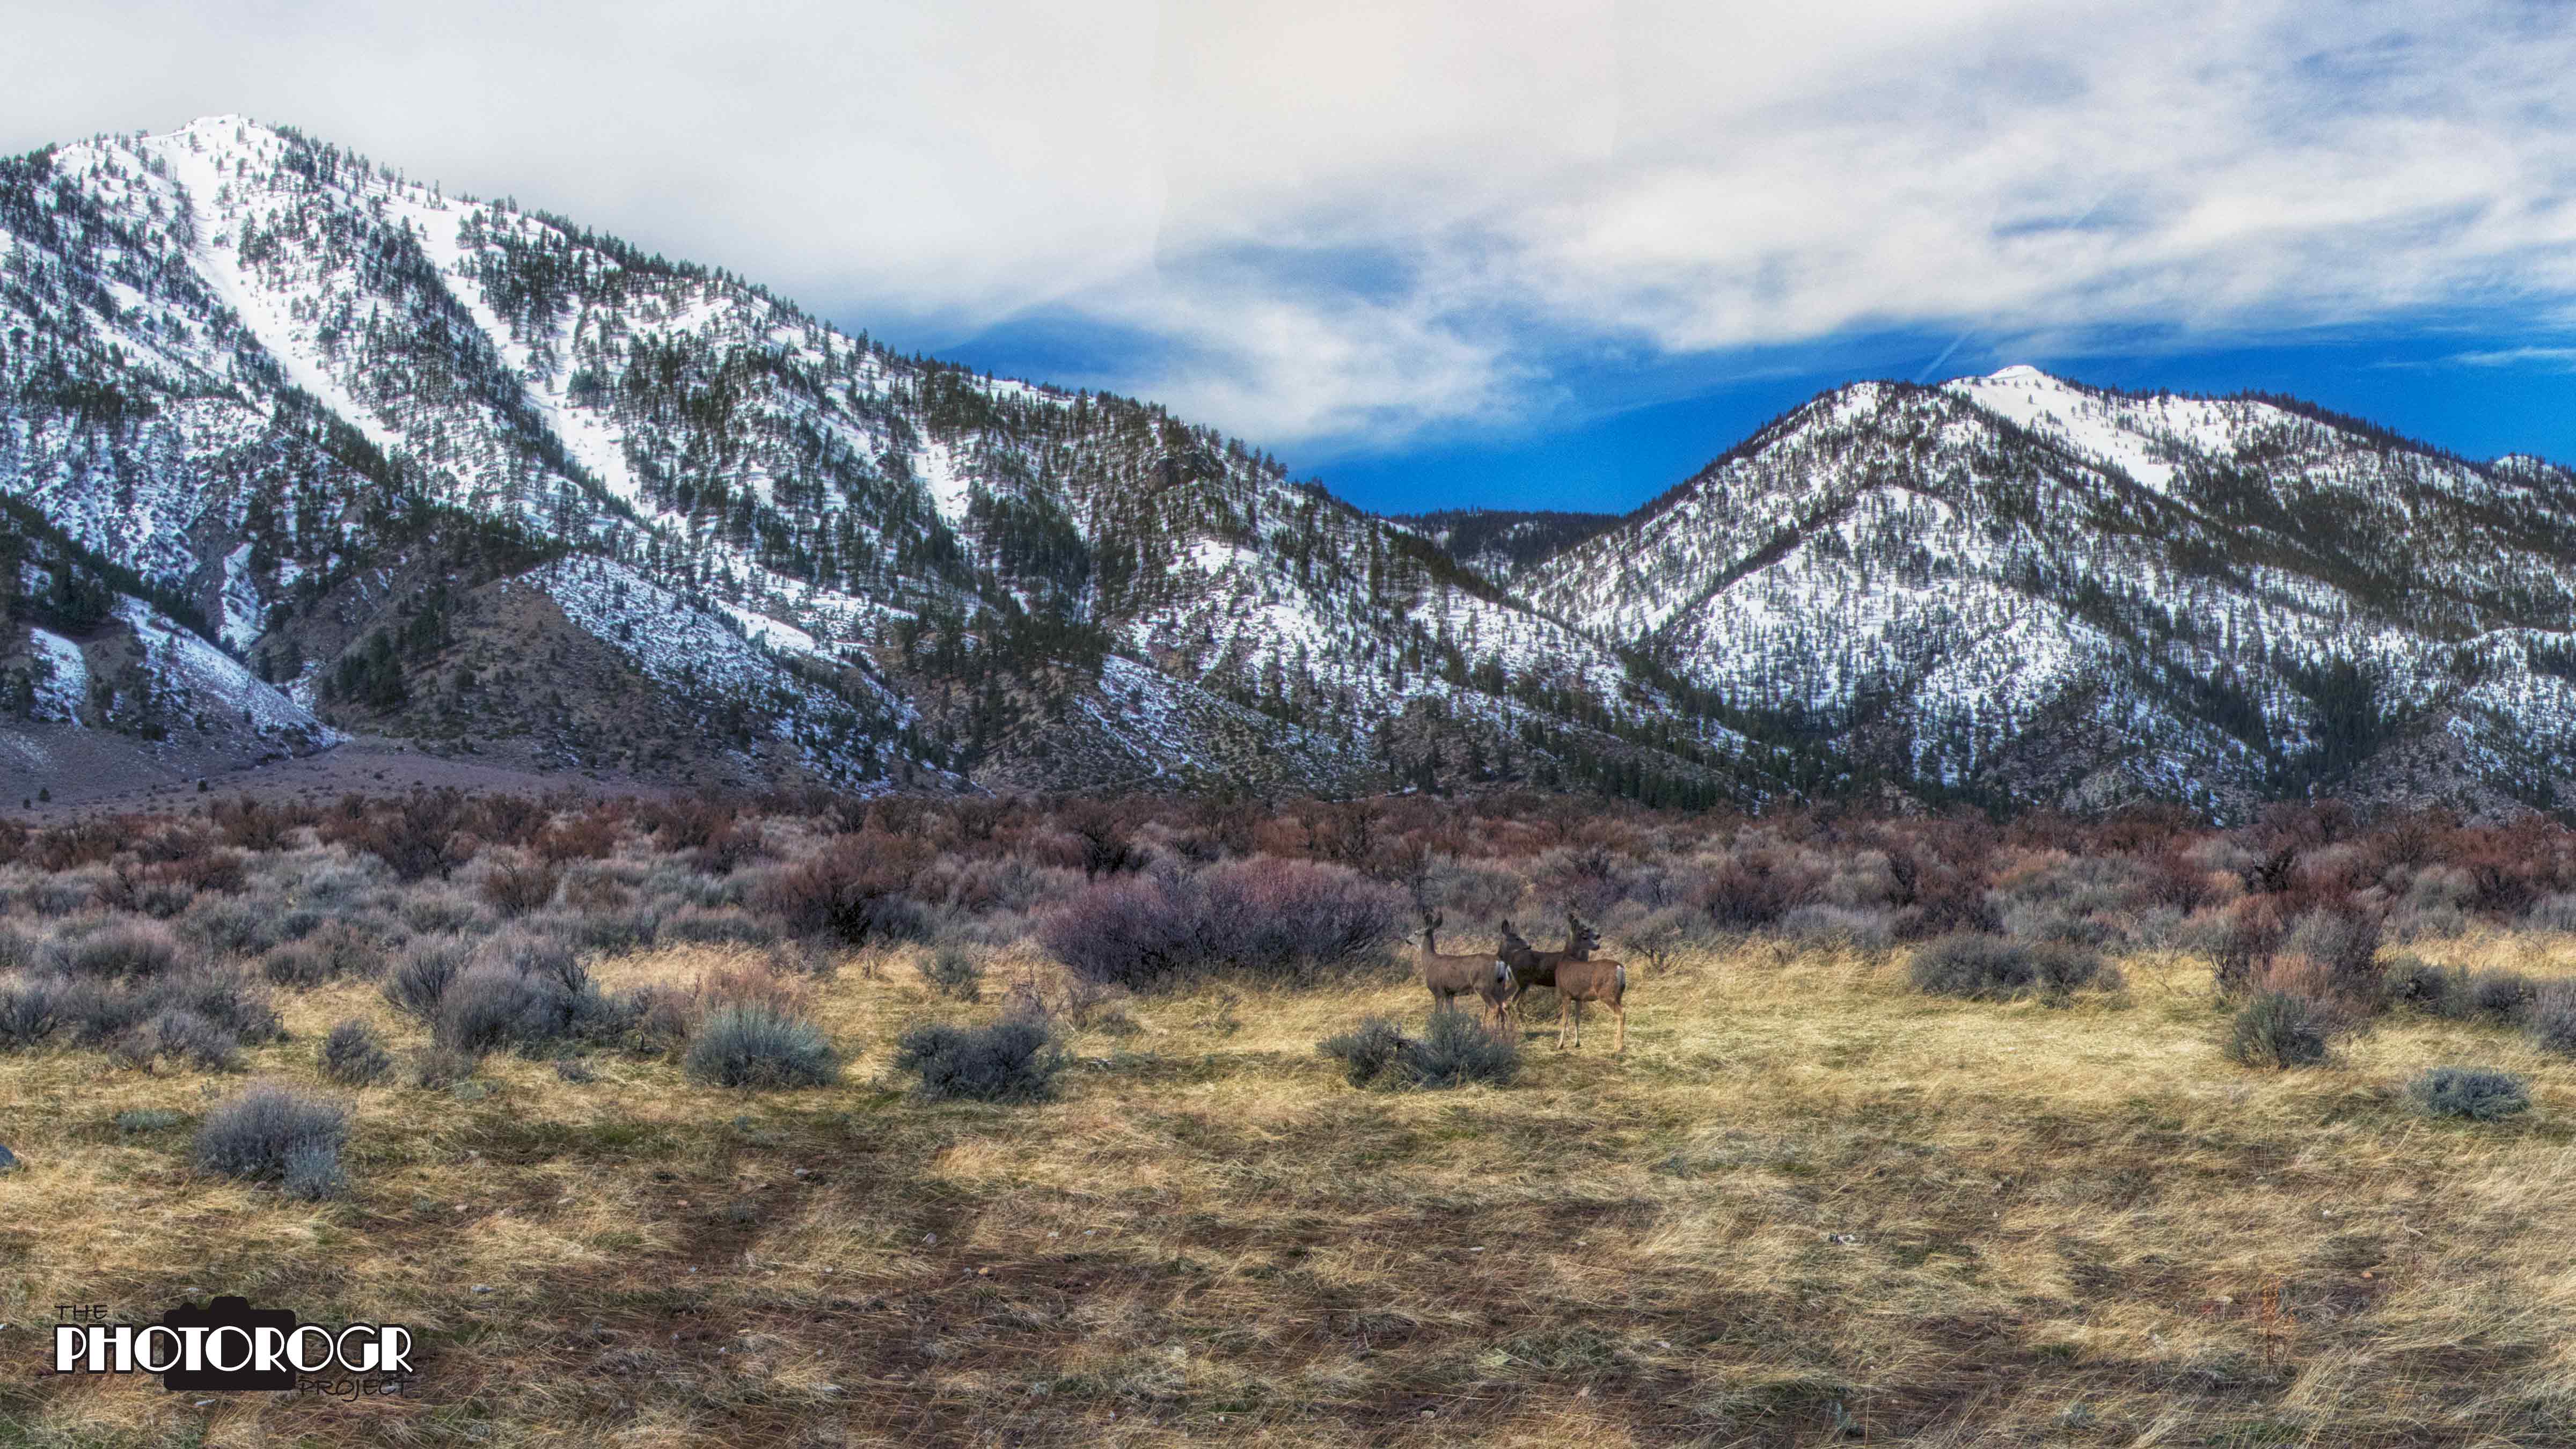
I had the opportunity to try a new technique I saw in Outdoor Photographer magazine – the wildlife panorama. I usually try to get my wildlife images as close and detailed as possible, but I love the concept of combining wildlife and landscape photography. Watch for more images like this.

I found these 4 another day, but they moved into a grove of trees as I approached. New challenge to get a good shot through the trees. This one moved in and stopped, not exposing more head for me. Changing my position wouldn’t have helped, as other trees blocked the view.
Spring is here – evidenced by the blossoms on some of our fruit trees. These are from the Flowering Plum in the corner of the backyard.
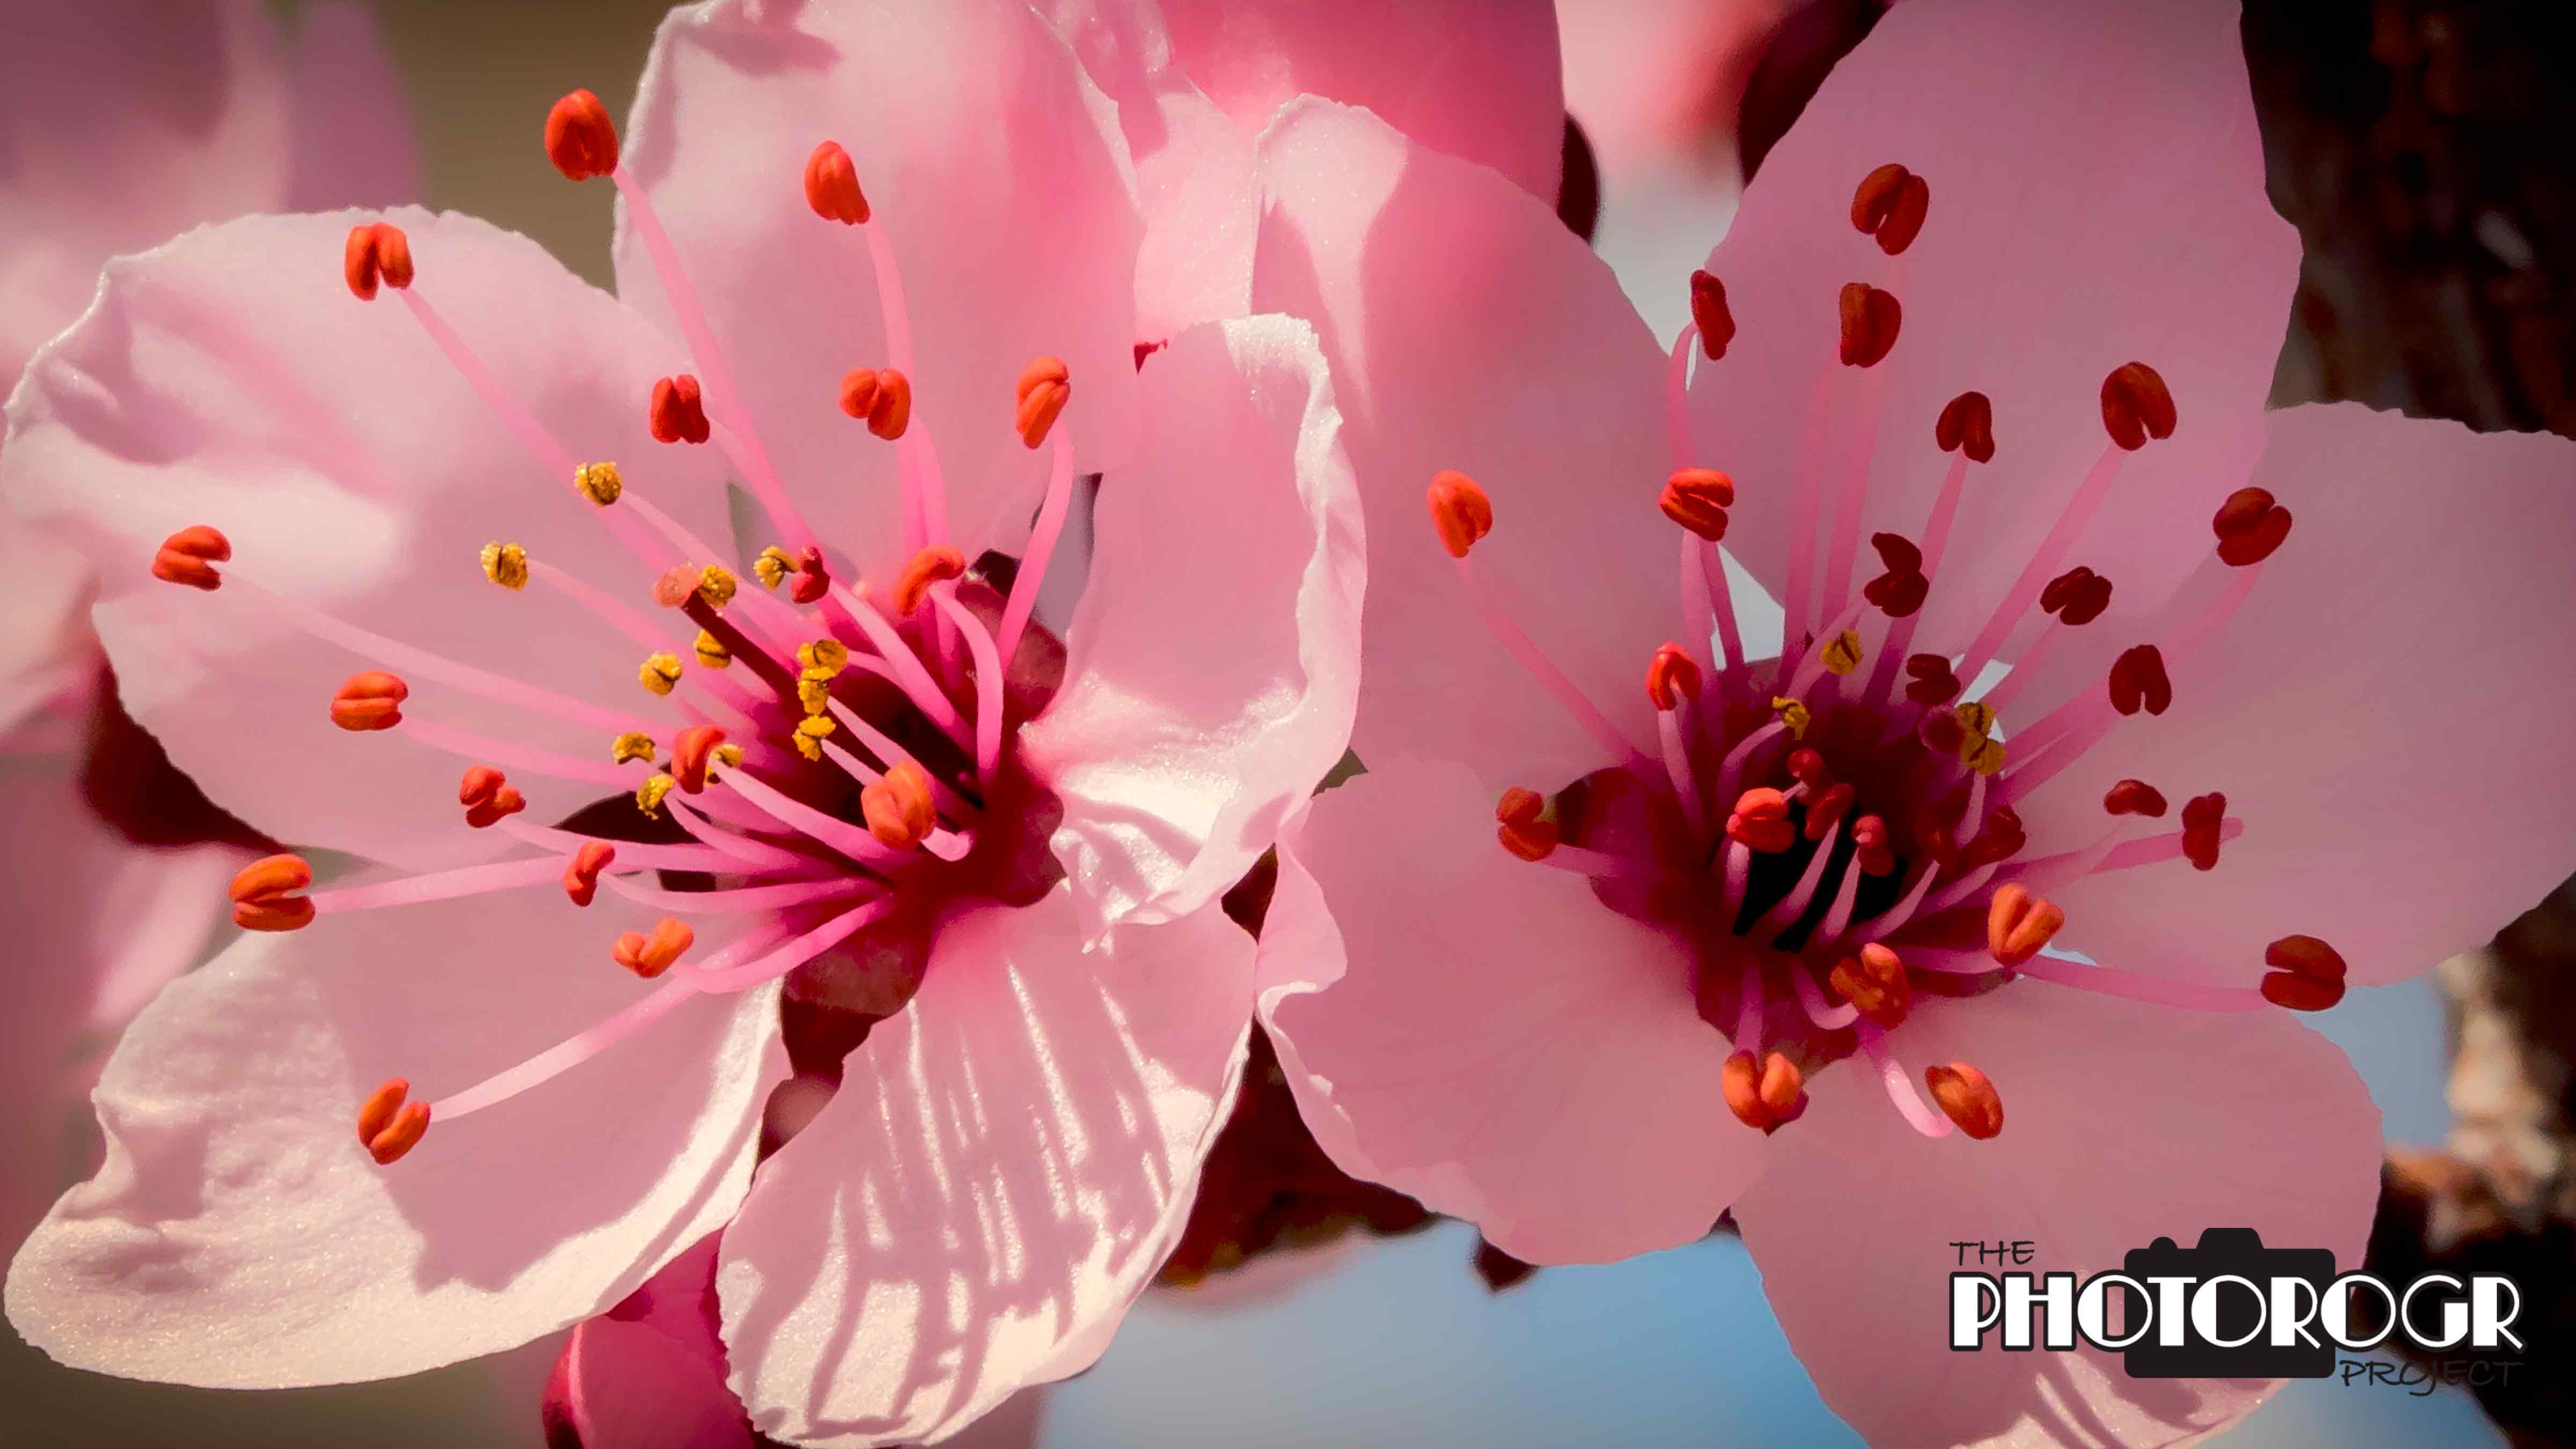
First close up of the year – almost a macro. Each blossom is only 3/4″ in diameter. As more flowers bloom, I’ll shoot more macros. Hopefully, the wet winter will cause the desert to bloom, and not delay too much the mountain meadows blooming.
Welcome Spring and the changes it brings. Thanks for reading this blog!
Enjoy – PHOTOROGR
So, there I was, reading the March/April 2017 issue of Popular Photography magazine (specifically an article by Glen Van Slooten on ‘seeing the trees for the forest’) which included this quote from Henry David Thoreau. The words resonated deep inside me. A few days later, I was reading about the cover shot for the March 2017 issue of Outdoor Photographer magazine. In his own words to describe the picture and his process for making it, the photographer, Robert Glenn Ketchum, said this, “…As you look at this image, I want to call your attention to an “old school” idea about taking pictures: The camera doesn’t matter; it’s what you see that’s important…” My technically oriented engineer’s brain almost exploded. I called one of my photo mentors to discuss this interesting concept. He laughed and said something like, ‘why yes, and that’s the subject of a presentation I’m making next week.’ (Though I didn’t hear it specifically, I’m sure that he covered the telephone and said something like ‘he FINALLY gets it!!’)
As I thought about the quotes and my mentor and his presentation, I realized that I have been subconsciously wrestling with the concept for some time. When I look at something, what am I actually seeing? I had always wondered why people making images from the same place and time that I was were making better images. In many instances, they could see an image that I didn’t.
What does it mean? Simply, there’s one more item on my list of things to learn about photography. This one, however, is not a setting on the camera – it’s consciously looking at an item, animal, or scene and visualizing the image it could be, or taking an idea and making it into a reality. We’ll all see if I can actually do it – the challenge is there.
I had the opportunity to go inside the Nevada State Railroad Museum in Carson City before it re-opened last weekend. The Museum suffered damage from flooding last January and has been closed for repairs and cleanup. I’m happy to report that the Museum staff and volunteers did an excellent job and the displays and exhibits are in excellent shape. Here are some images from my visit.

This is the Glenbrook. I made this image from three exposures processed in Photomatix, a High Dynamic Range (HDR) software, and finished as a monochrome image. HDR utilizes multiple images made at different exposures to bring out the best highlights and details in the shadows. (I discuss HDR in more detail in this post, https://photorogr.com/2016/03/29/an-amazing-week-for-me/ – go take a look!)
Same image as above, but rendered in color.
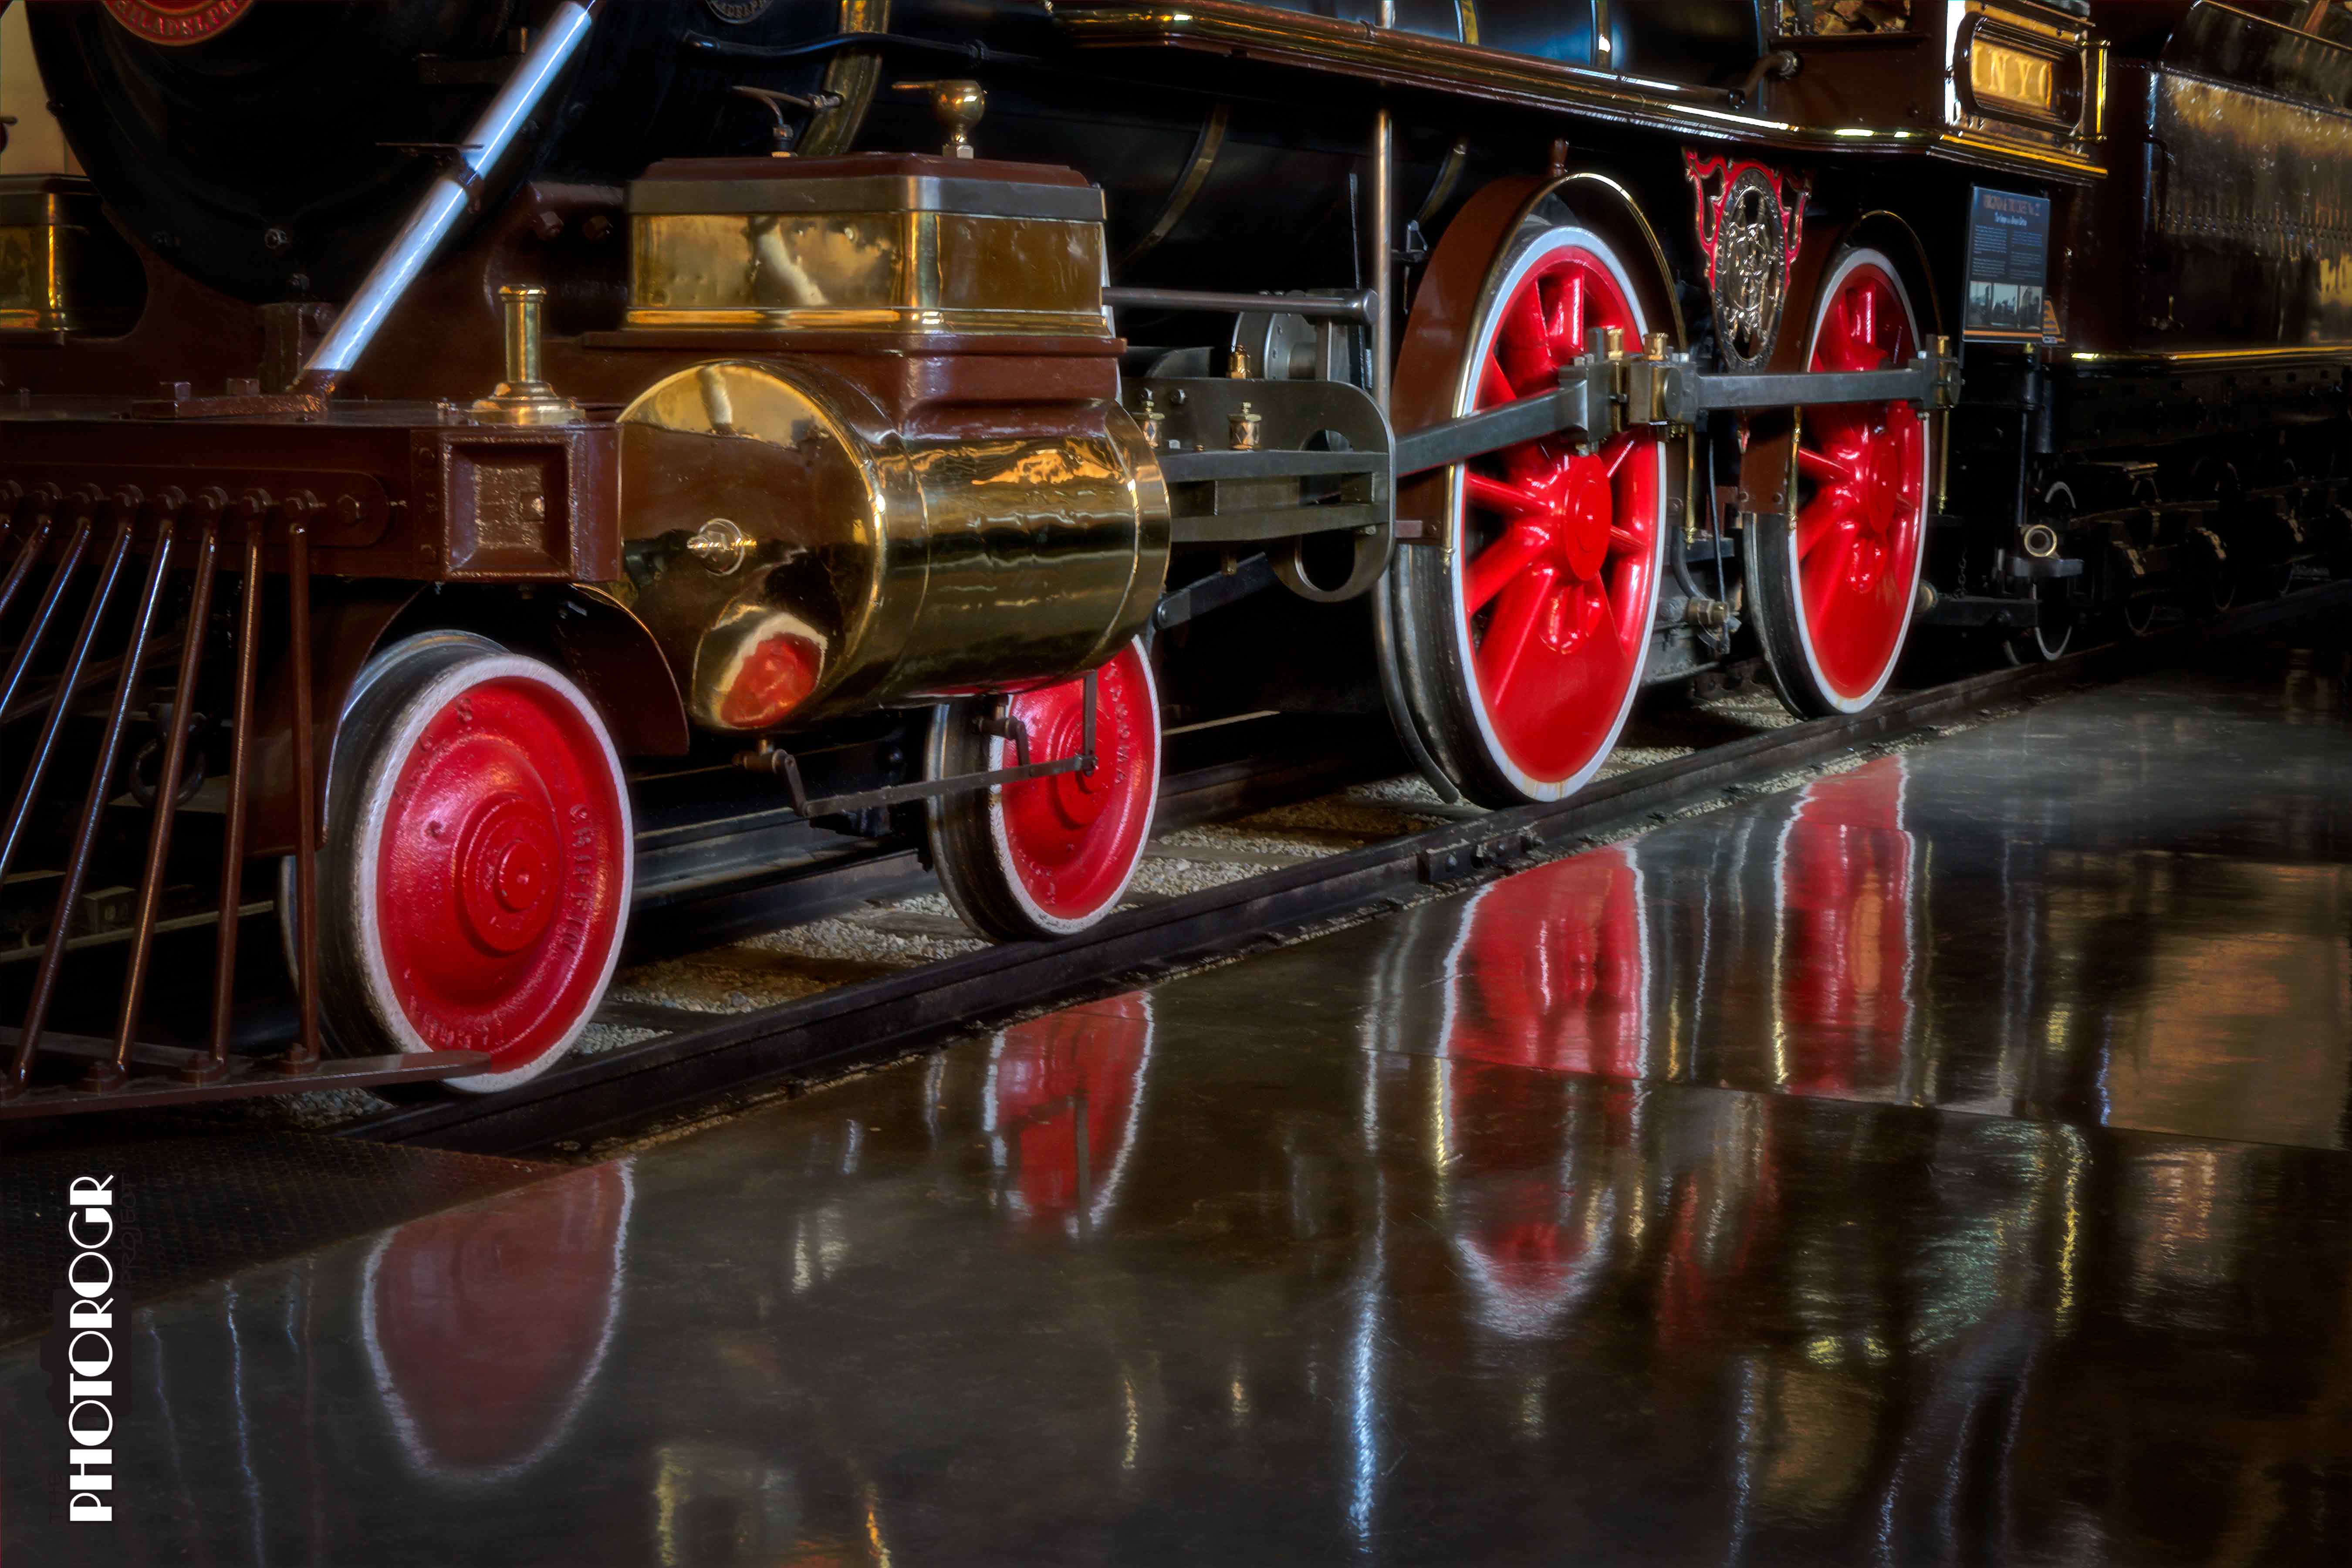
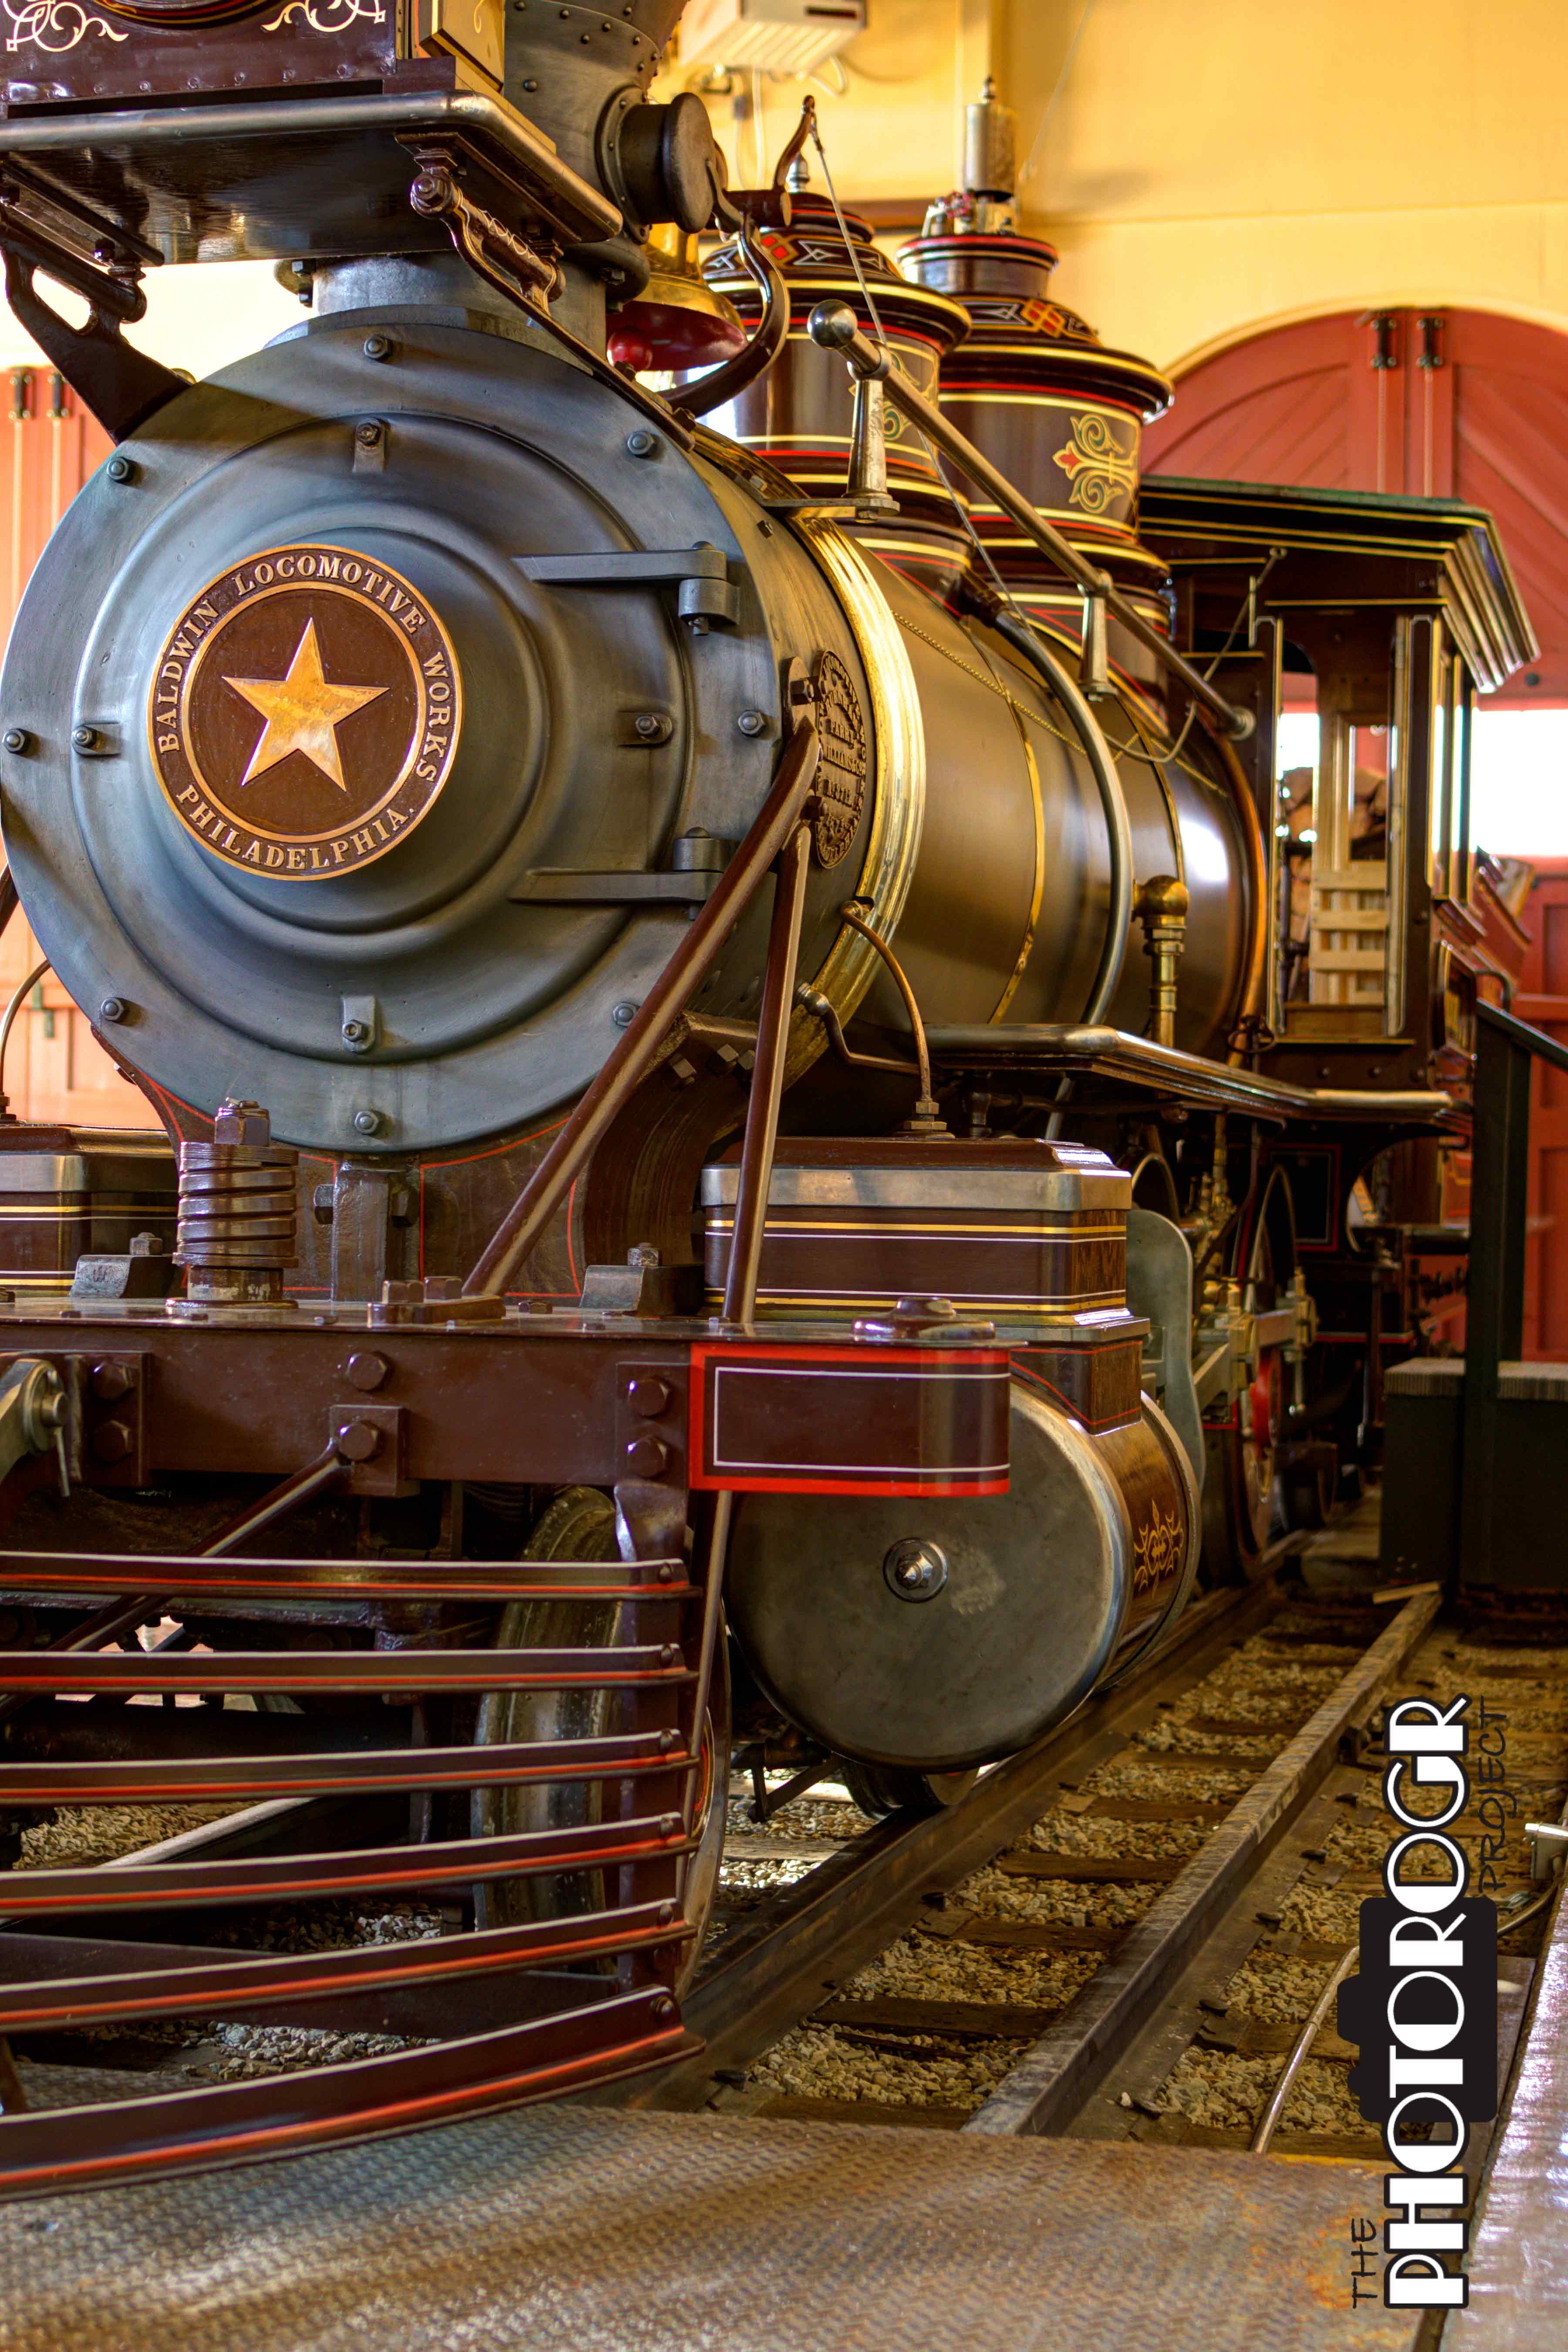
The drive wheels on the Inyo. Note the reflection in the floors – Museum staff thinks the floors look better than ever and I agree!
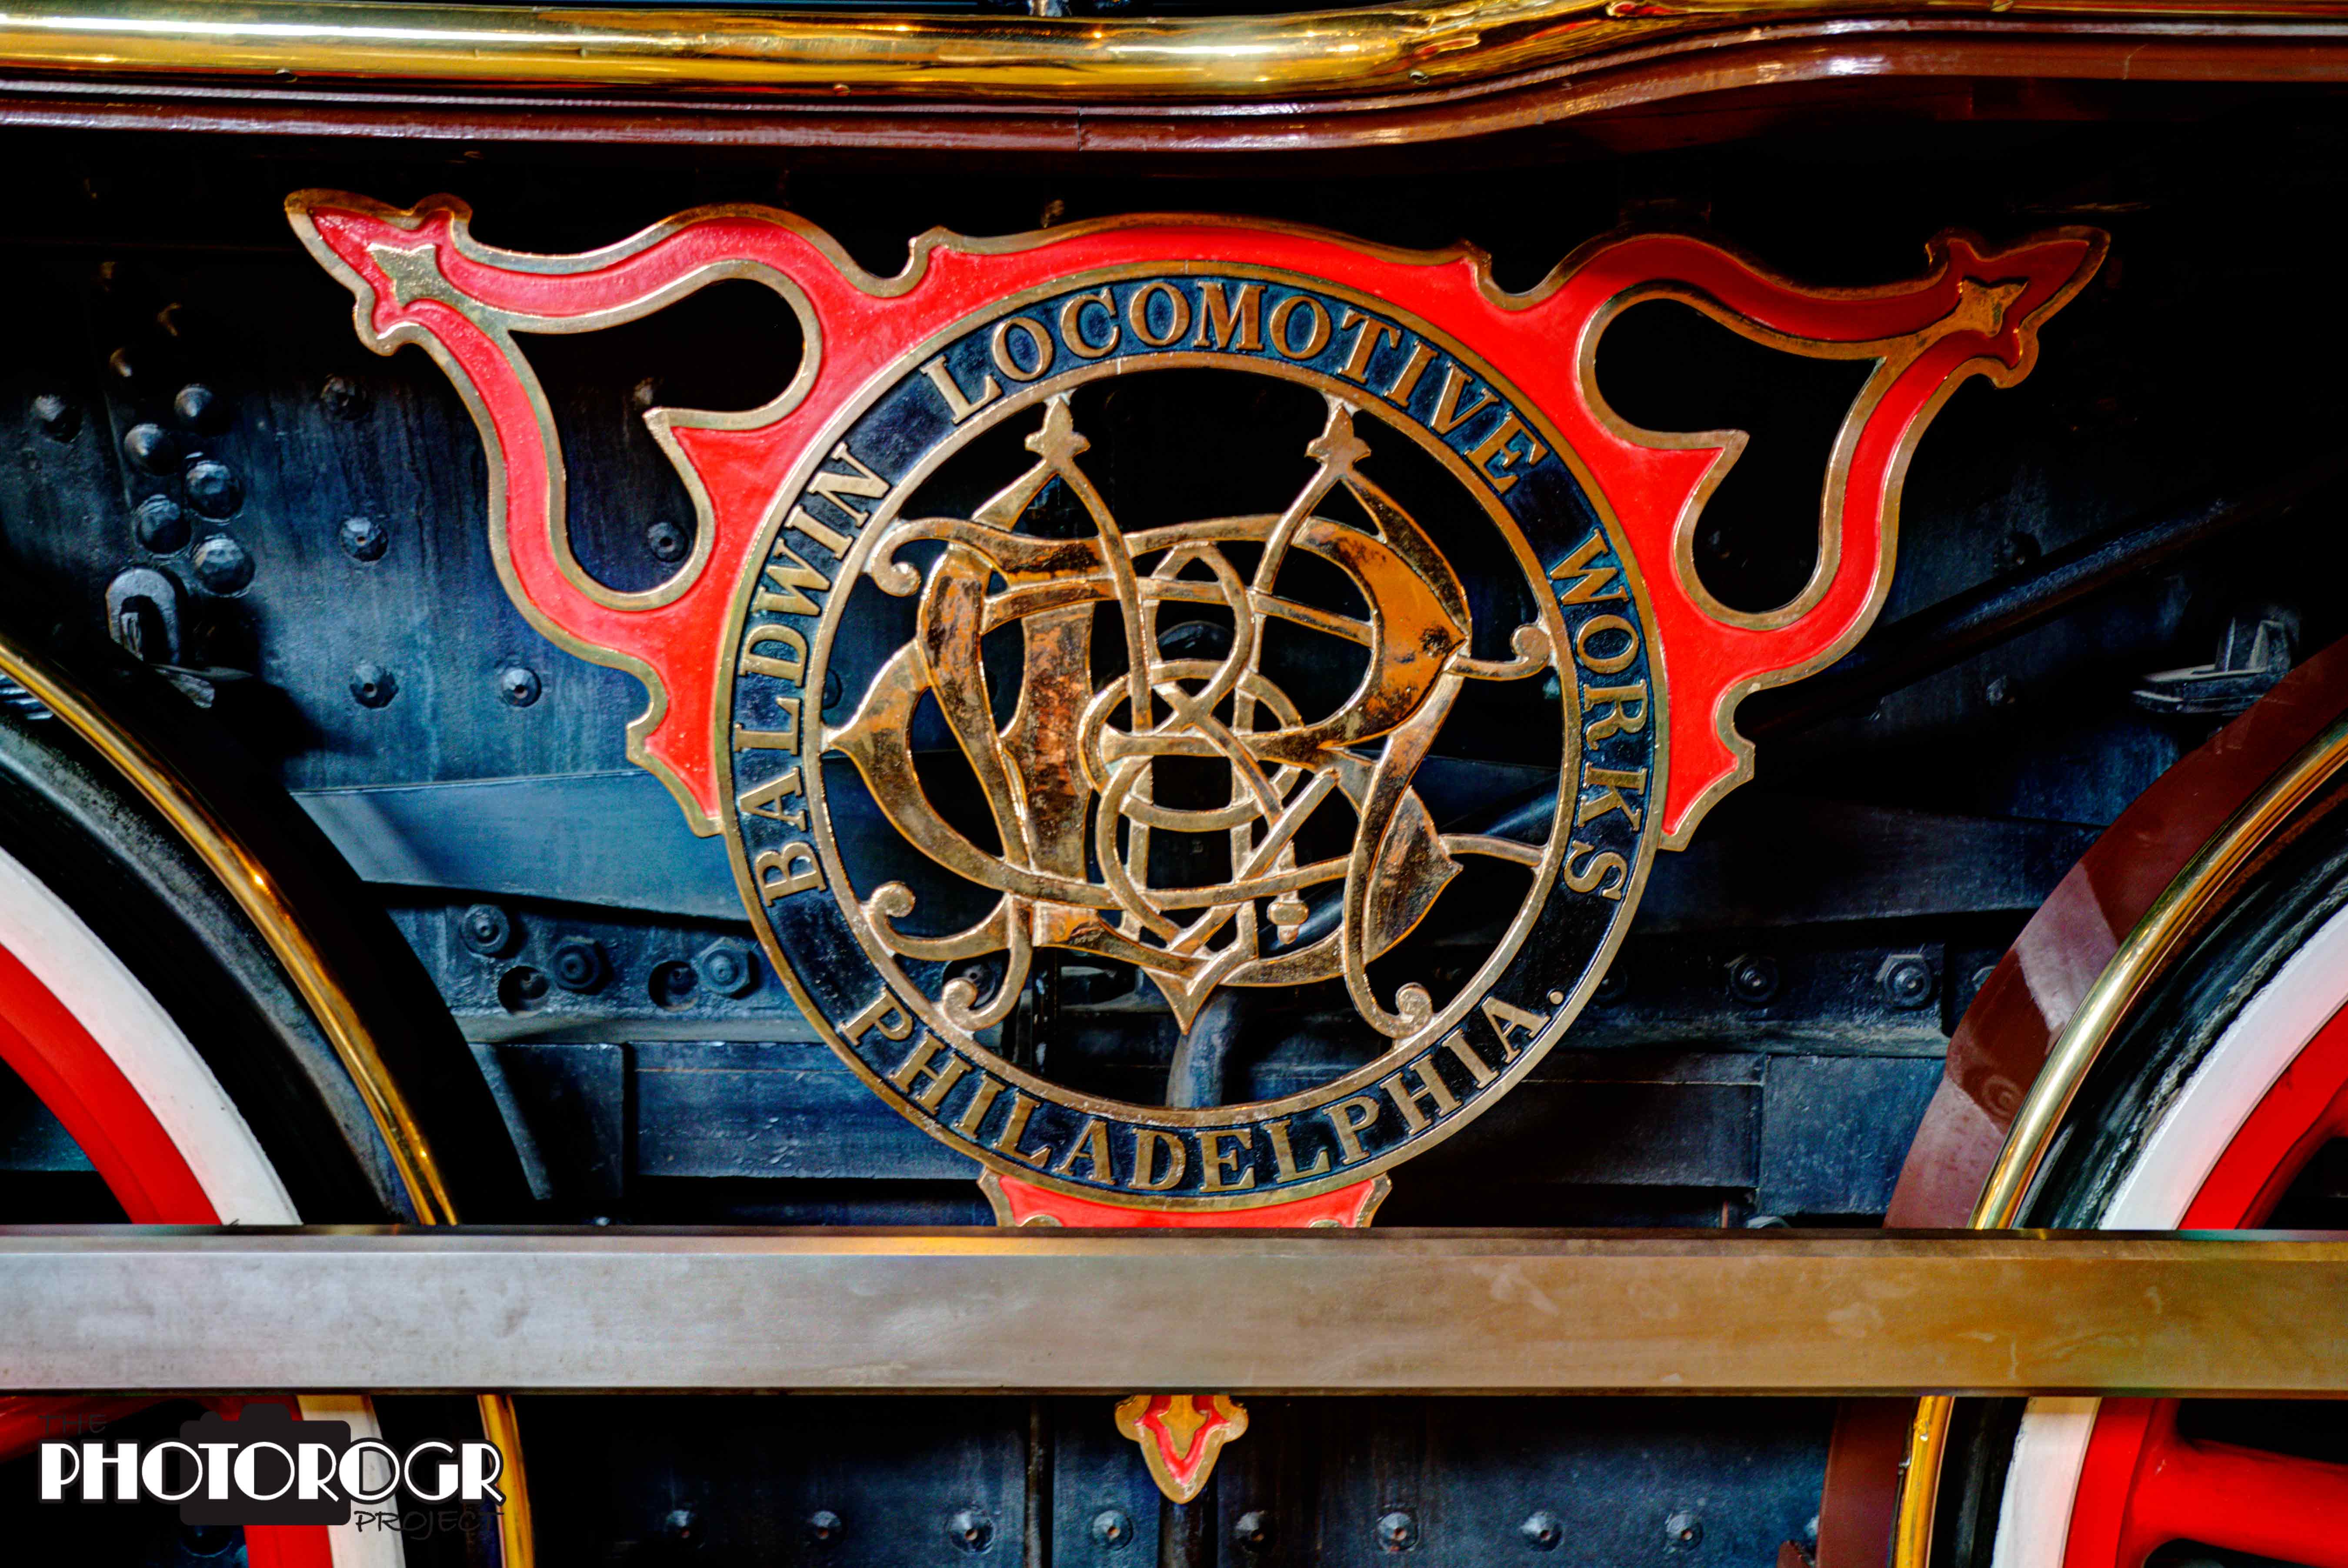
If you think the names on cars are obtrusive, take a look at this! We can clearly see that the Inyo was built by the Baldwin Locomotive Works in Philadelphia. This decoration/advertisement is displayed between the drive wheels and can be seen in the previous image.

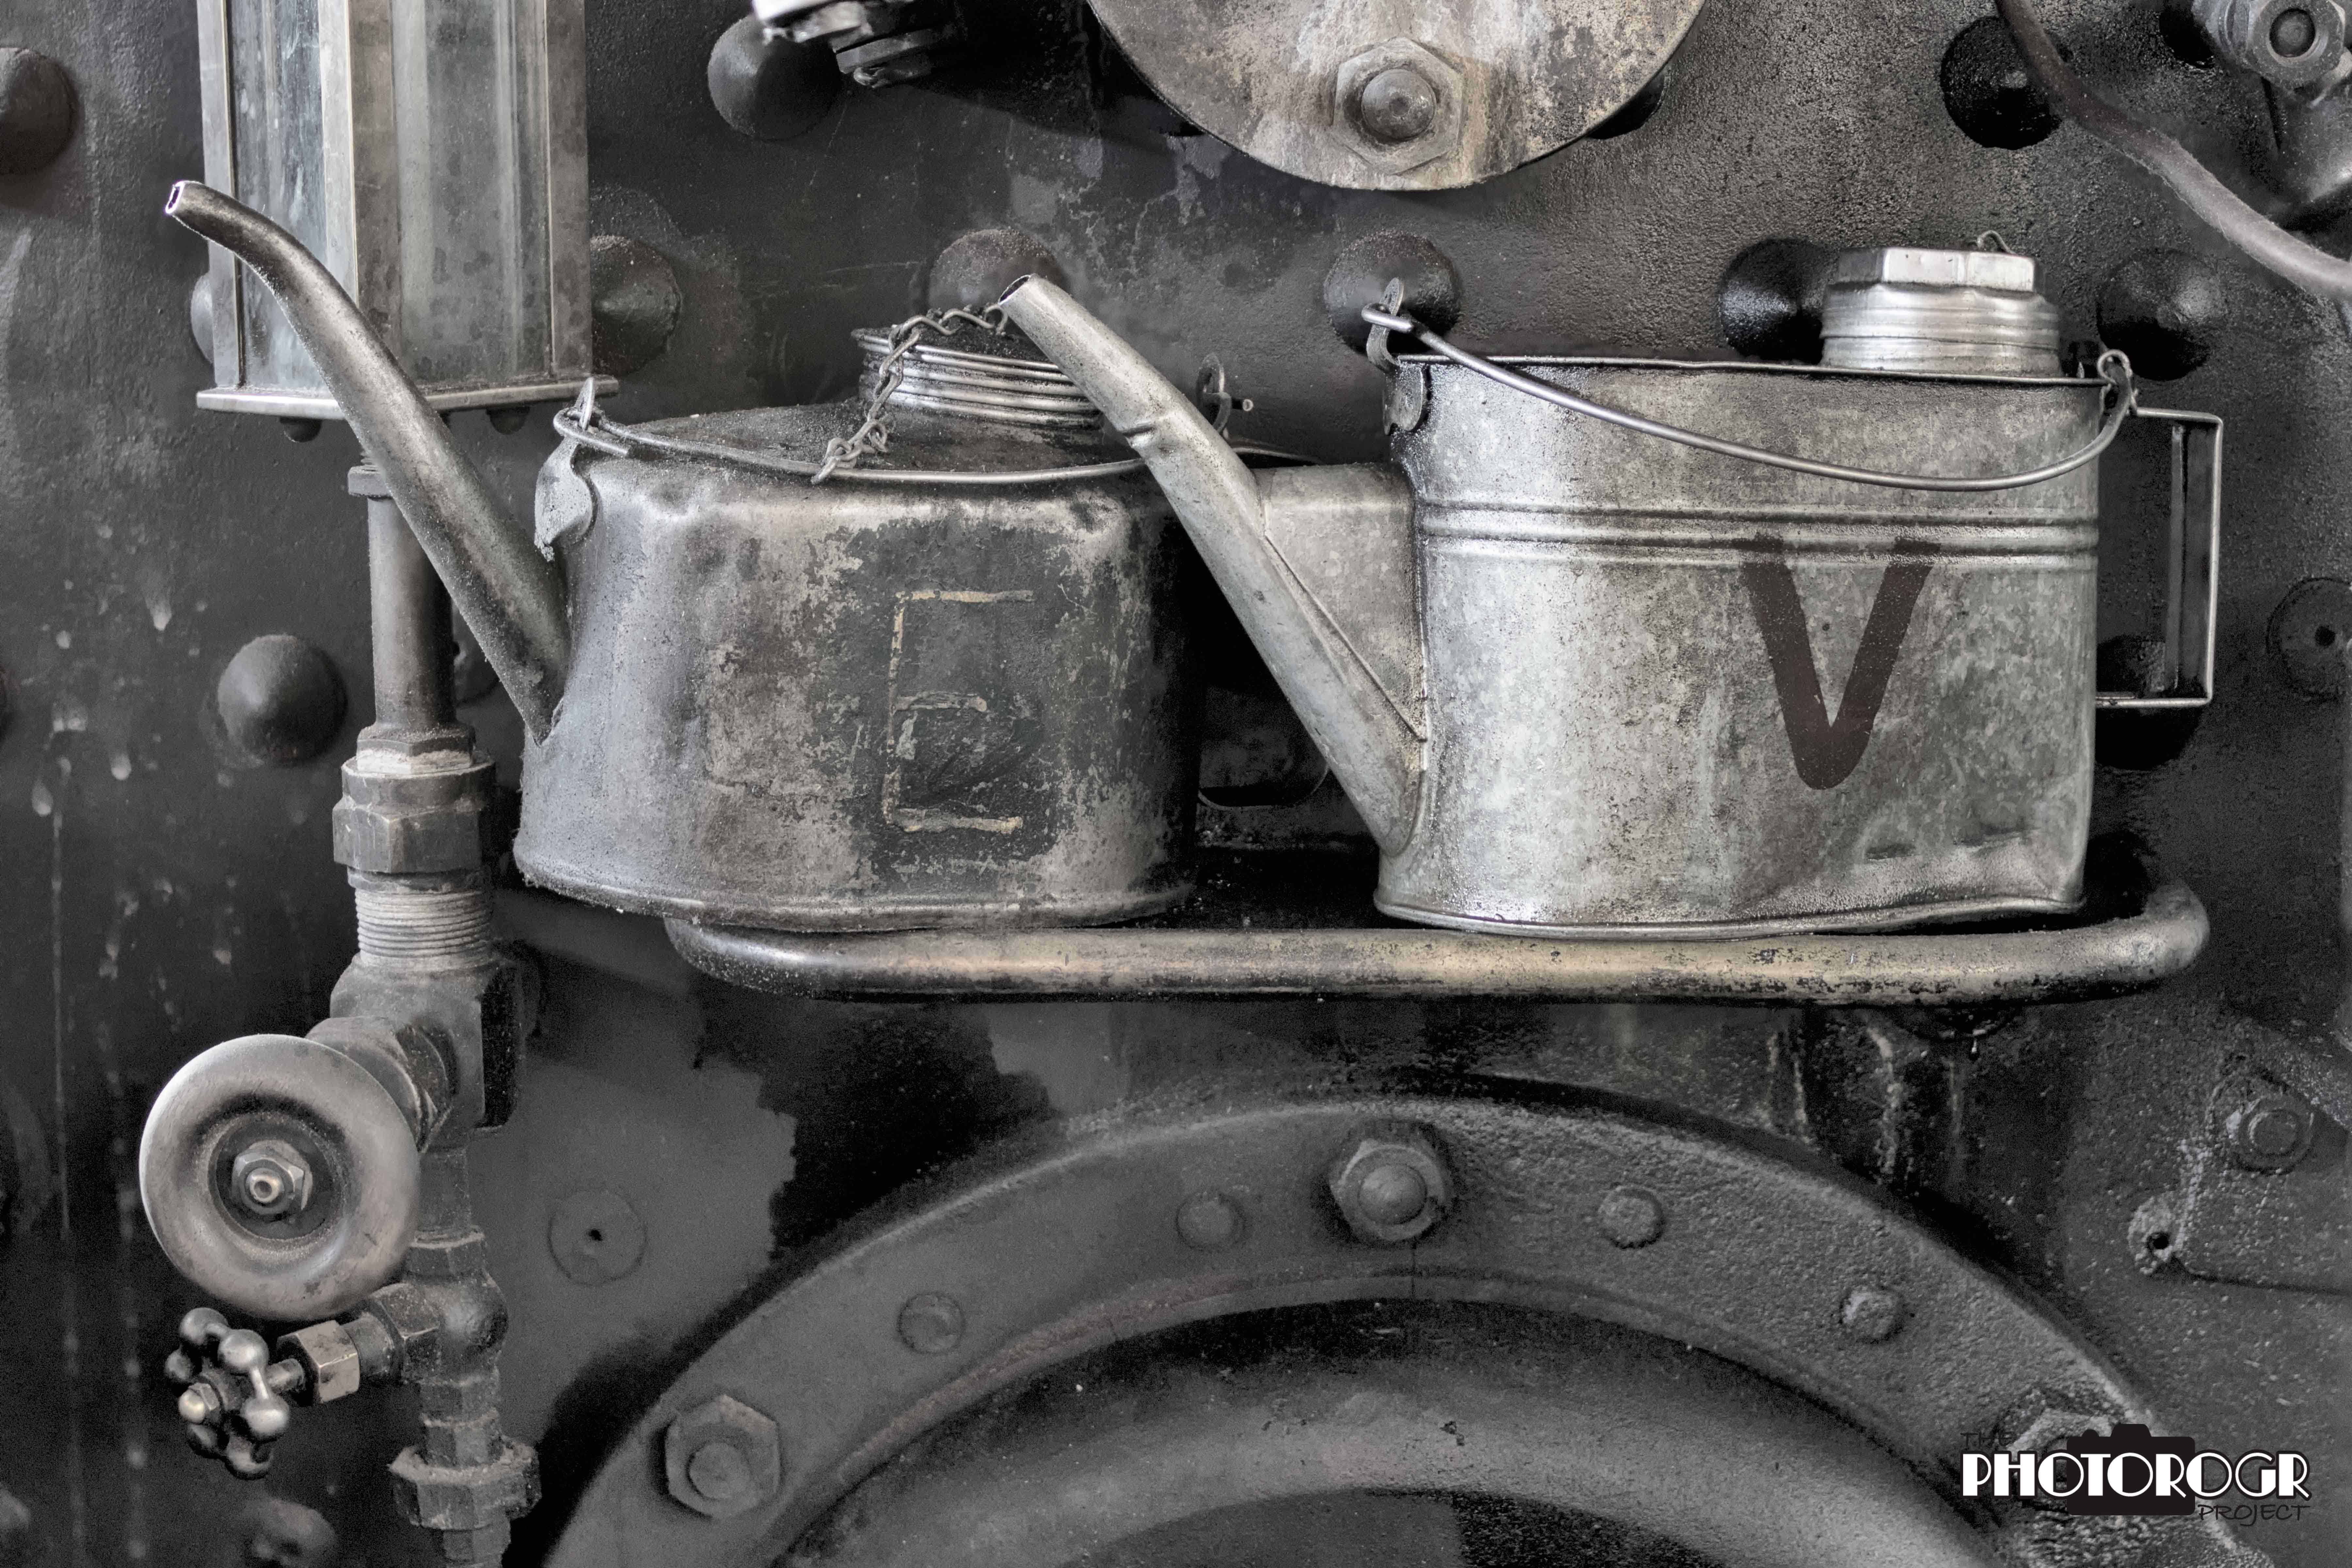
I’ve got to learn the names of the things that make these beautiful machines run. This is an HDR image.

The firebox and surrounding area of the Glenbrook, processed as an HDR image.
As you can see, I worked on my HDR skills. I also tried a new technique that I’ve been exploring – focus stacking. In focus stacking, images are made at different focal planes and then blended together to achieve deep focus in subjects. The Museum was probably not the best place to work this technique as many of the subjects have curved surfaces, making focus stacking a challenge. I did it, however, and learned lots about the technique and its challenges.

One of the drive wheels on an engine. I focused on the face of the bolt (at left center), the washer, the face of the drive shaft, the bolt heads on top of the drive shaft, the wheel spokes, and the machinery behind the wheel. The light was at the top of the drive shaft, so everything below was in shadow. I liked the composition.

Inside the cab of one of the engines, a focus stacked image (8 focal planes).
Same image as above, rendered in monochrome.
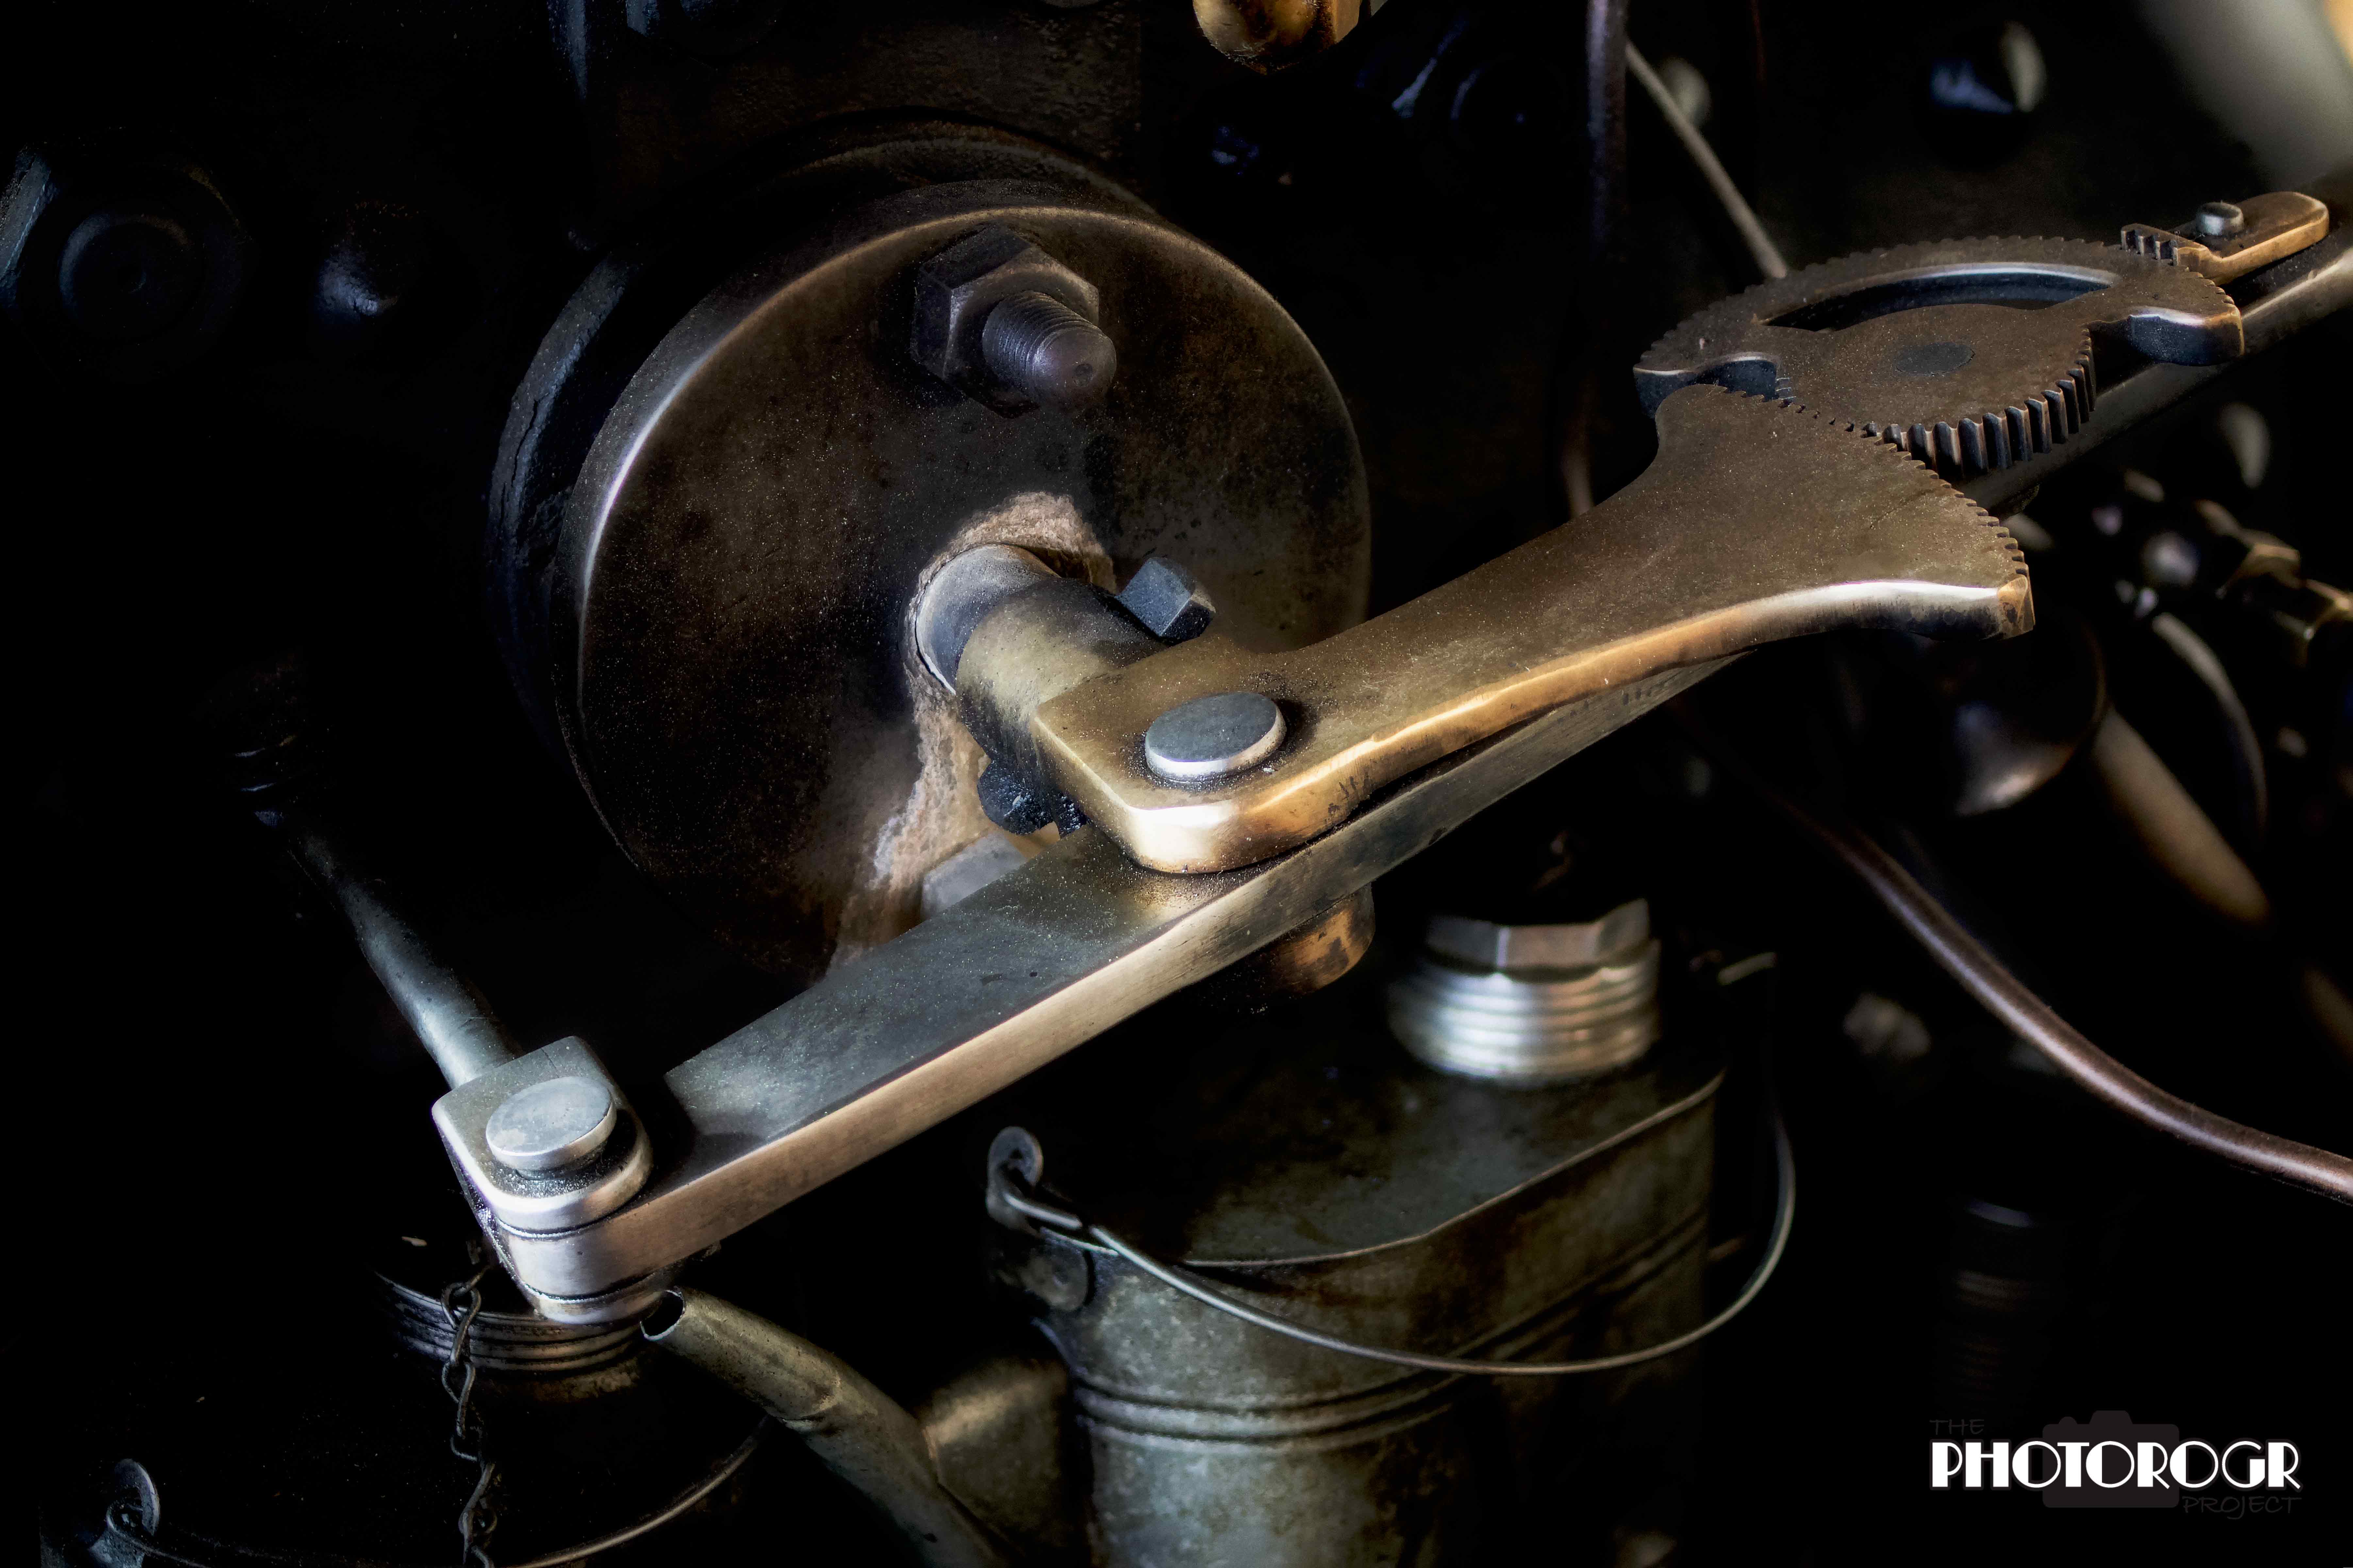
I was intrigued by this control lever, and made a focus stack using 8 focal planes along the length of the lever. This wouldn’t be possible in a single image, even at a small aperture maximizing depth of field.

The spherical object on the right presented the greatest focus stack challenge, as the gauges were all on the same focal plane.
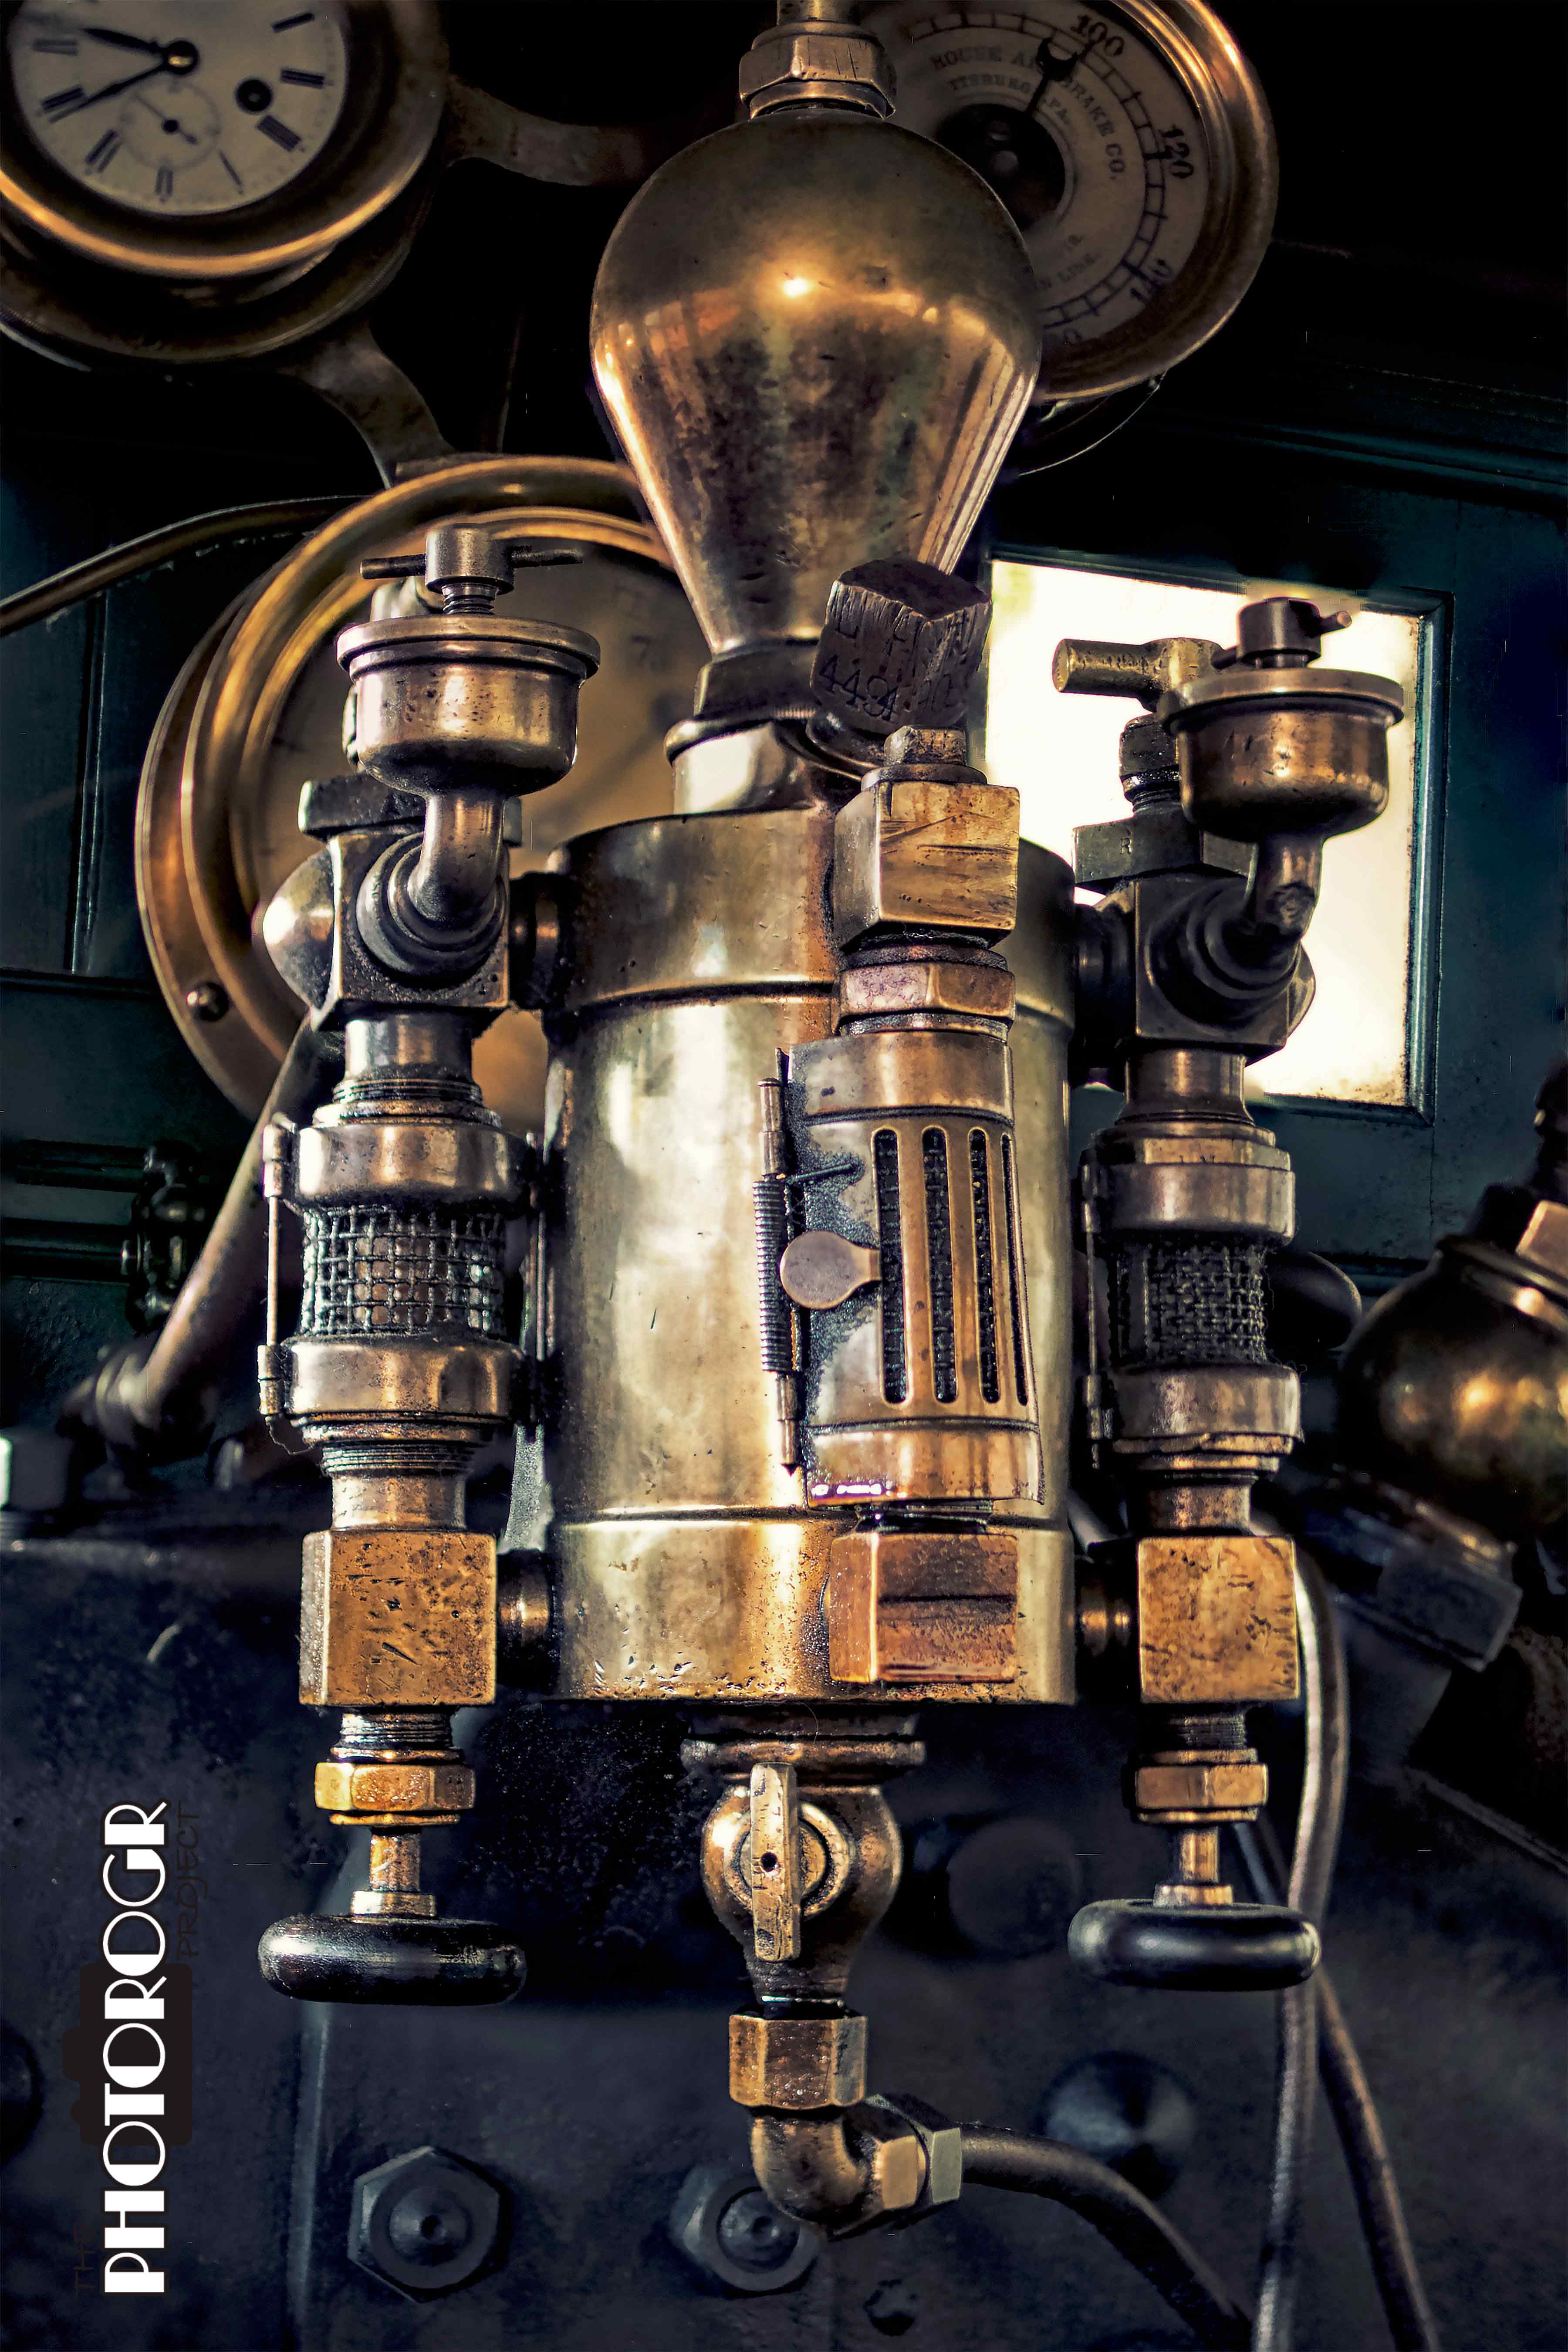
This is the entire apparatus, 7 focal planes. I worked the image to bring out the patina of the brass as well as the deep focus.

This is a shot from inside the passenger car. I loved how the old glass caused the somewhat rippled appearance of the Inyo cab, against the straight and in focus wood paneling. This was made from two exposures and focal planes, one for the interior and one for the Inyo.
This is the ceiling of the passenger car. The artwork is amazing and the lamps are just gorgeous. I used 8 focal planes to make the image in focus from the front lamp to the wooden header behind the far lamp. As I refine my focus stacking technique, I will use more focal planes for better quality images.
I love focus stacking, and am happy to add it to my photography toolbox. Just like everything else in my toolbox, its best use is a work in progress. I hope you enjoyed my revelation and my trip to the Railroad Museum. A big thanks to the staff for allowing me to visit.
Enjoy – PHOTOROGR
In my last post, I introduced the sharpening process and described my first footsteps into its intricacies (yes, I had to look this one up to make sure). The study is going well, but there’s an amazing amount of information to digest. I am surprised by the number of tools available. Unsharp Mask, for example, has its roots in film photography, where wet-darkroom magicians would use a duplicate negative to create a mask to increase the apparent sharpness of a photographic print by increasing contrast along edges. From the descriptions I read, it was quite a process. Other digital sharpening tools in Photoshop include Smart Sharpen and Shake Reduction. Of course, the flip side of digital sharpening is the introduction of digital noise. (Noise is the grainy appearance of a photograph, and is beyond the scope of this blog, so we’ll save it for another day.) Lightroom and Camera Raw’s sharpening and noise reduction tools work the same way – very easy to use, and the Nik filters have Define (for noise reduction) and Sharpener (for sharpening). My head is swimming.
In a feeble attempt to keep myself somewhat sane (those who know me will attest that it’s as good as we can expect) while I’m learning sharpening, I’m still out there looking for great subjects and trying new techniques. Here’s a few pictures from the last couple weeks.
Okay, this isn’t really a new technique for me, but it’s fun and worthy of continued exploration. For this image, I overlaid a picture of the Ward Charcoal Ovens onto a picture of a wood floor (beautiful texture). I’m looking for a little constructive critique (CC), please!

This is a Merlin, and it’s the latest capture in my quest for new raptor species. (Recall that I also got a Northern Harrier and a Rough Legged Hawk this year.) Merlins are in the Falcon family, and only get to about 12″ tall with a 25″ wingspan – just a little bigger than a Kestrel. This little one was in a tree in my neighbor’s yard and, uncharacteristically, sat for me for several minutes.

My lovely bride was with me the other day and she is an excellent spotter. She saw this Great Horned Owl in a tree as we drove by. Some of my friends thought it was a Long Eared Owl, but my resident expert on bird identification confirmed Great Horned (thanks Larry!).
Because I like to explore with different filters during processing, I used a vintage colors filter in Nik Silver Efex for this interpretation. This filter is one of my favorites
Okay, this is a new technique called focus stacking. I mounted the camera on a tripod and locked it down. I took 5 images of these crabapples on a tree in our backyard, each image using a different focal plane (focusing at different levels) and blended them in Photoshop to create this image with all the crabapples in focus. I’ll refine my focus stacking workflow and use it on flowers this summer!

While I was making images for focus stacking, I made this image of an ‘about to drip’ from another crabapple tree in the backyard. When I downloaded these images to the computer, I noticed the inverted tree in pretty good focus. I tried to get closer, but I would have bumped the tree and dislodged the drip. I’ll take it for now, but will look for other drips to shoot. Aren’t optics fun?
Well, that’s it for this blog. Stay tuned for more info on sharpening, focus stacking, and macro. Until next time – enjoy!
PHOTOROGR
I can hardly believe that it’s already the first day in February! Tomorrow, the Groundhog comes out and we’ll see just how much longer we’re going to have winter – at least according to folklore. I’m betting we’re going to have more winter, partially because a big storm is coming into the Carson Valley tonight! Speaking of folklore, many of you have spent the last month trying to sustain the new year’s resolutions you made. I didn’t make any, nor did I set any specific goals for my photography. As I’ve continued my photographic journey, I’ve found that my best goal is to look for and be ready to pursue knowledge as I find new things.
In my last post, I announced that I was taking a winter photography course. The snow was deep and our outdoor shooting time was shorter than expected. The instructor was excellent – we shifted the program indoors to study light and shadow and photo processing techniques, which brings me to the ‘new kind of whet stone.’ Us old Boy Scouts remember that a whet stone is used to sharpen knives and axes. In the digital photography world, we use software as a ‘whet stone’ to sharpen our images. During the workshop, we spent quite a bit of time on sharpening. The most important thing I learned was that I’ve been doing it all wrong, and badly to boot. I now have a specific goal – become proficient in using software to sharpen my images!
In the book Real World Image Sharpening with Adobe Photoshop, Camera Raw, and Lightroom, authors Bruce Fraser and Jeff Schewe begin the discussion on sharpening with, “…one of the ways our brains try to make sense of the world as seen through our eyes is by breaking down the scene into edges (objects) and non-edges (surfaces). If the edges in an image appear too sharp or not sharp enough, our brains tell us that there’s something wrong, and in the case of a photograph, the image appears unconvincing.” Bruce and Jeff tell us that, “Sharpening works by increasing the contrast around edges.” (Contrast is the difference between light and dark tonal values.) And so begins my journey into the wide world of sharpening! Since I’m just beginning my venture into sharpening, I don’t have anything to show you. I will soon – I promise.
What have I been doing besides reading about sharpening? Let’s look at some pictures!

From the winter photography workshop – this is the view across the road from Sorensen’s Resort in Hope Valley CA. As I said, the snow was deep. Sorensen’s got a foot of new snow the night before the workshop and several inches while we were there. They were expecting another three feet that night!
Same picture, just a little bit different editing technique. Could be a nice Christmas card!

I ventured into Diamond Valley looking for Eagles and found this tree covered in Pogonip (heavy frost). I made this image before the frost melted away.

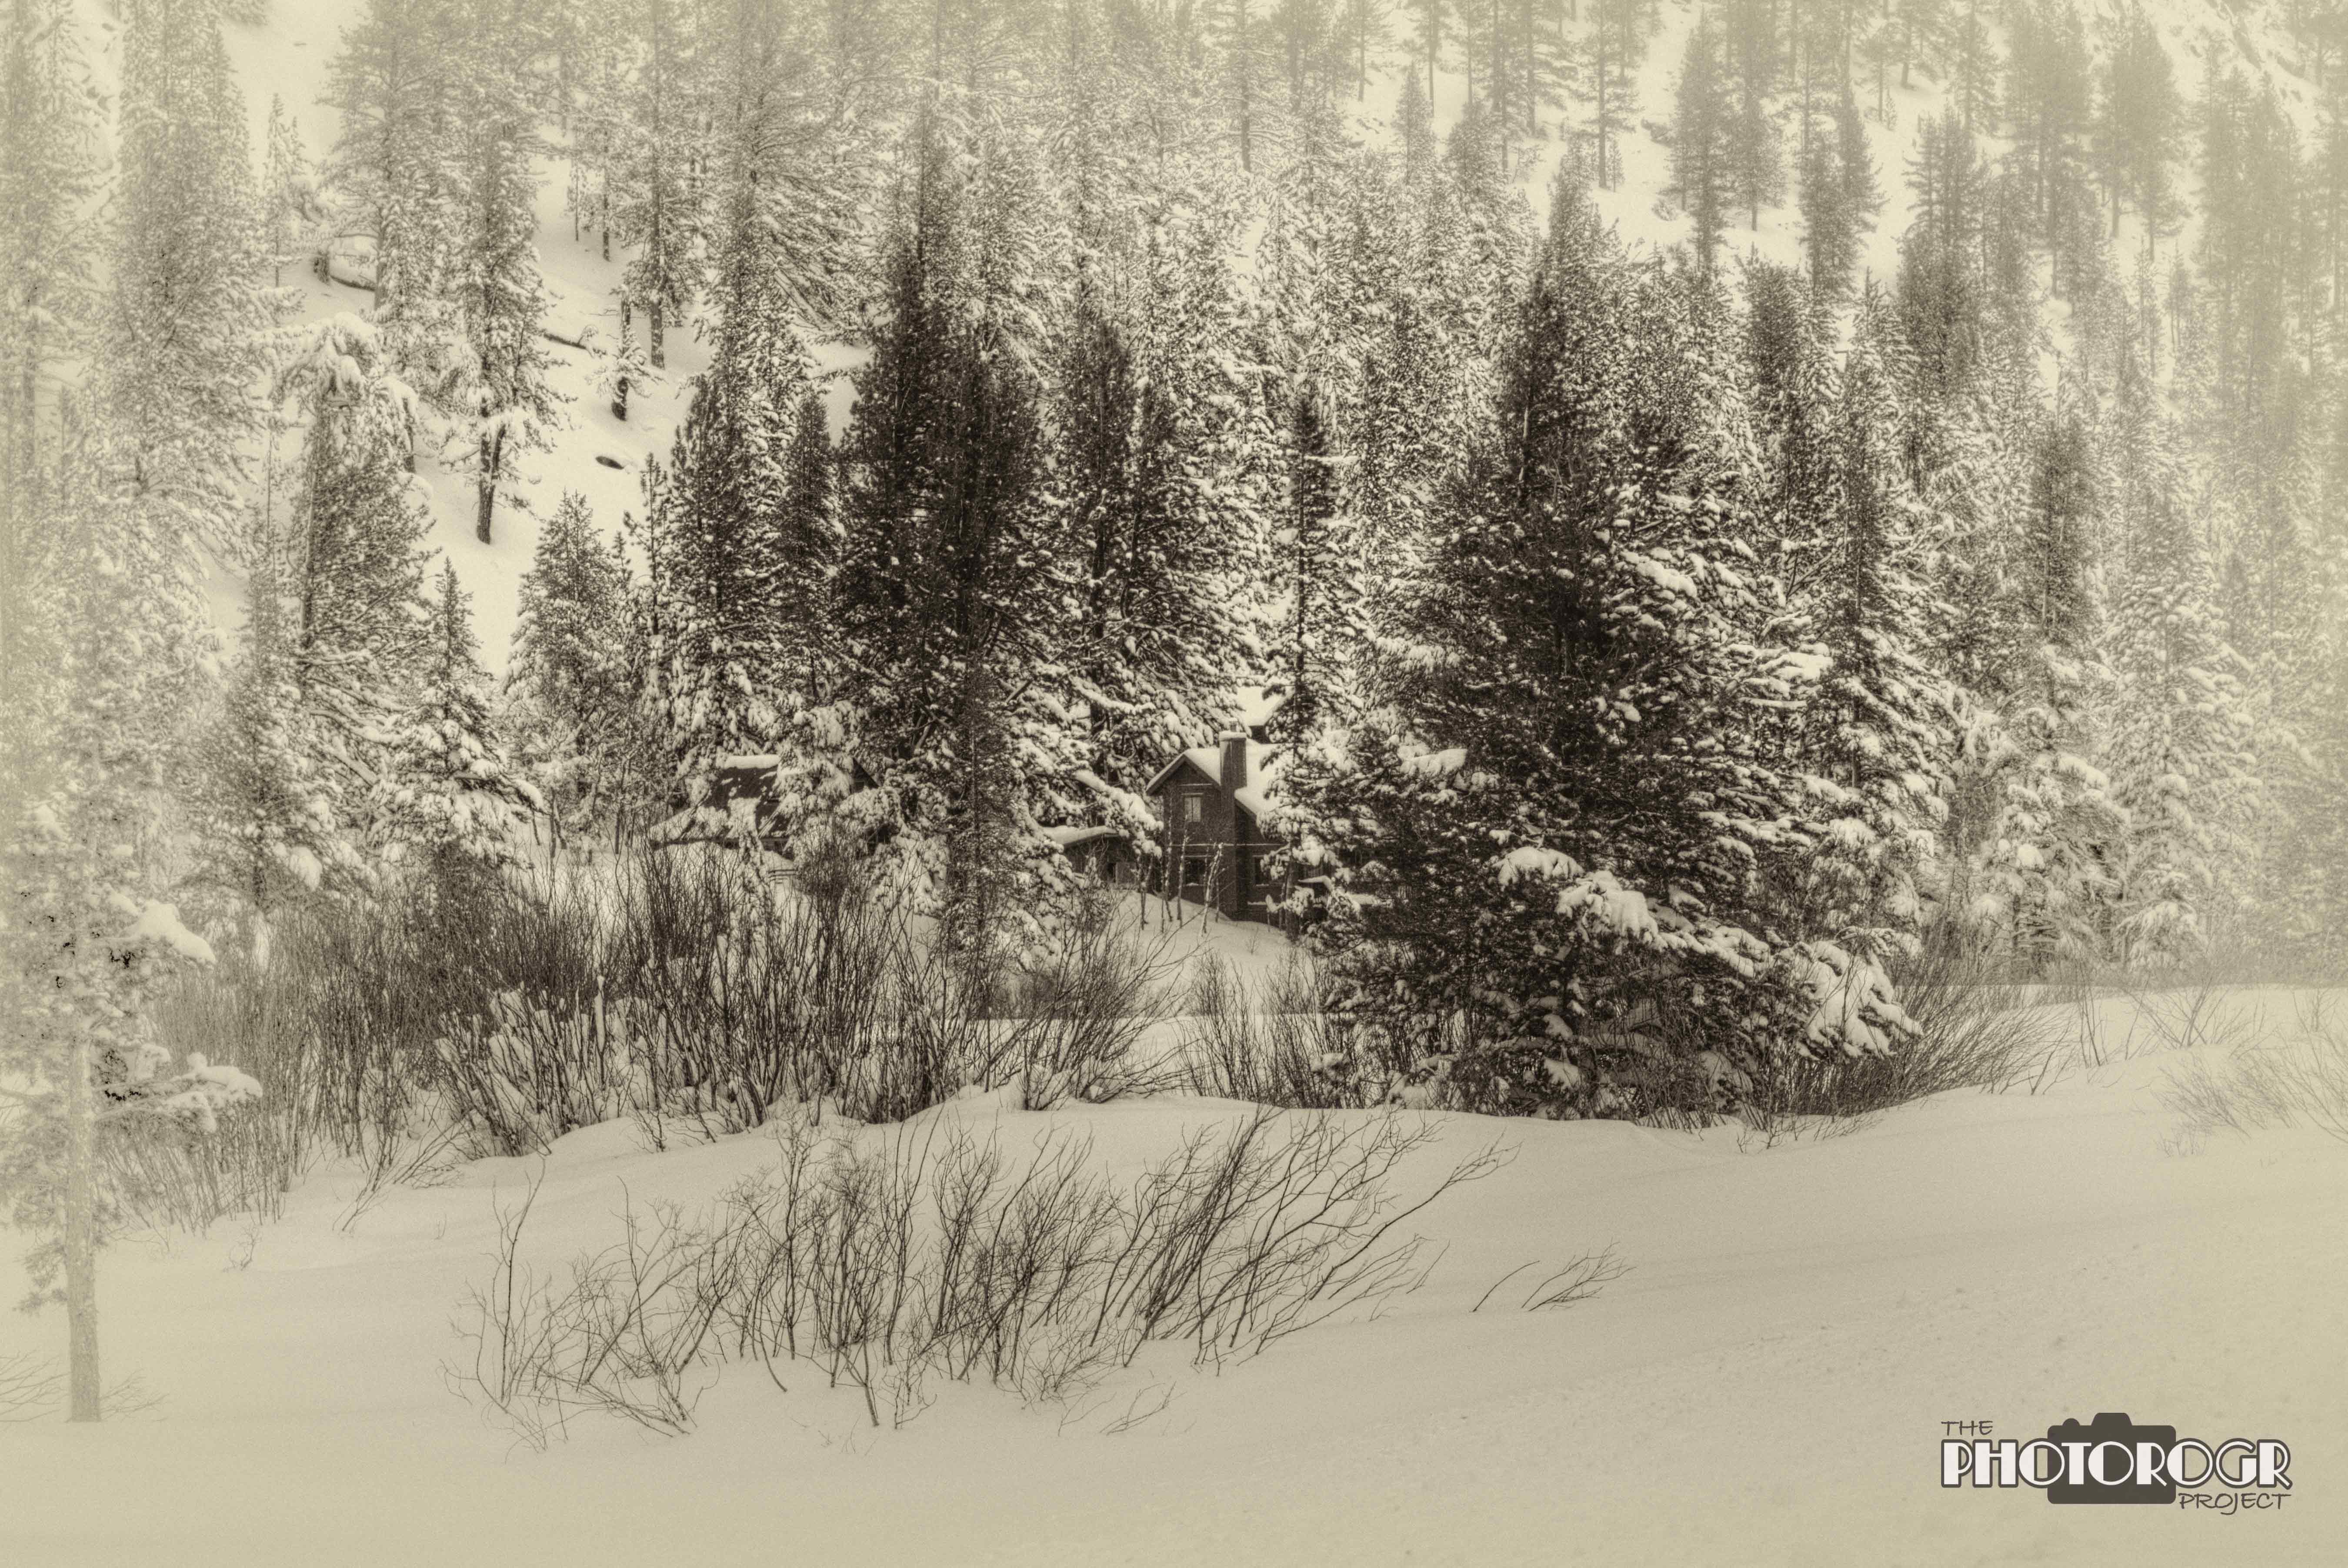
A recent storm dropped several inches of snow at my house. This is a Spruce tree in my backyard…
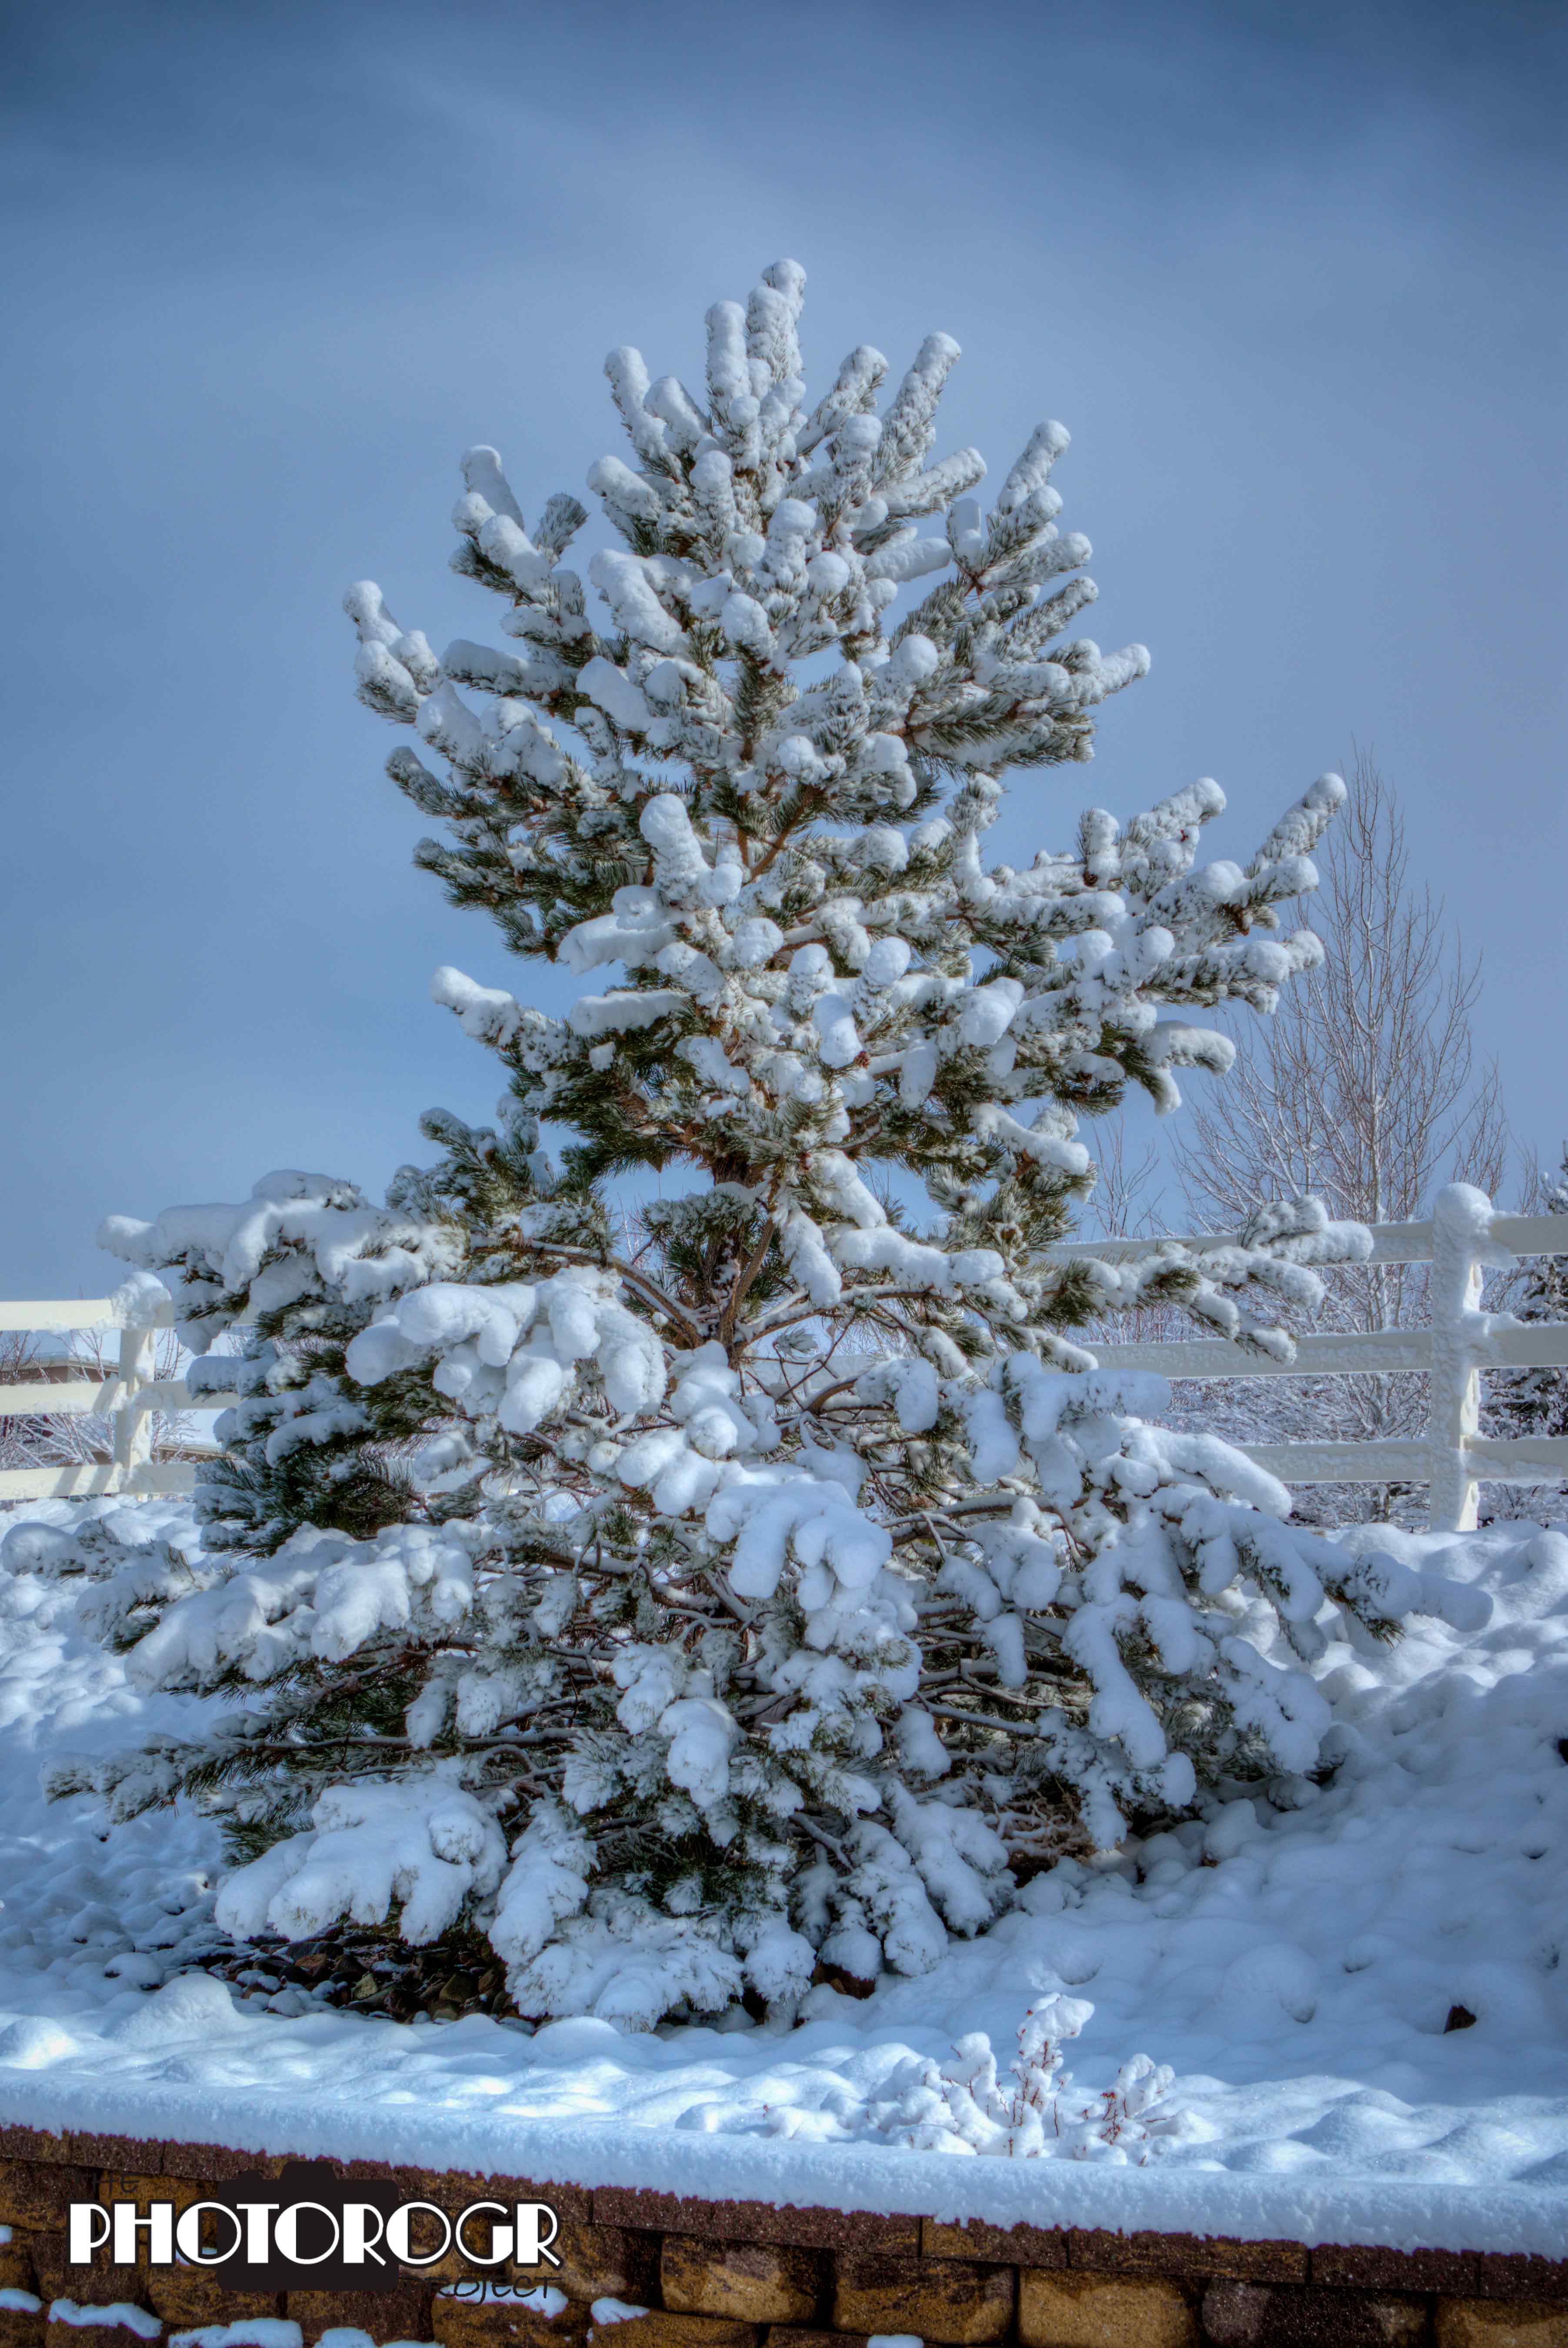
…one of the Austrian Pines…

…and one of the clumped Crab Apple trees in my backyard. The apples help feed the little birds all winter long.
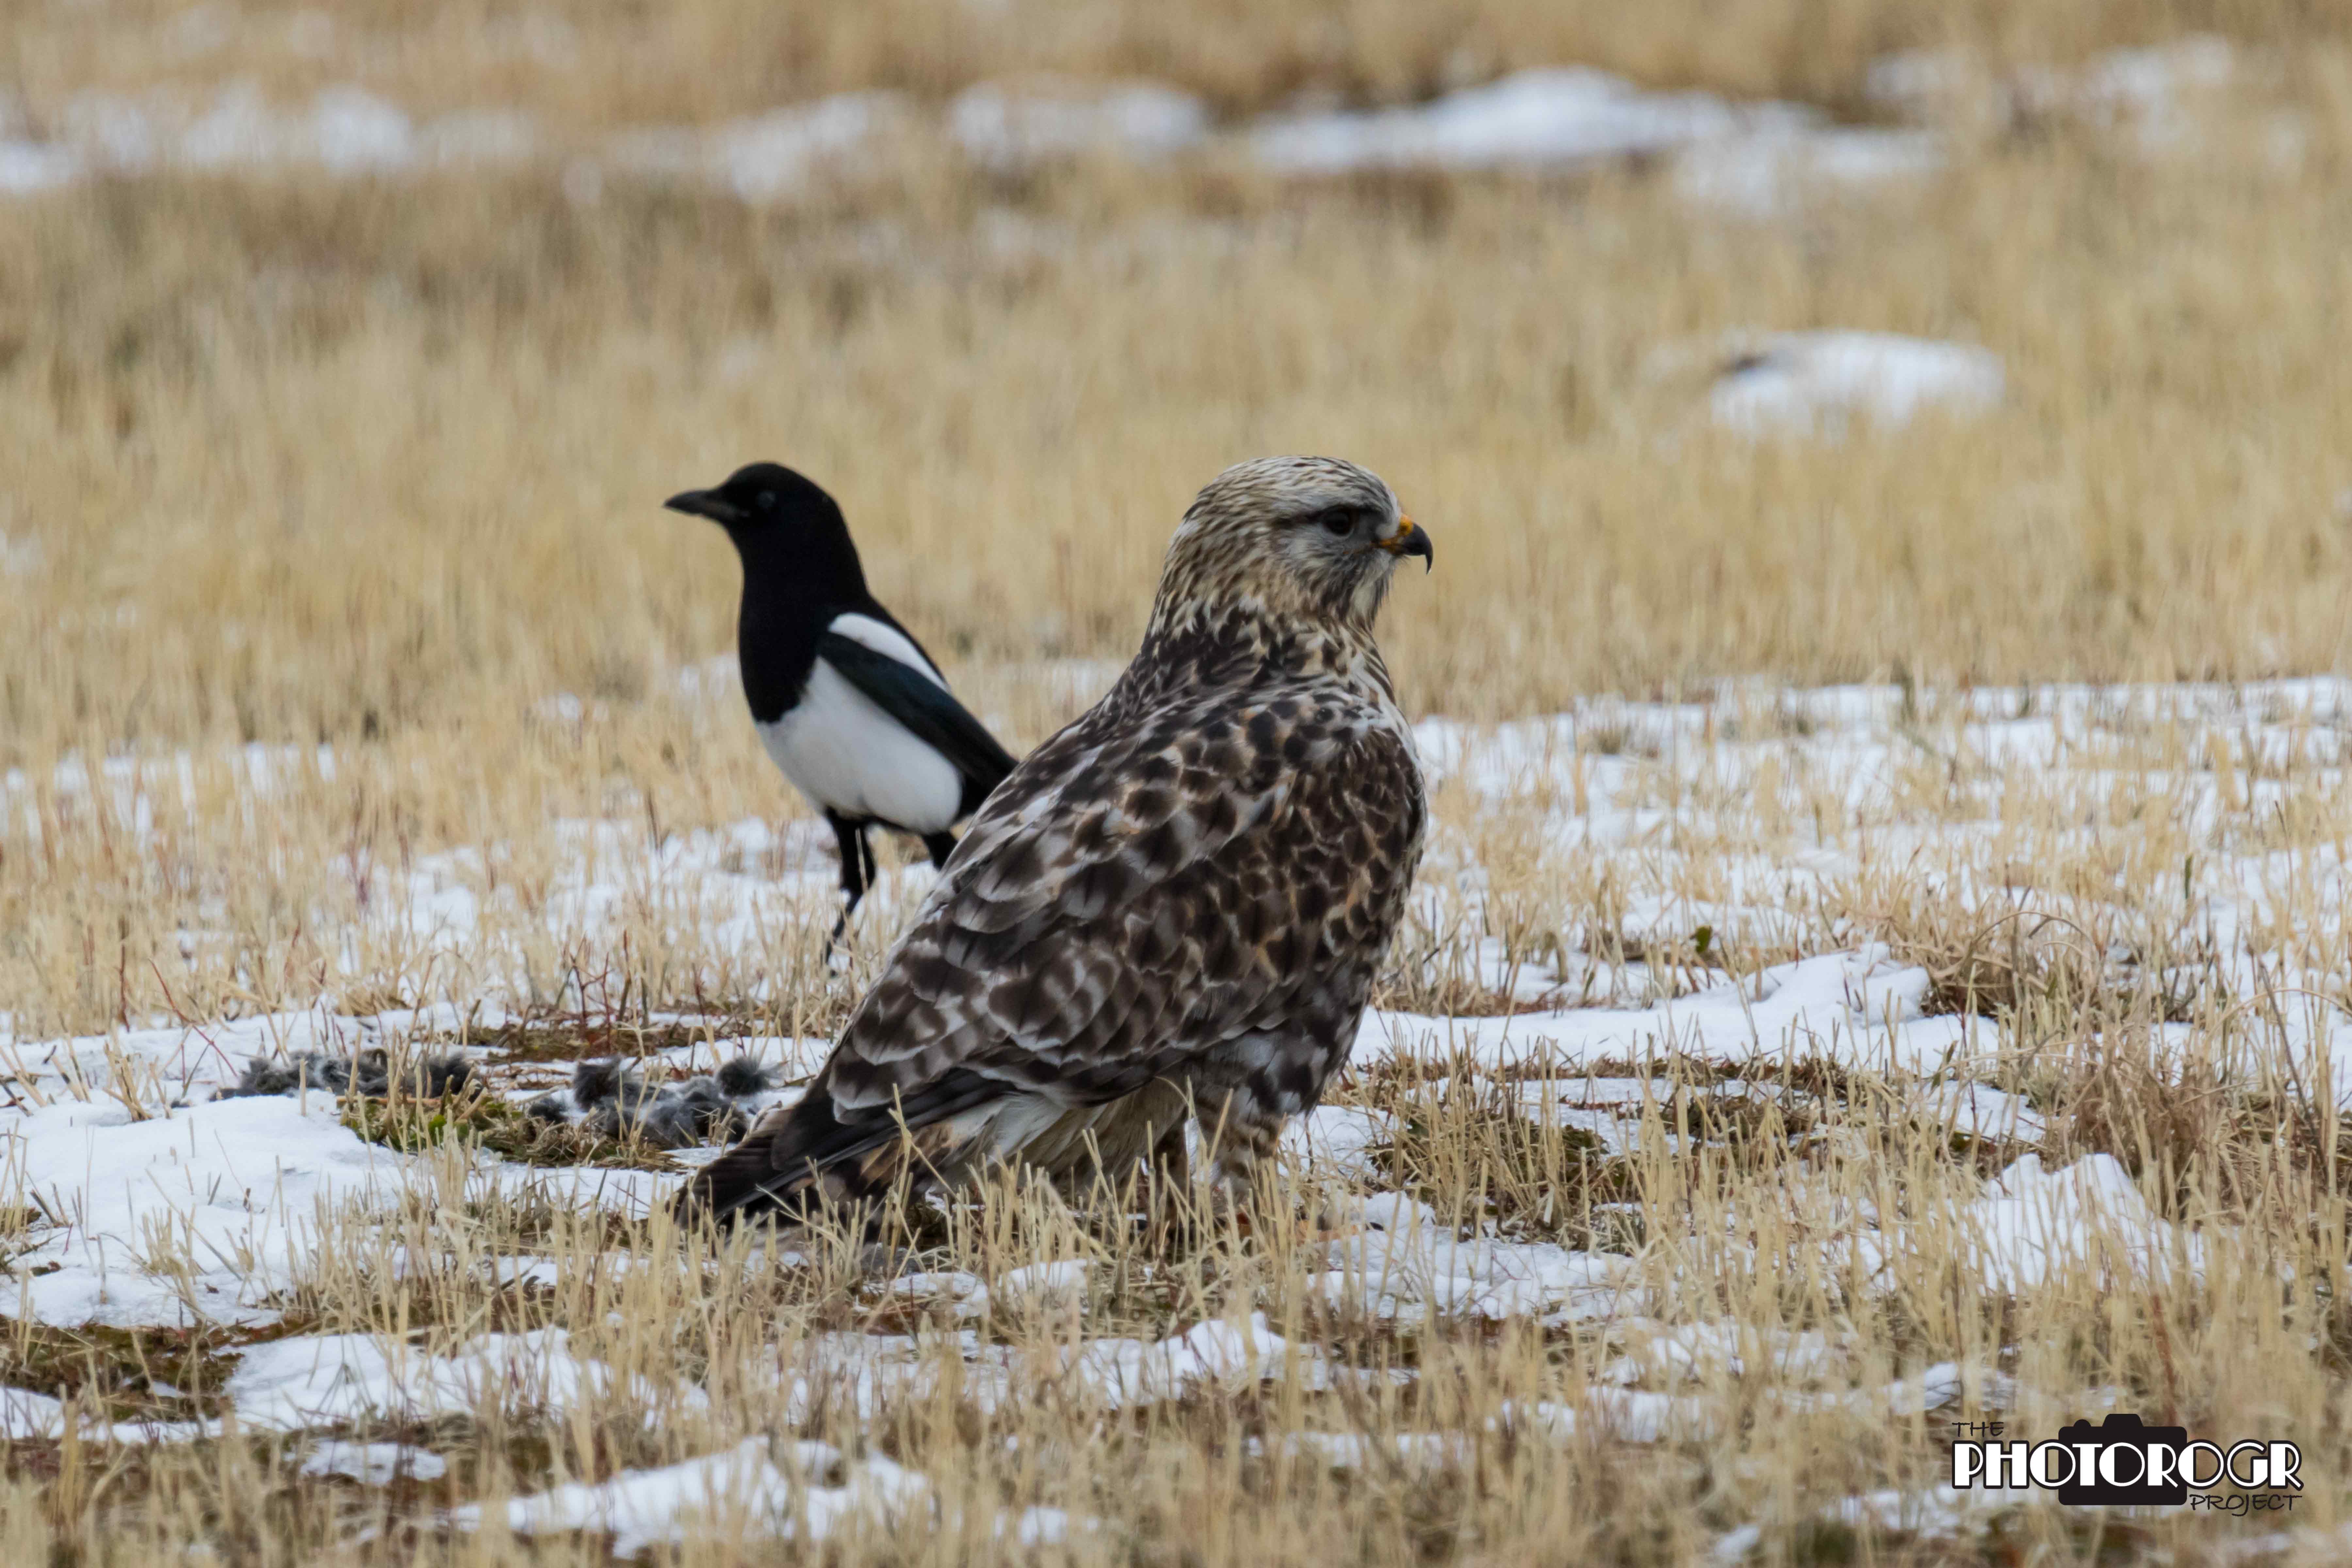
I found this Rough Legged Hawk near Genoa last week. As I was shooting, the Magpie flew into the shot. How lucky for me!

A couple days later, I found the Rough Legged Hawk again – this time on a fence post. He launched…
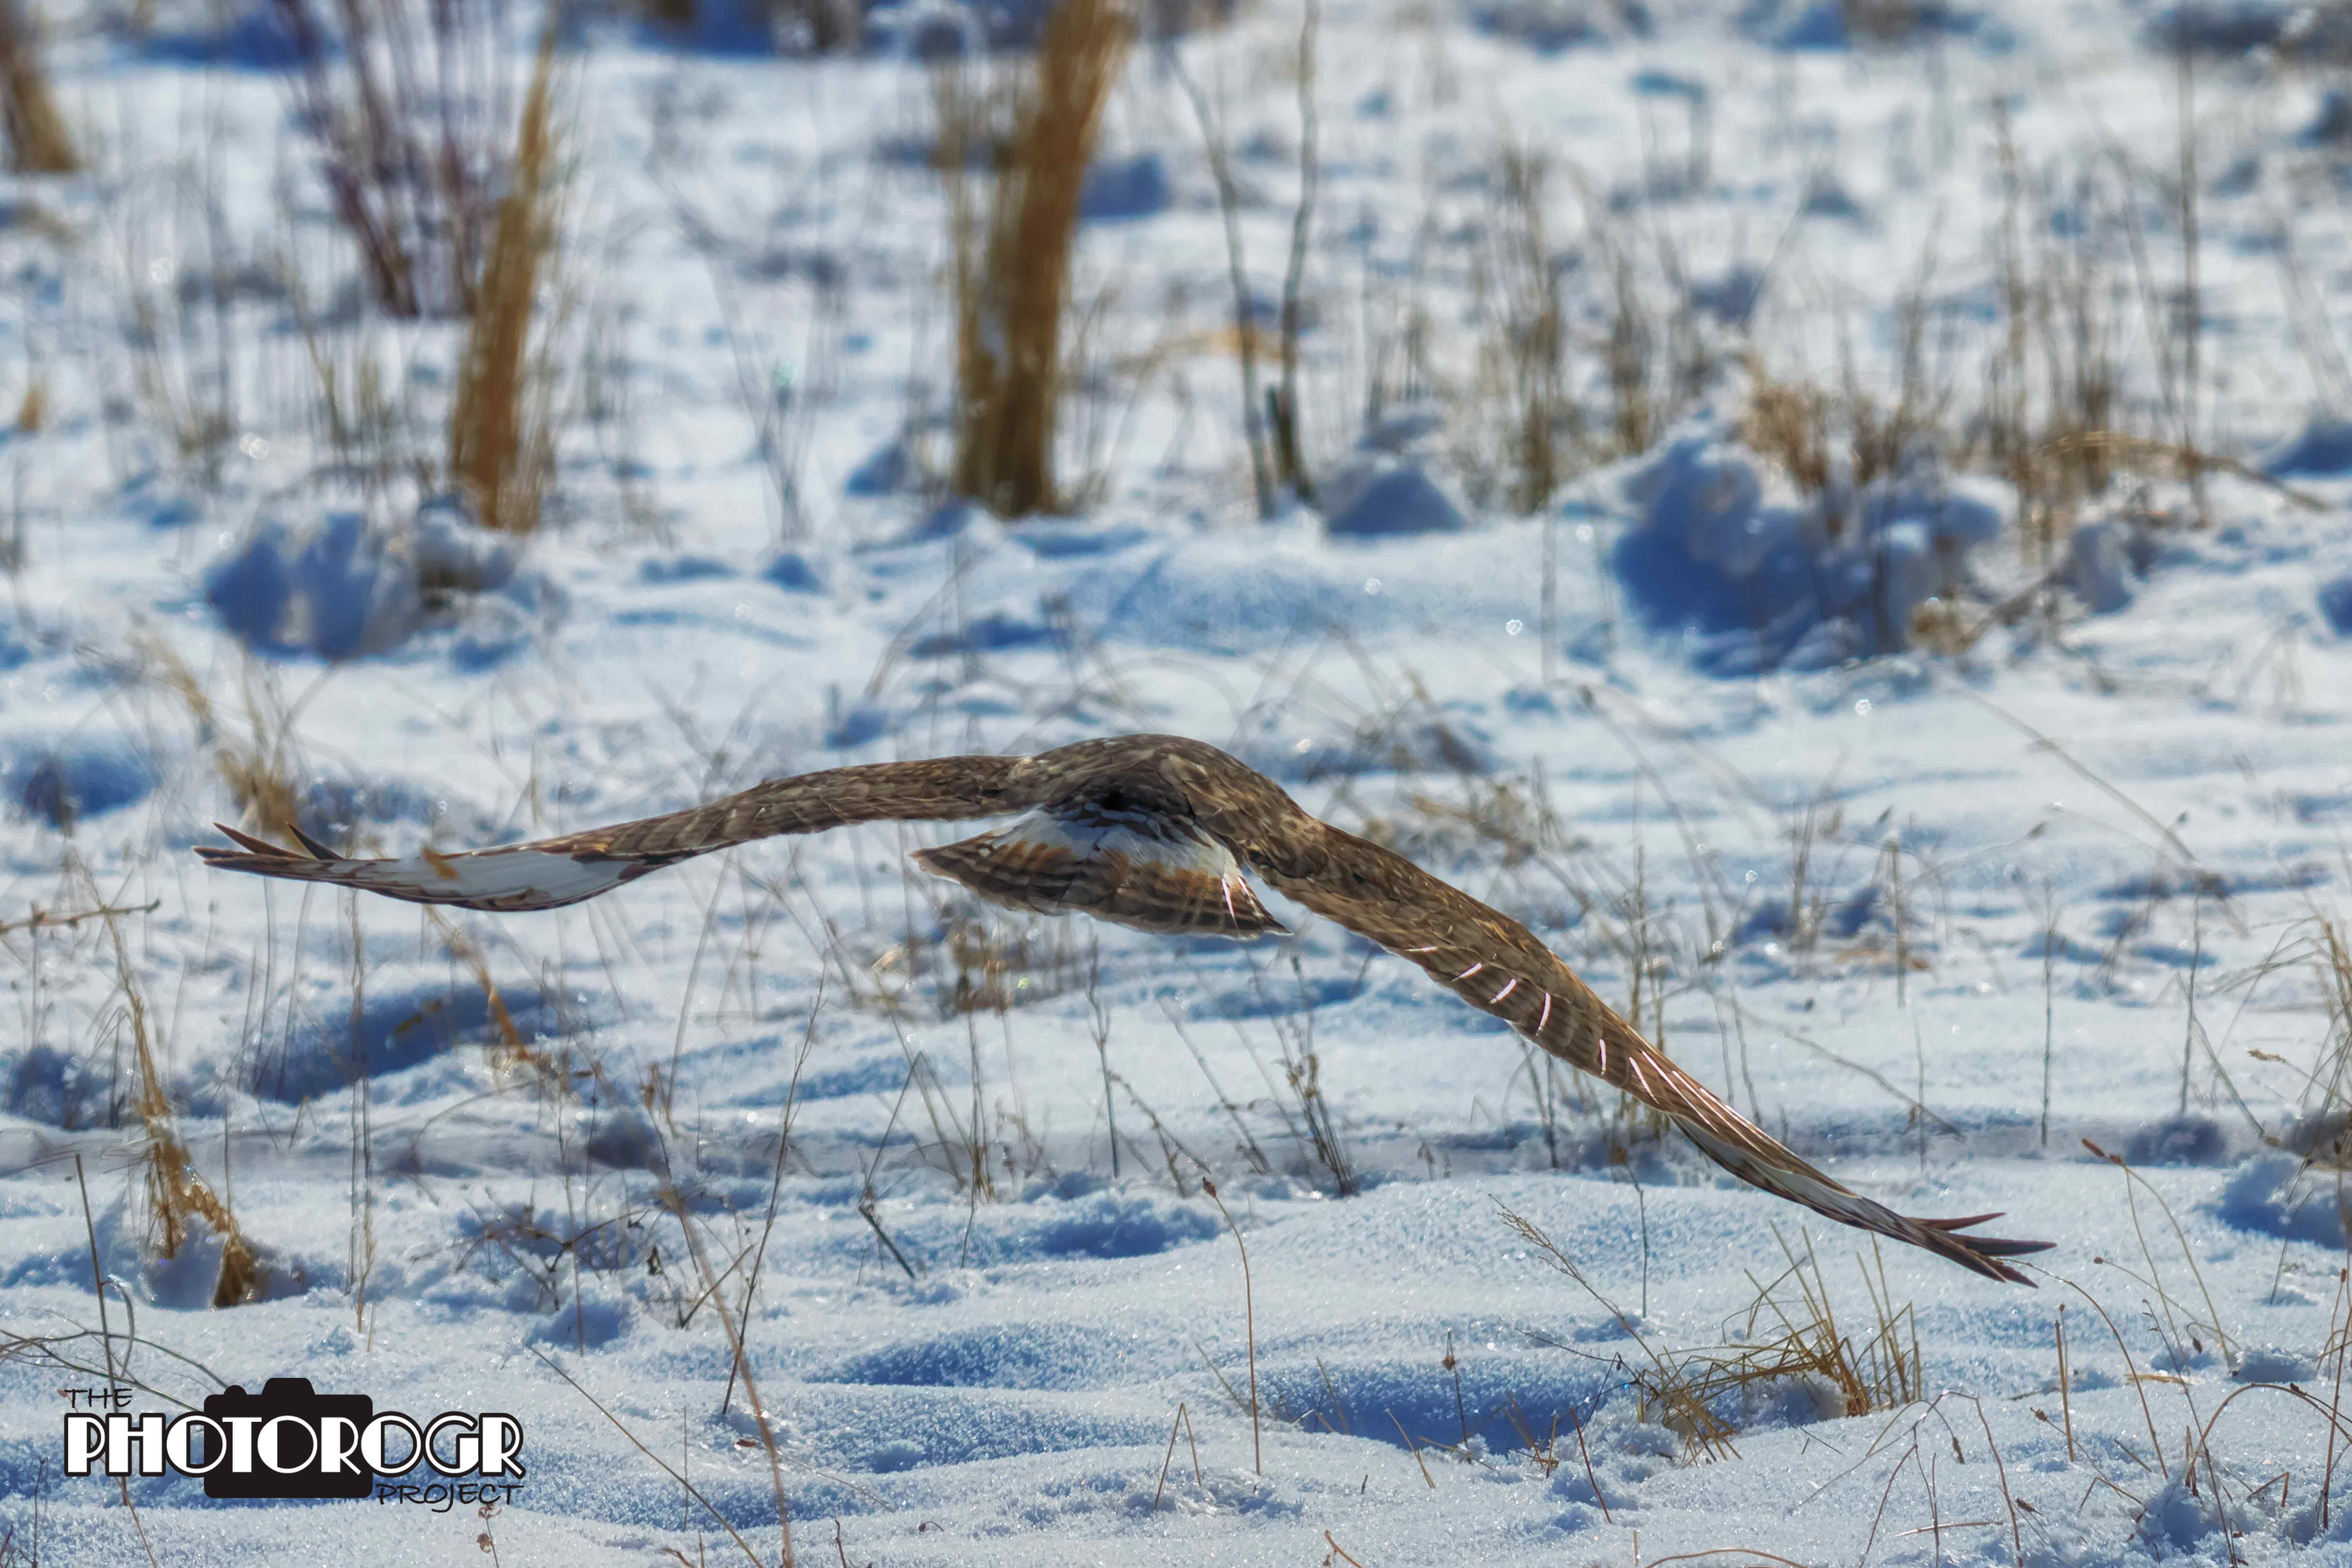
…soared gracefully, close to the snow-covered ground…
…and pounced on his noon meal!
The Kestrels have been out in force. I came on this little fella’ just south of David Walley’s Hot Springs on Foothill Road…

…and his friend north of Genoa. They always give me a good look before they take off!

This Cooper’s Hawk was sitting on the snow pile when I first saw him. He launched as I was taking pictures.

I added a new tool to my toolbox – a 2X teleconverter! My big lens now has a maximum focal length of 1200 mm! While this is wonderful, the longer focal length comes with a new set of challenges. Using a tripod is a must. Autofocus only works in Live View (not a bad thing on tripod anyway). The longer focal length exacerbates any movement or imperfections in focusing, and depth of field is very shallow at any aperture setting. It’s a tool, however, and only a matter of learning how to use it! This is the first image at 1200 mm. Not bad!
This is my second attempt with the teleconverter. This Eagle was 173 yards away (I bought a rangefinder) and the background looks like heat waves, although it was near freezing when I made the image. A little soft, but he looks good nonetheless.

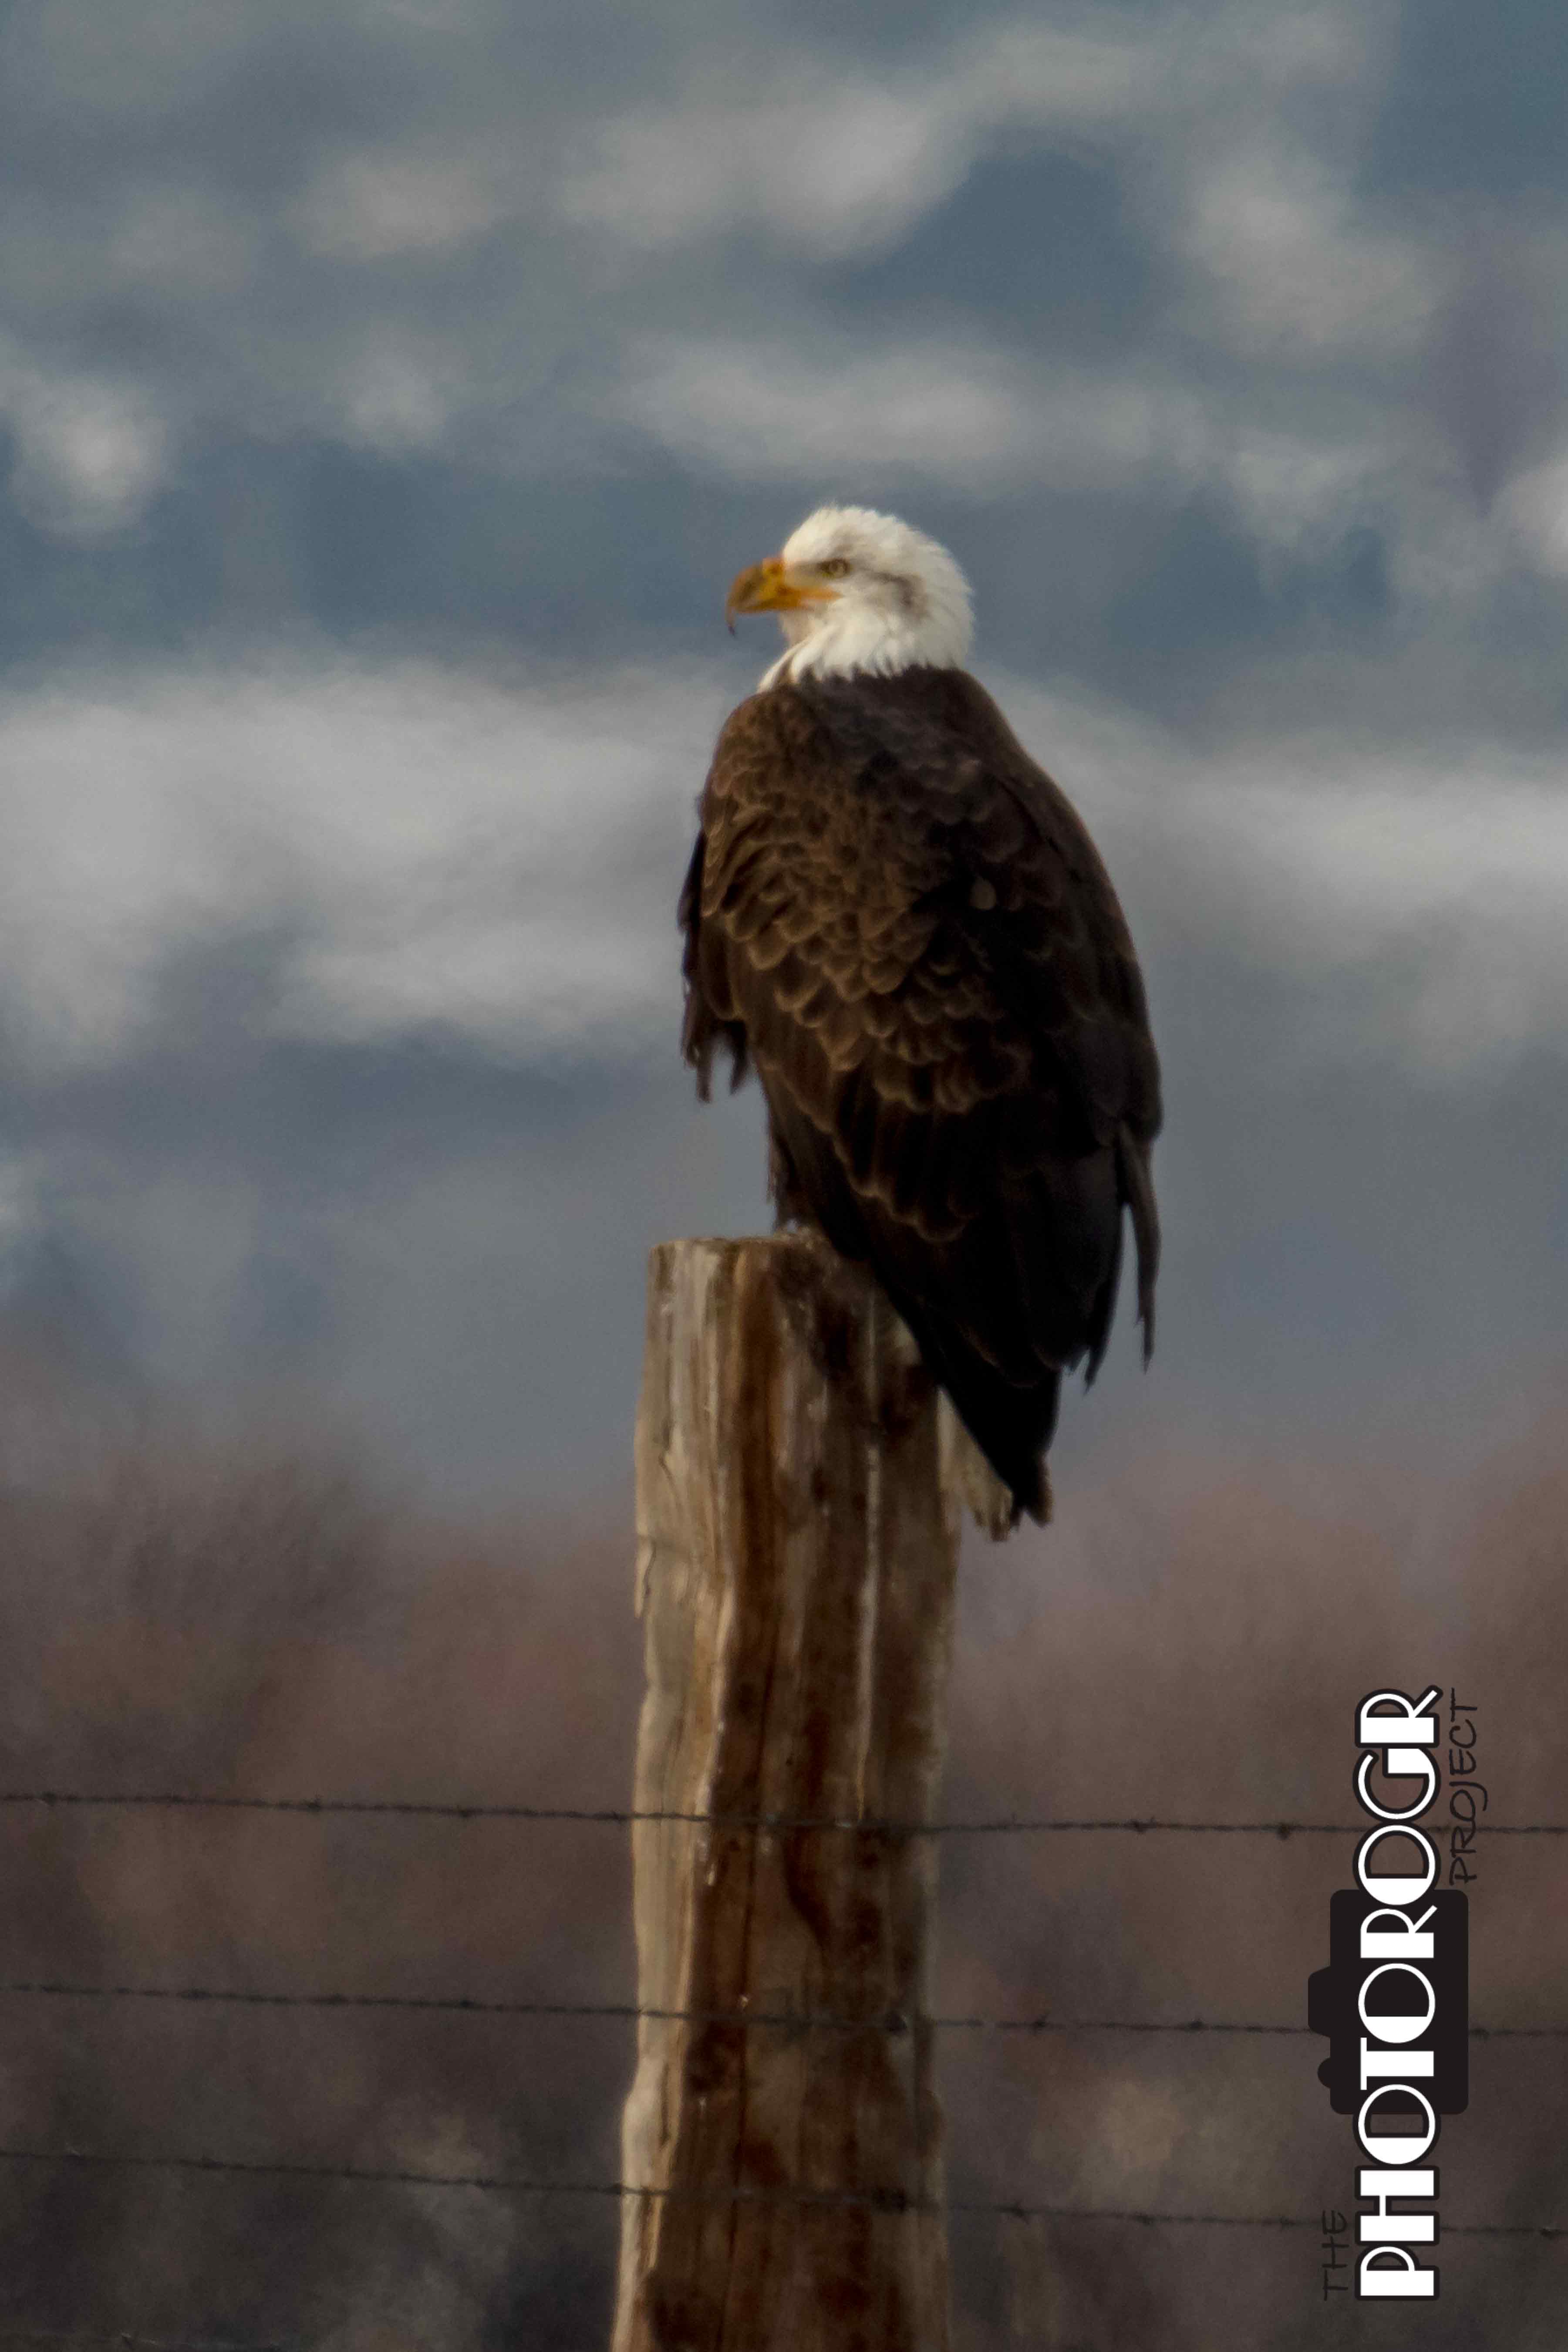
The Eagles have been in town. I seemed to find this one hanging out at the Dangberg Home Ranch Historic Park rather frequently.

I think he’s in his final year of being a juvenile, based on the coloring in his head feathers.

His ‘pensive’ pose…
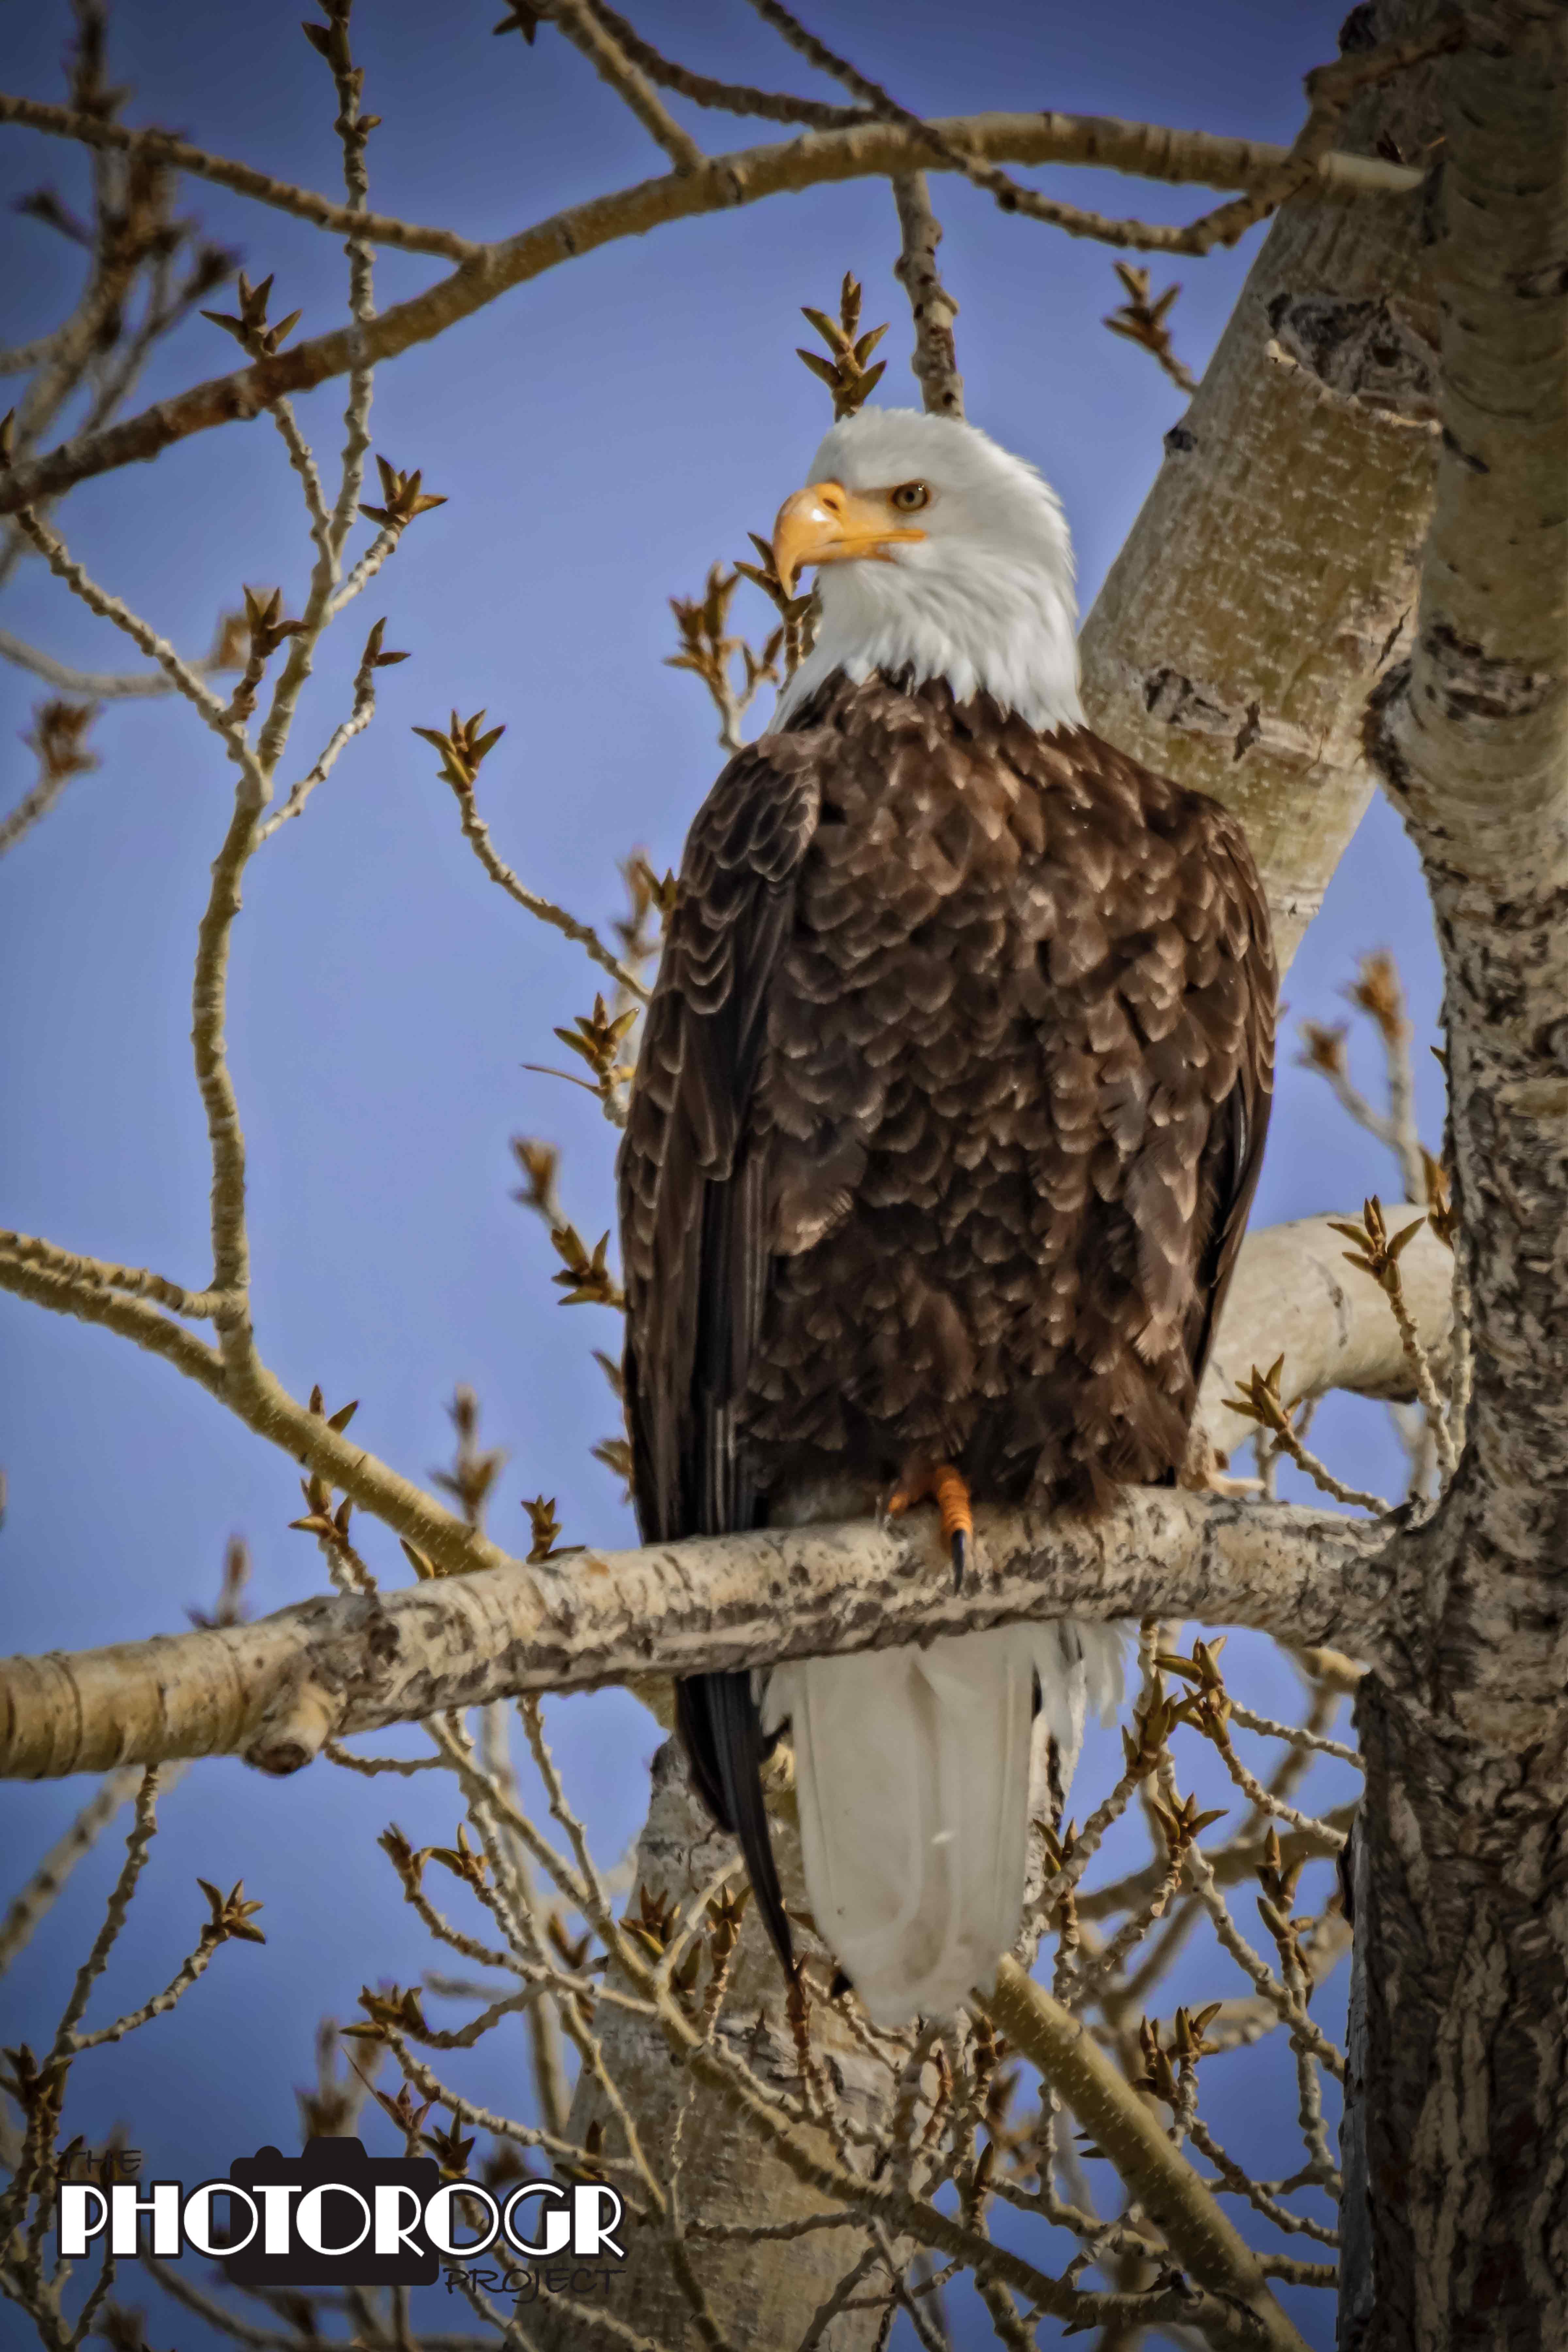
This is a different Bald Eagle (note the lack of dark feathers in his head), using his ‘regal’ pose!
One of the fun things for me was having one subject in the same spot on different days and different lighting conditions, then playing with the processing for a different interpretation of each image. I hope you’ve enjoyed my images, and I promise to be sharper in the future!
Enjoy – PHOTOROGR
Our collective attention has focused on the weather for the last week or so, as seemingly the entire nation has been under siege by cold and snow. (One of my good friends ran off to Australia to escape. Travel safe, Butch!)
Taking pictures in snow is very challenging. I’m taking a winter/snow photography class next week so I’ll learn the mistakes I made in shooting for the last couple days, but I’ve had a great time this week and I look forward to learning something next week!
I’ve been out in the Carson Valley the last couple days. The snow was falling both days – very evident in many of the images. One of the challenges of shooting snow is preventing the snow from blowing out (or overexposing), making great white spots in the images with no recoverable detail. One means of preventing this, I’ve read, is to overexpose the image by one stop. (This is primarily done to maintain white balance in snow pictures. Since I shoot exclusively in RAW format and assign white balance in the computer, this is not a factor for me.) I tried this technique and feel that I had great success.
Let’s get to the pictures!

You’ve seen these horses before – they were in a landscape I did last year. The two on the left were standing in the snow, and the horse on the right came over the culvert to join them. I couldn’t have placed them in better position.

The irrigation ditches are running strong with all the moisture we’ve had. I was drawn by this meandering ditch with the yellow vegetation covered in snow. I thought about processing this in black and white but I loved how the yellow showed through, so I left it alone.
This is a bigger irrigation ditch with more vegetation. I didn’t need to desaturate (remove the color to make it black, white, and various shades of grey) the colors…nature did it for me!

I processed this scene using Photoshop and Nik Silver Efex to enhance the contrast, give the image a bluish tone, and add a nice vignette and border. I loved the dark tree in the foreground with the smaller tree up the hillside in the background!

I had a lot of fun with this image. This is the Genoa Bar in Genoa, Nevada. It is the oldest bar in Nevada. I had made three images when a guy drive his car into the foreground and parked. Darn it! For this version, I processed the RAW image and went into Photoshop. I created a duplicate layer and desaturated the first (or background) layer, then applied a Gaussian blur to the duplicate color layer. I overlaid the blurred layer on the black and white layer and blended them. I then adjusted shadows and highlights and applied a vignette to make this image. It’s a technique called ‘Dreamscape’ that I learned in a weekly photo challenge a couple years ago. It’s a fun effect and works well for this image.

Dreamscape is not for everyone, however. A couple of my friends didn’t like the above image, so I processed this image without the Dreamscape effect. Like most art, beauty is in the eye of the beholder (or something like that).
After the interloper disrupted my Genoa Bar shoot, I rolled forward a few feet and began shooting the structures next door. This antique store, with its wagon and covered porch, made a great composition. I worked to bring out the colors in the buildings and the wagon to offset the snow covered trees and foreground. If only I’d had some people in period costume or maybe a horse or two…oh well!
There’s a few of my snowy images from this week. I hope you enjoyed them. I look forward to learning how to take pictures in the snow next week, and sharing the results with you! Everyone stay warm, drive safe, and enjoy! PHOTOROGR
…until you know and understand them.” This is the final tip in an article called ’50 Tips from 50 Years Behind the Camera’ by Allen Weitz (https://www.bhphotovideo.com/explora/photography/tips-and-solutions/50-tips-50-years-behind-camera?BI=4906).
My lovely bride found the article and sent it to me (it’s so nice to have a partner who supports your habits). The other 49 tips are also good but this one resonated with me for some reason, especially as we begin a new year. I began my journey in creative photography a few years ago with the stated intent to learn how to take better pictures. Every now and then I catch myself challenging those few rules that I know, mostly as I investigate more creative techniques and photographs. These tips help me be a little grounded, though, because I don’t know all the rules – YET! I’ll just have to continue working on it! Stay tuned to watch me challenge the rules…as I learn them.
The winter months can be challenging for photographers. Here in the Carson Valley, when the weather gets cold we break out the really big lenses and go looking for the Raptors and other predatory animals that migrate into the area during this time. We’ve seen a few Bald and Golden Eagles in the area, but the Hawks and Coyotes are the most evident, at least for me. Here’s a few for your enjoyment!

I saw this three-legged Coyote near the California line a few days ago. He wasn’t interested in me taking his picture!

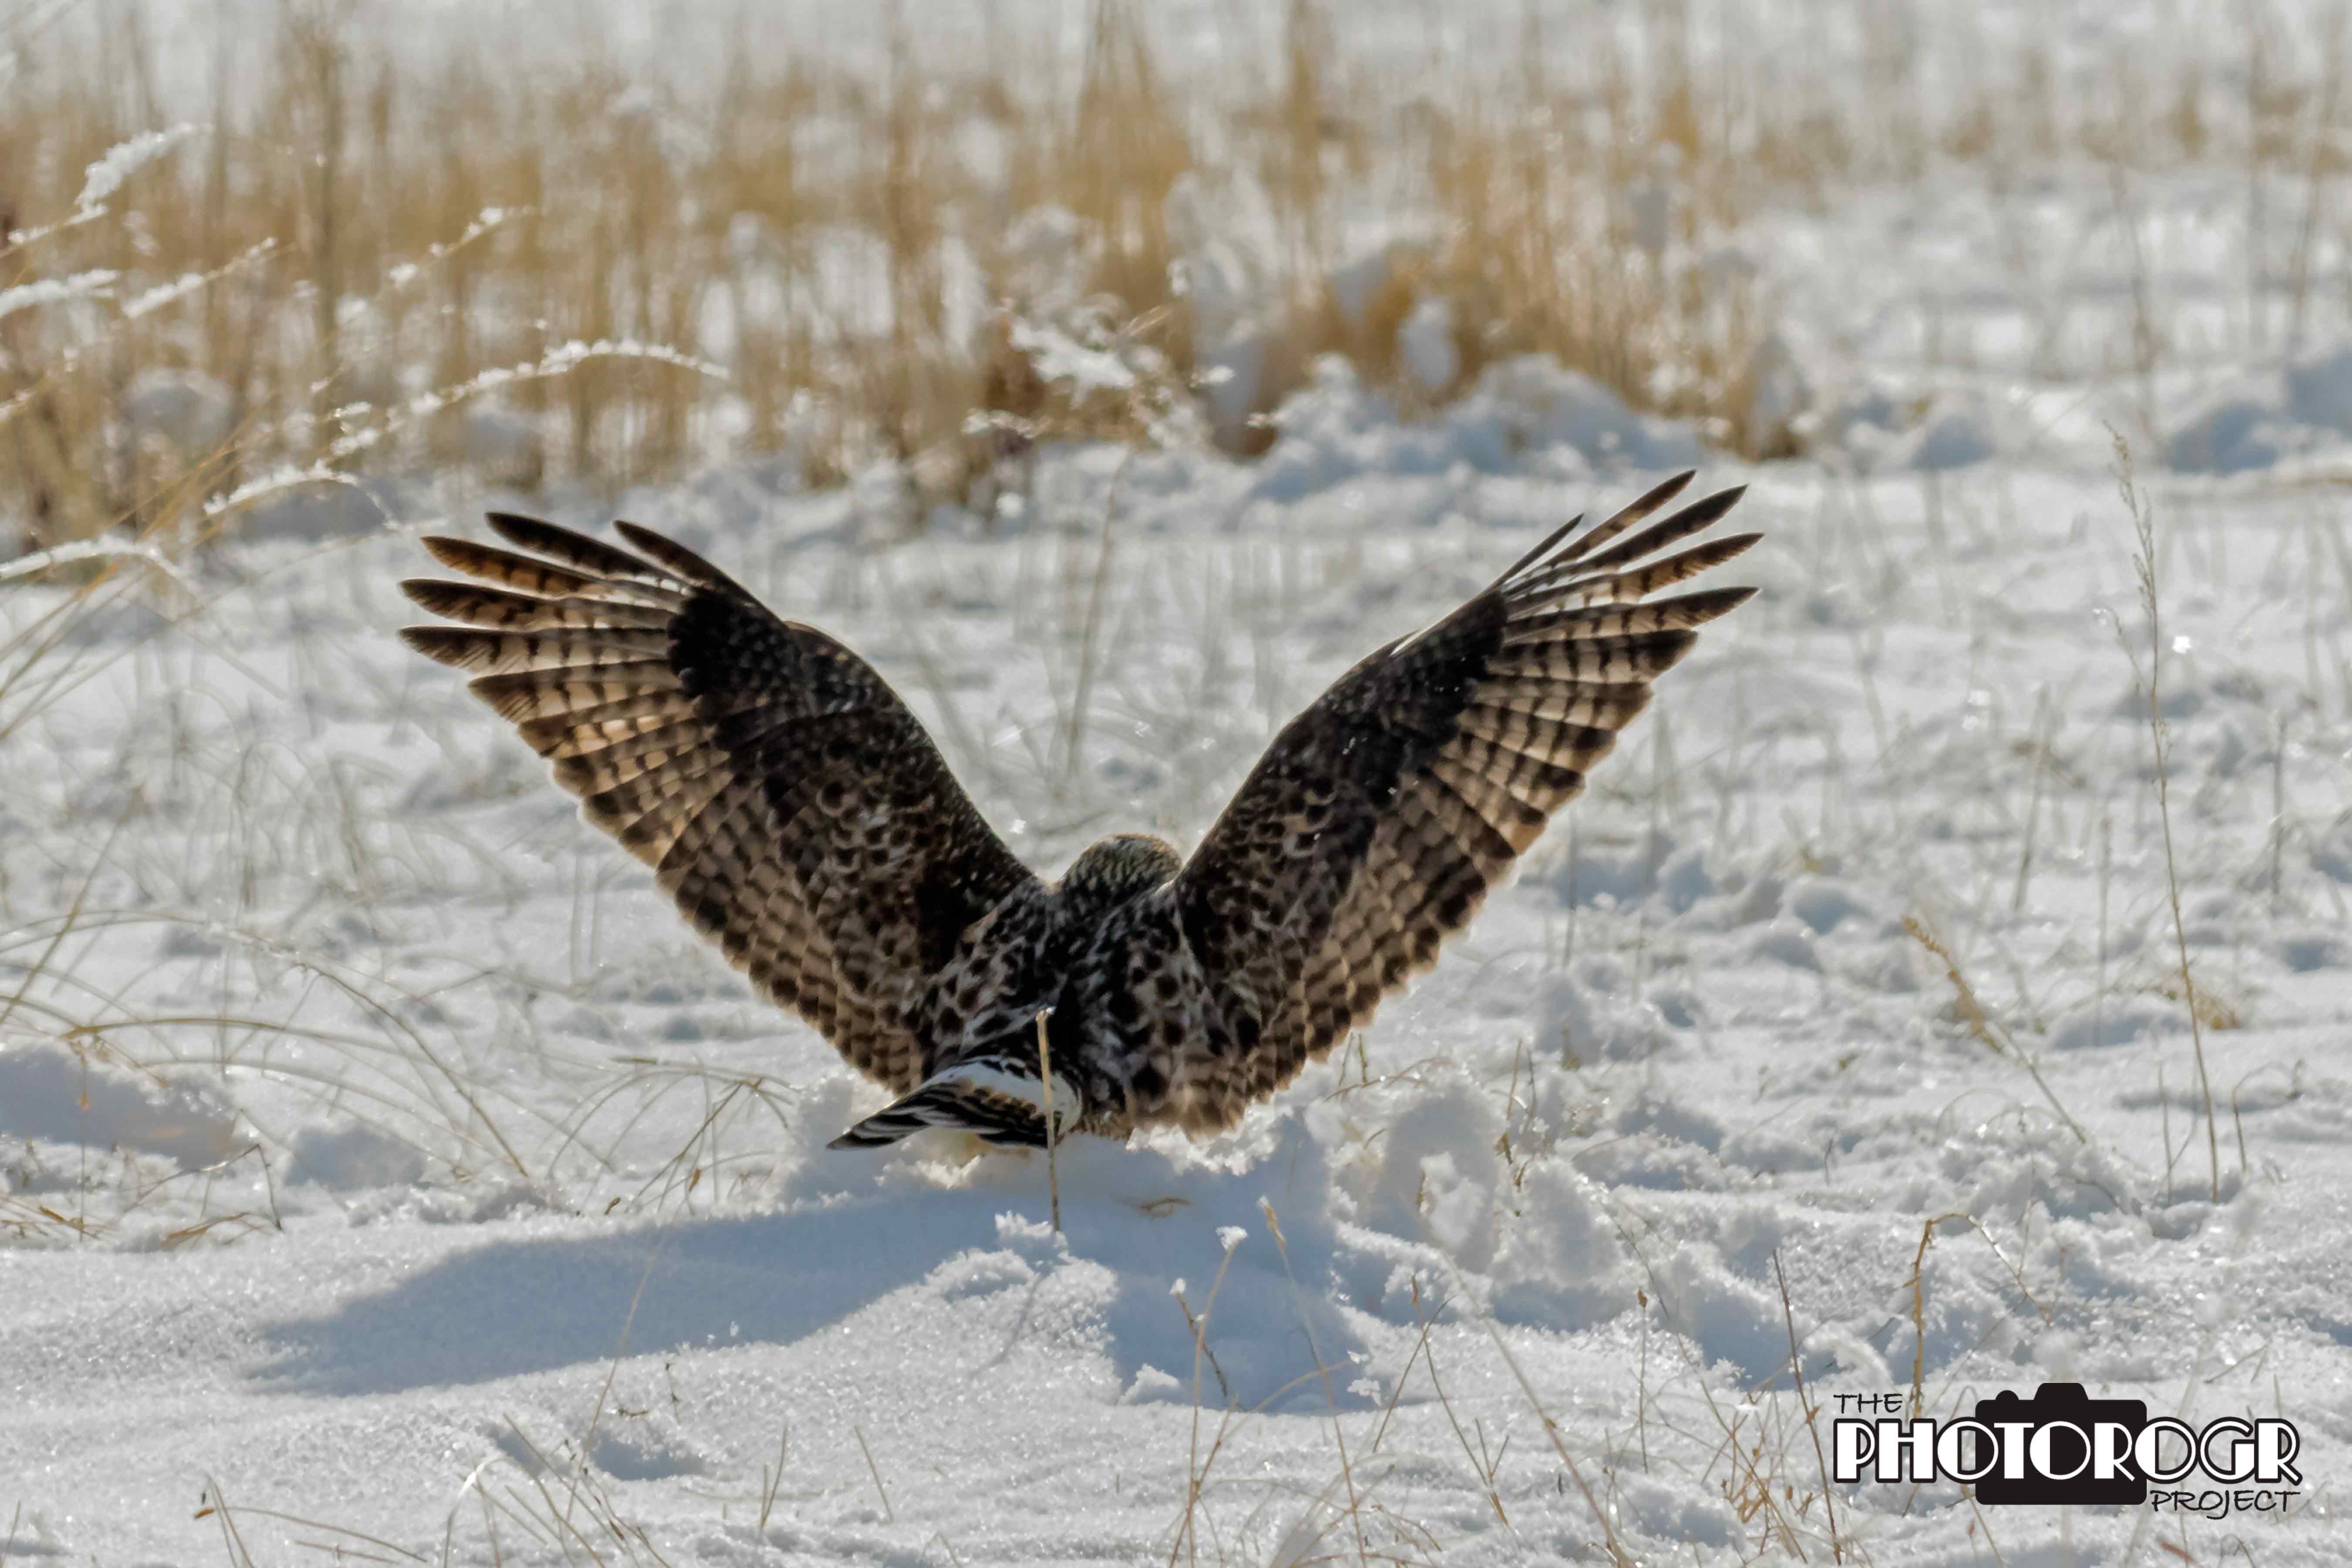
I found this female Northern Harrier on Mottsville Lane last week.

Several friends like the previous picture, but I’m kind of partial to this one. She appears to be thinking about something, but she’s actually cleaning herself. This is my favorite composition for a Raptor picture – eye level, wide aperture giving great detail on the subject with a pleasing out of focus background.
I found the Red Tailed Hawk south of Genoa. I think he was checking his position relative to the camera to ensure I got his good side.

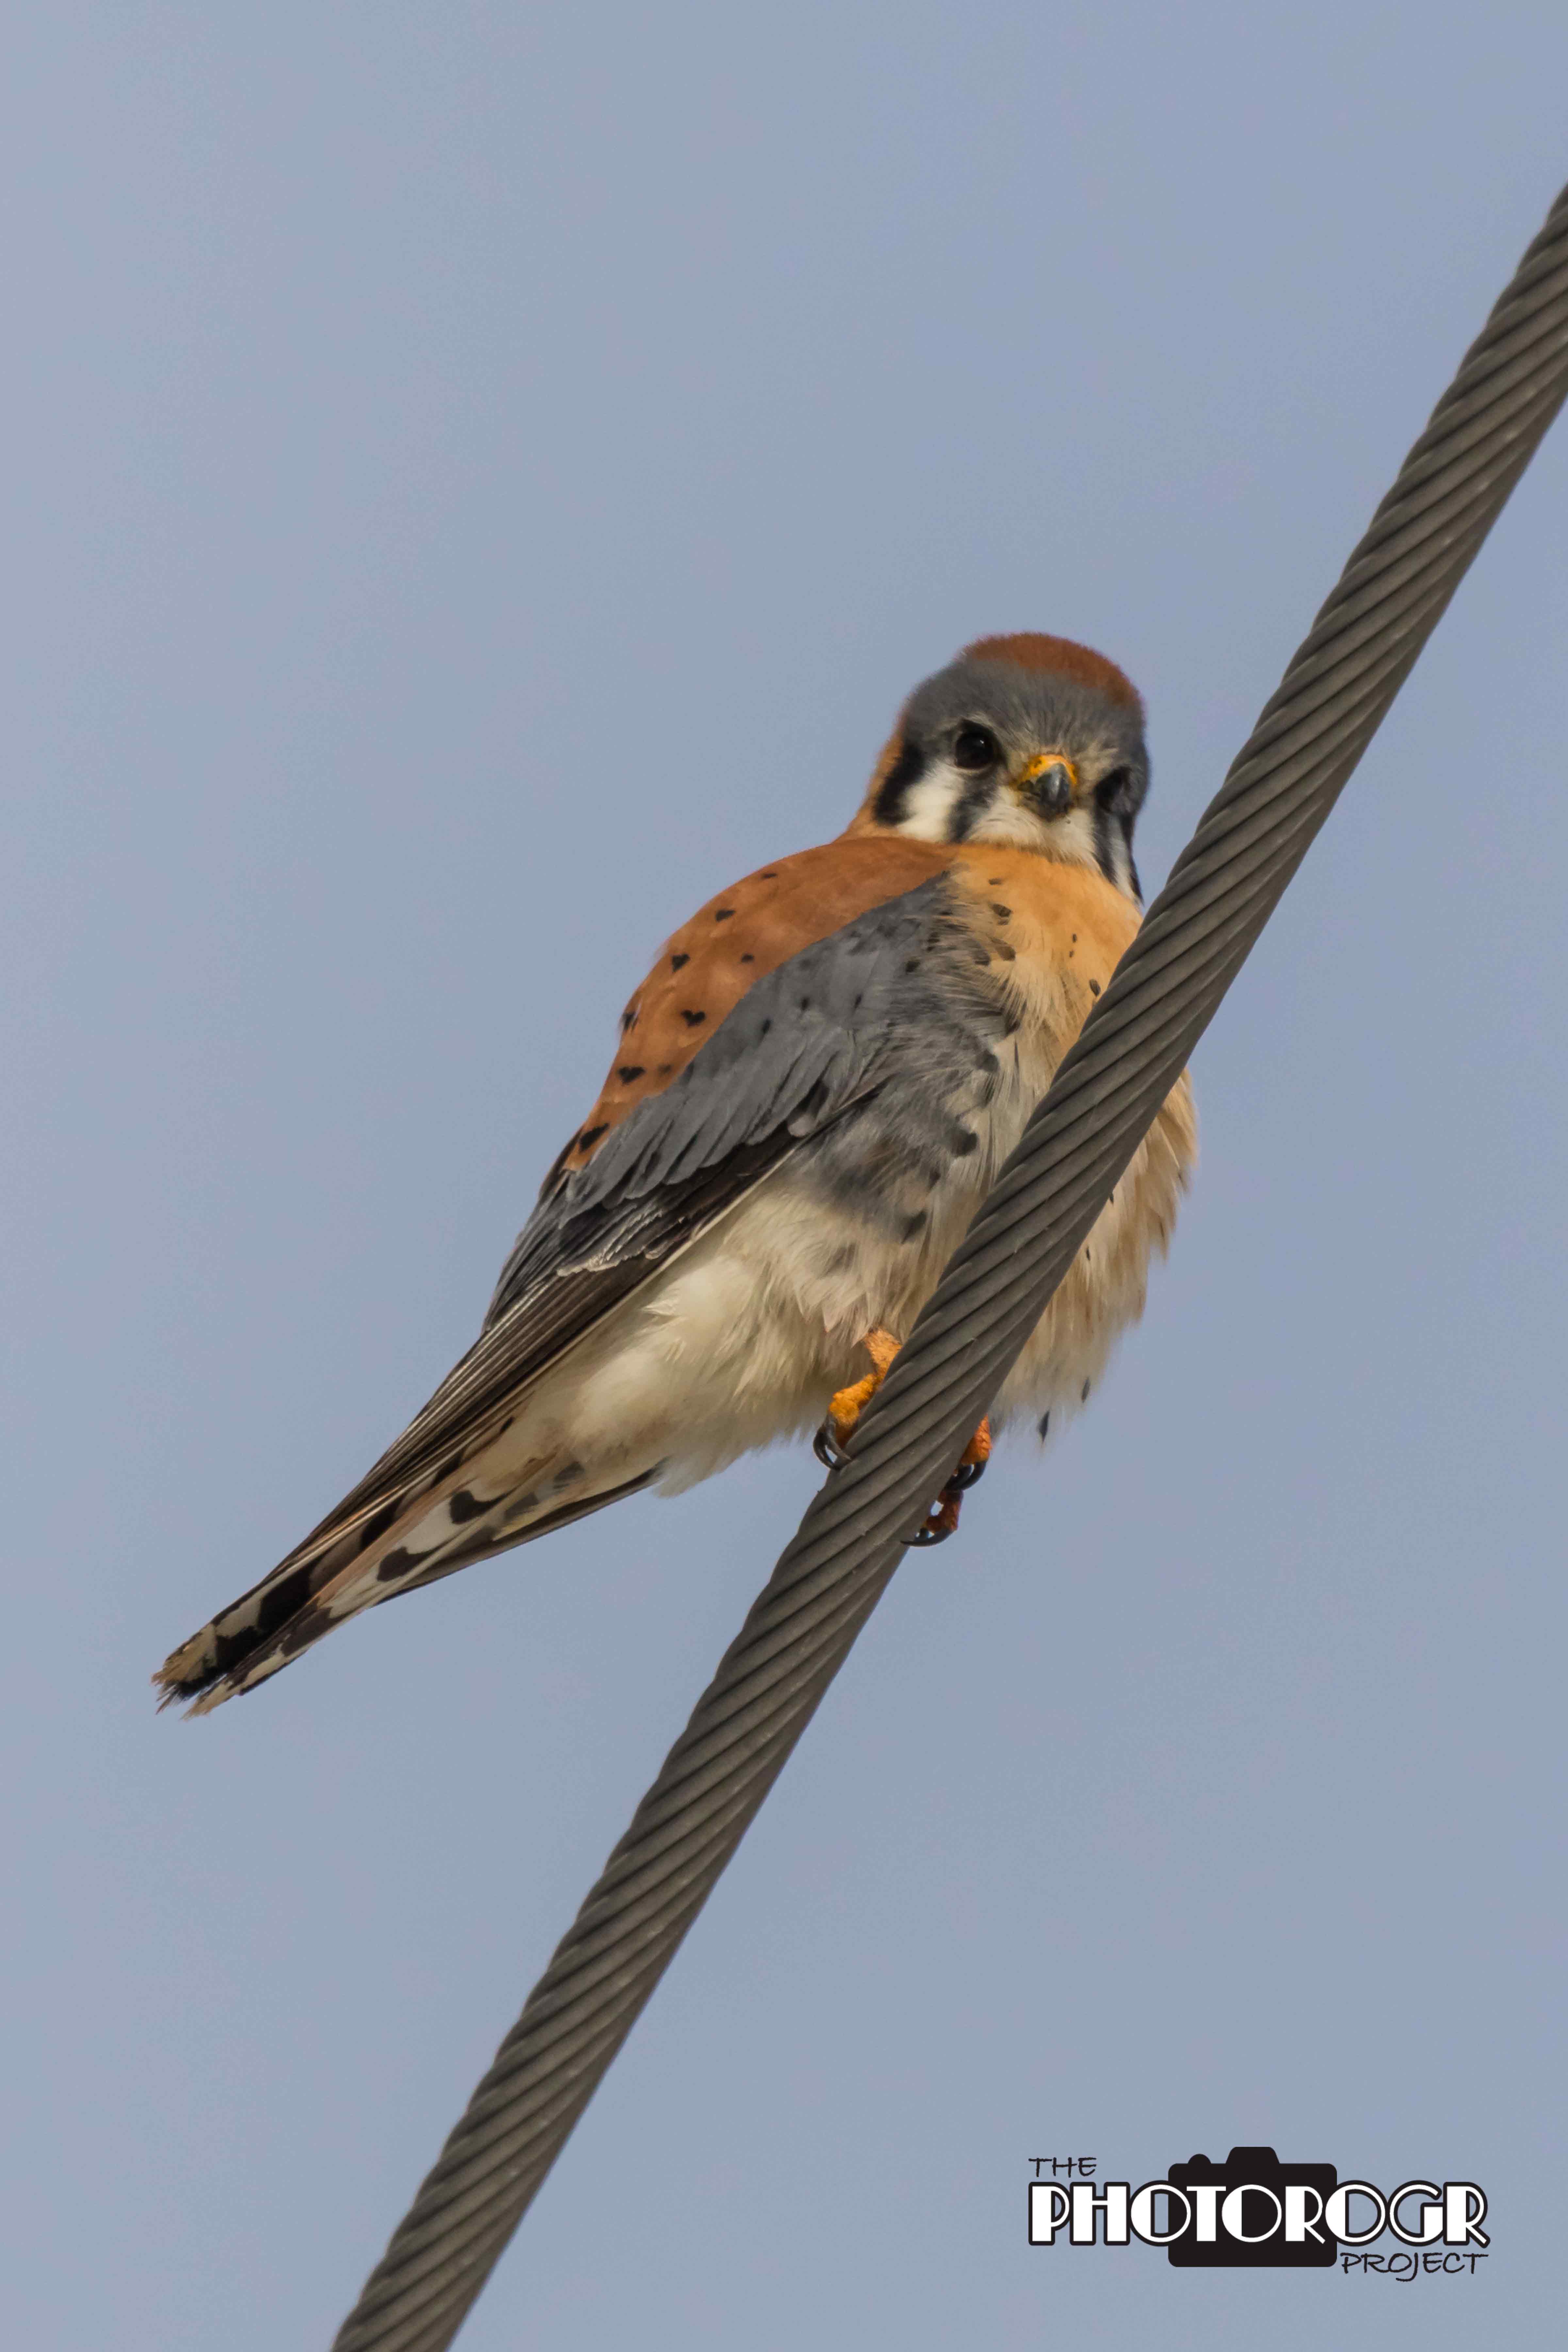
American Kestrels are the smallest and most common of the Falcons, but they are extremely camera shy. I snuck up on this guy while he was enjoying lunch!

But I obviously over stayed my welcome.

I first saw this Kestrel on a utility wire, but he quickly flew to the backslope across the road. I was very excited to get a Kestrel with a background other than a blown out sky.

Of course, he took exception to me taking pictures of him and flew off to another utility line.
Enjoy – PHOTOROGR
From everyone here at The PHOTOROGR Project (meaning me and my lovely bride!) – have a very Merry Christmas!
I hope you were good this year so Santa can treat you right! For me, the jury’s out until tomorrow morning!
Enjoy – PHOTOROGR

