The PS Challenge is Underway!

My apologies for the long break between posts. I’ve been busy shooting, but I took a little break when my friend and photo buddy, Richard Hawkins, lost his battle with cancer. Many of you are familiar with one of Rich’s best pictures.

Richard and I were out with the wild horses a couple years ago. I had just made a few images and turned around when he grabbed this shot of me. Shooting with him was always fun – he had a great eye for images and helped me look at things a little differently. Rich bought a 1964 Olds 442 just before he received his cancer diagnosis. He dated his wife in a car just like it many years ago. At his first car show, he won the ‘under construction’ category. He also asked me to take his picture in the same pose he was in when he had his original 442. I was very happy to do so. God Bless You, Rich – my cameras and I miss you.

On to the images from this month. I picked up a point and shoot camera, a Canon PowerShot G9 X Mark II, to enhance my camera bag. I’m learning the capabilities and limitations of this tiny little camera (it’s only 3.75″ wide, 2.5″ tall, and a narrow 1.25″ thick), but it makes marvelous images. I’m getting very nice landscape images, as you can see, and there’s potential for close up and macro photography, once I learn the camera a lot better. The PS challenge can be either ‘point n shoot’ or PowerShot, depending on my feeling that day.

I made this image just south of Woodfords CA. That’s CA 89 on the left. I made this image with the PowerShot.

I’ve driven by this section of the East Fork of the Carson River several times, and finally stopped to make the image. Great sky and great light!

The beauty of the PowerShot is the ability to stop and jump out for the quick shot. This image was made from the side of CA 89 (the Carson River is just behind and downhill from these trees) in an area where a wildfire burned a couple years ago. The tree on the left was completely burned but the other two were only burned on the bottom half. I hope they survive.

The last PowerShot image for this post – the West Fork of the Carson River in the middle of the Carson Valley. The Town of Genoa is visible at the base of the mountains, and Duane Bliss Peak is reflected in the river.

As much as I love my PowerShot, it will never replace the big camera for many things. The PowerShot will bracket exposures and focal length, but the big camera does it much better.

This is an HDR combined from an exposure bracket of the West Fork of the Carson River, in the mountains. There’s lots of ice in the stream still, as this section of the river gets very little direct sunlight in the winter months.

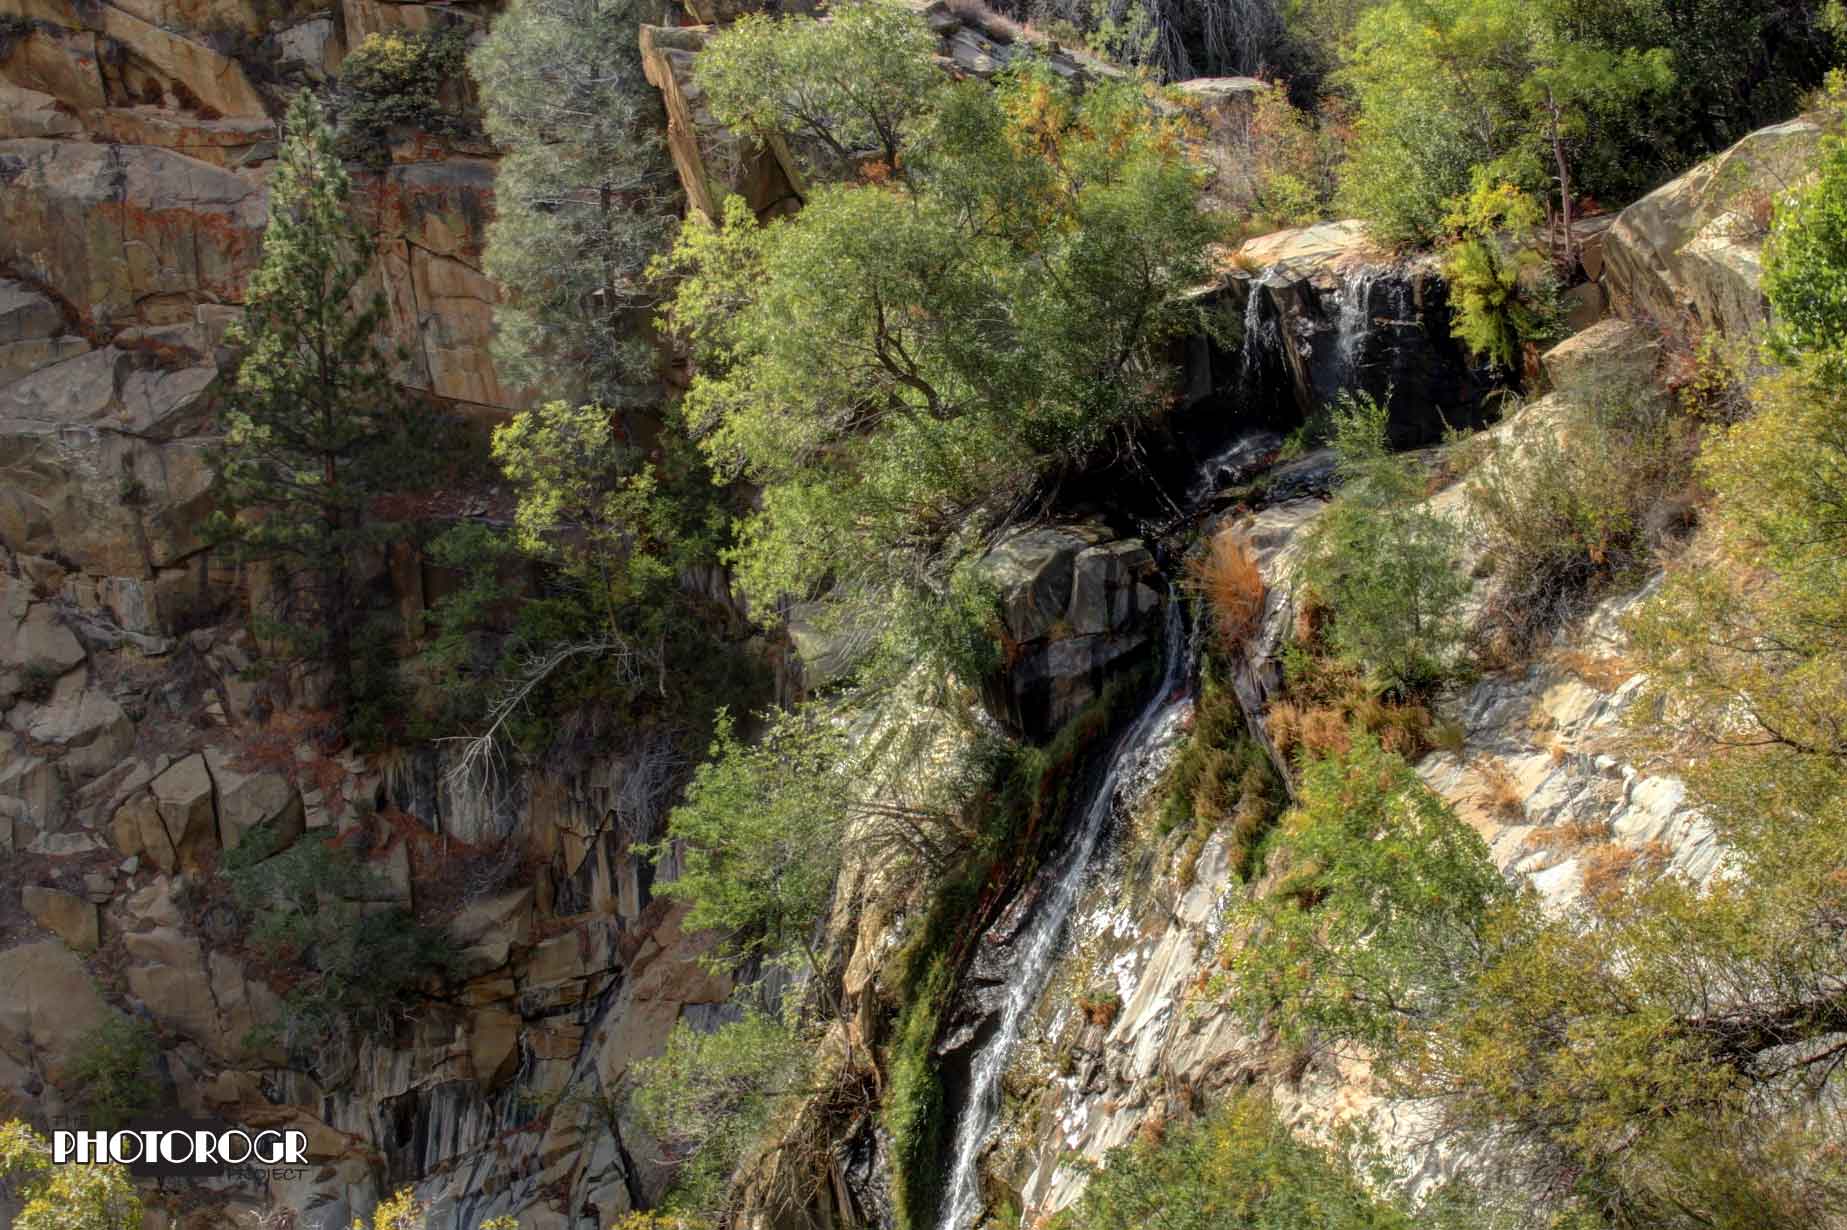
Another HDR of a usually dry wash feeding the East Fork of the Carson River.

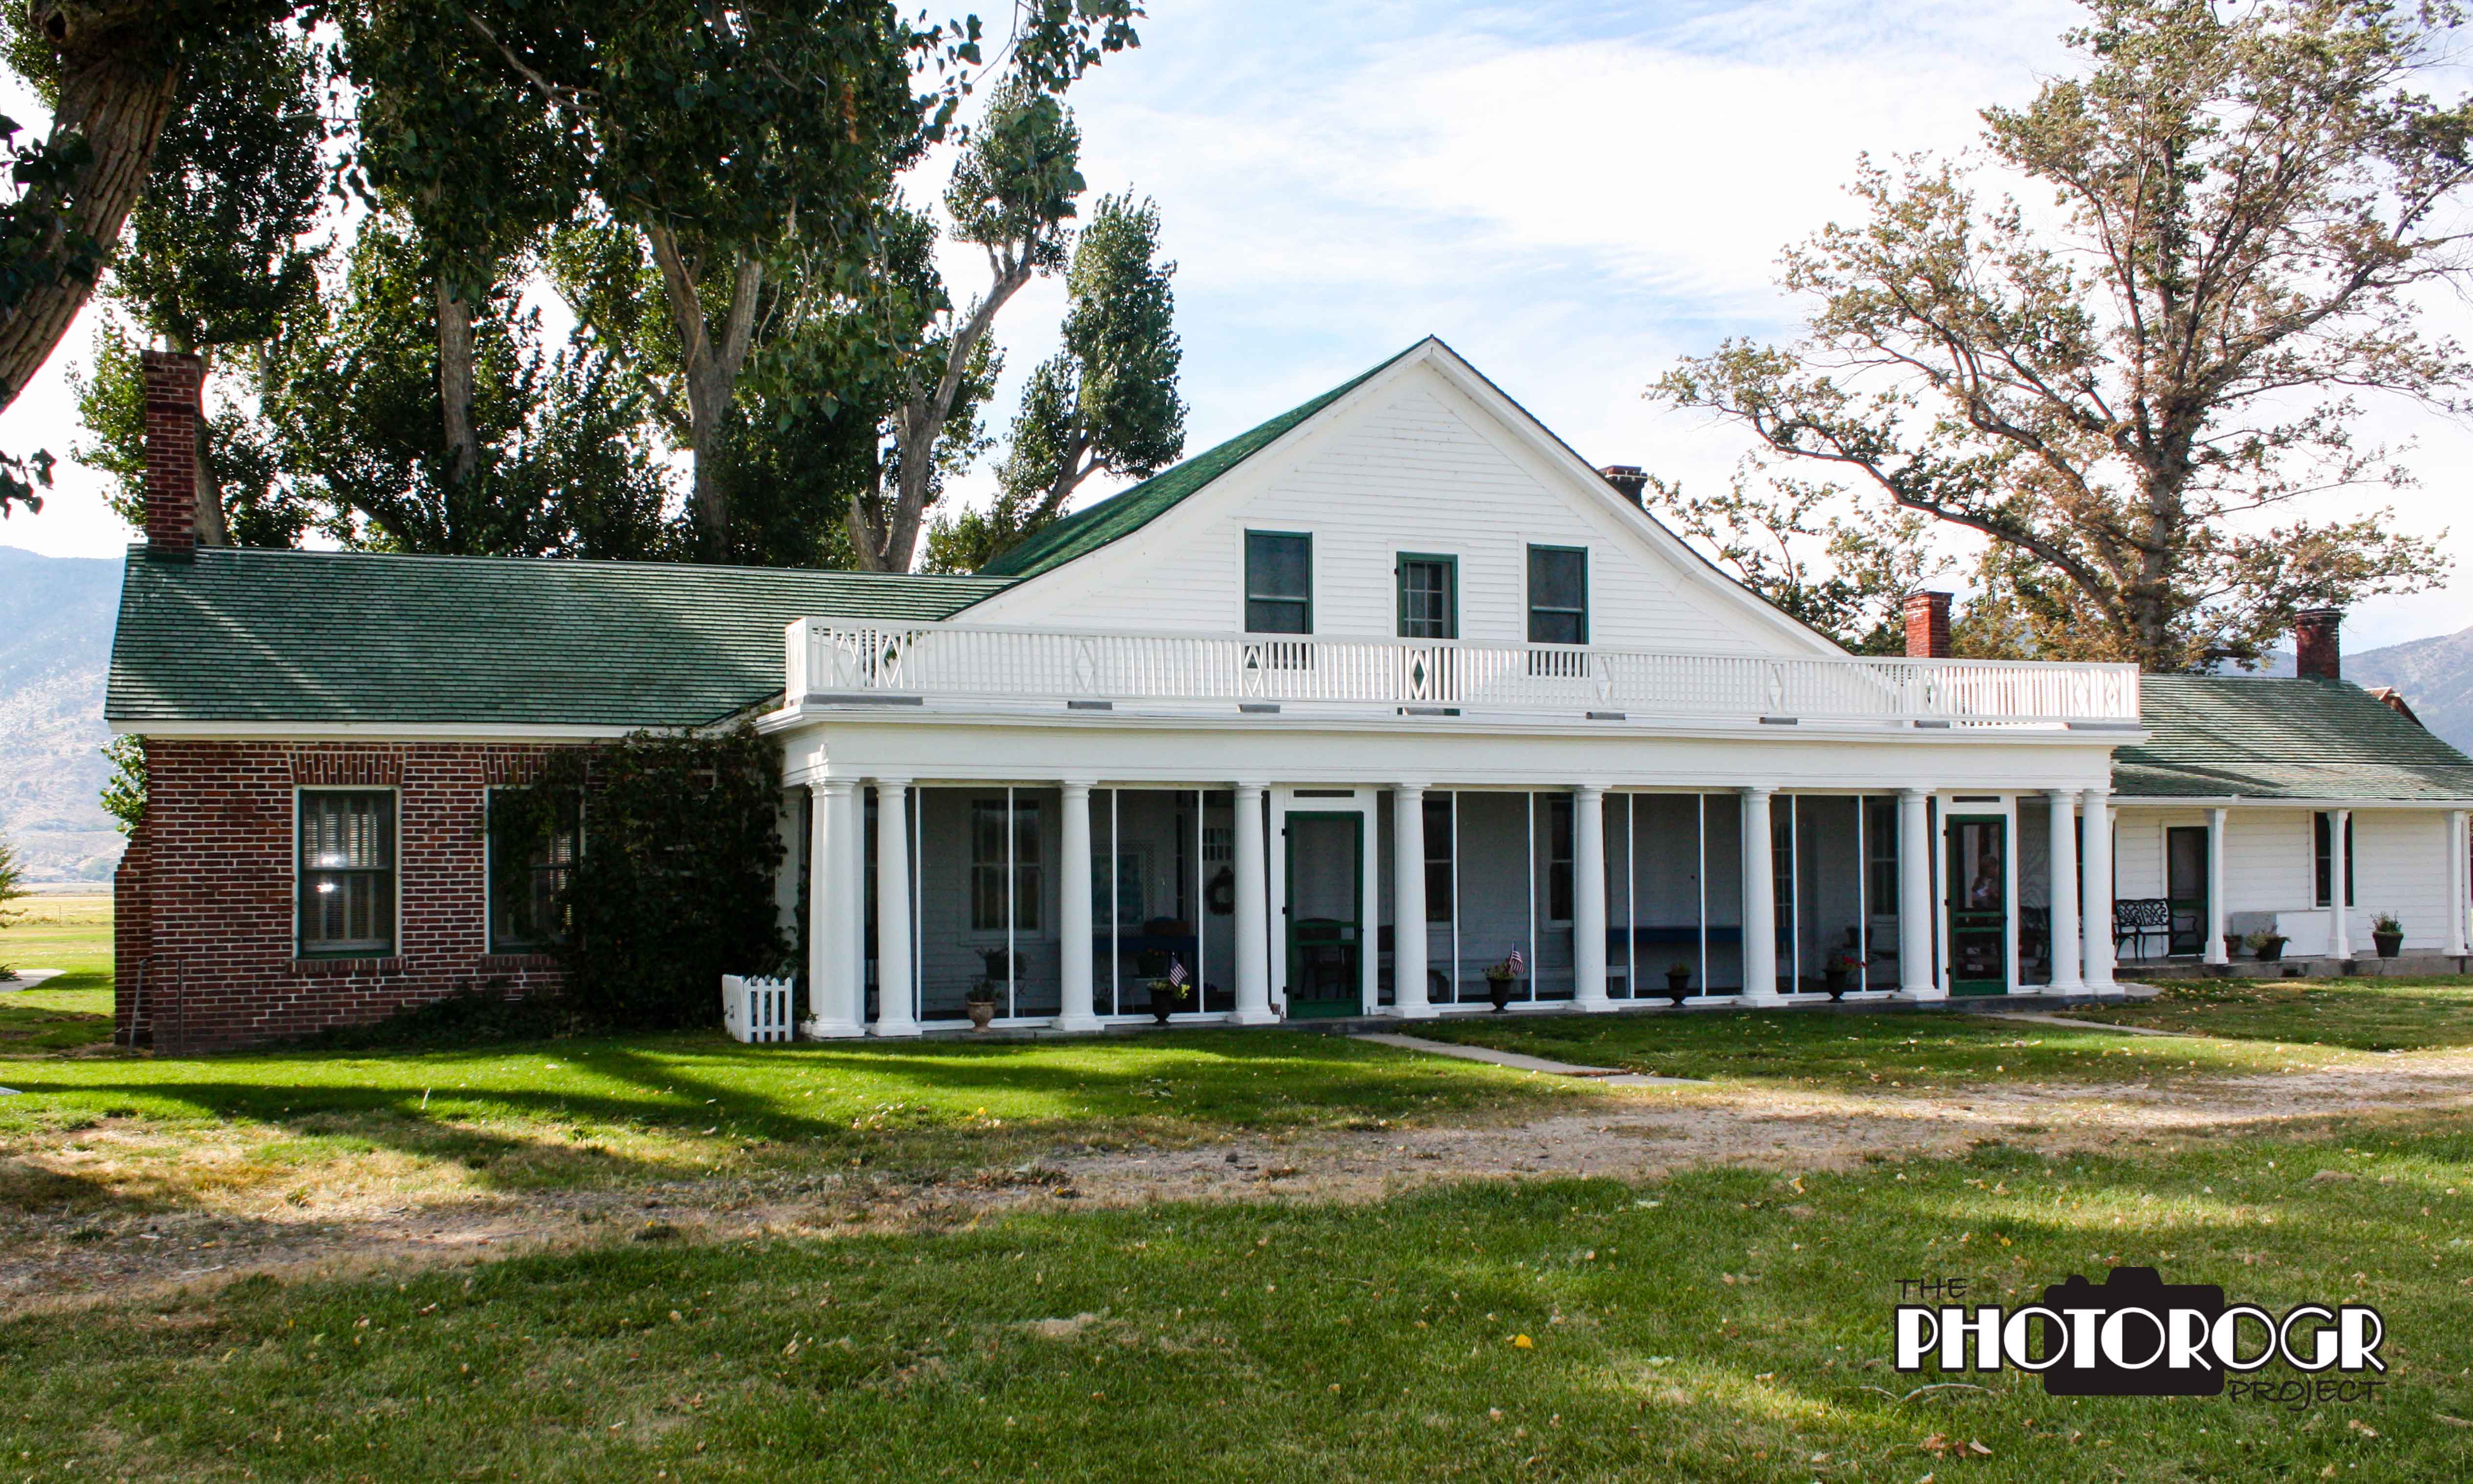
This is the Bower’s Mansion, an historic structure on the west side of Washoe Lake, just south of Reno.

The Eagles are long gone, except for the nesting pairs, and the other Raptors are slowly leaving the area as spring approaches. Smaller birds are returning, so we have subjects to shoot and new challenges in shooting. Small birds are more likely to move as you approach, so a long lens and quick reaction to spotting them is critical.

I found this Western Meadowlark on a fence post in the wildlife viewing area on the south end of Washoe Lake. Chilly morning, so it was trying to fluff up and stay warm.

This Western Meadowlark landed on a branch near me, and posed nicely.

These Black Tail Deer are part of the Town of Genoa herds, although these 4 can be found a couple miles north of town on Foothill Road.

I’m not sure they were more worried about me or something to the right, but they held still long enough for me to make this image.

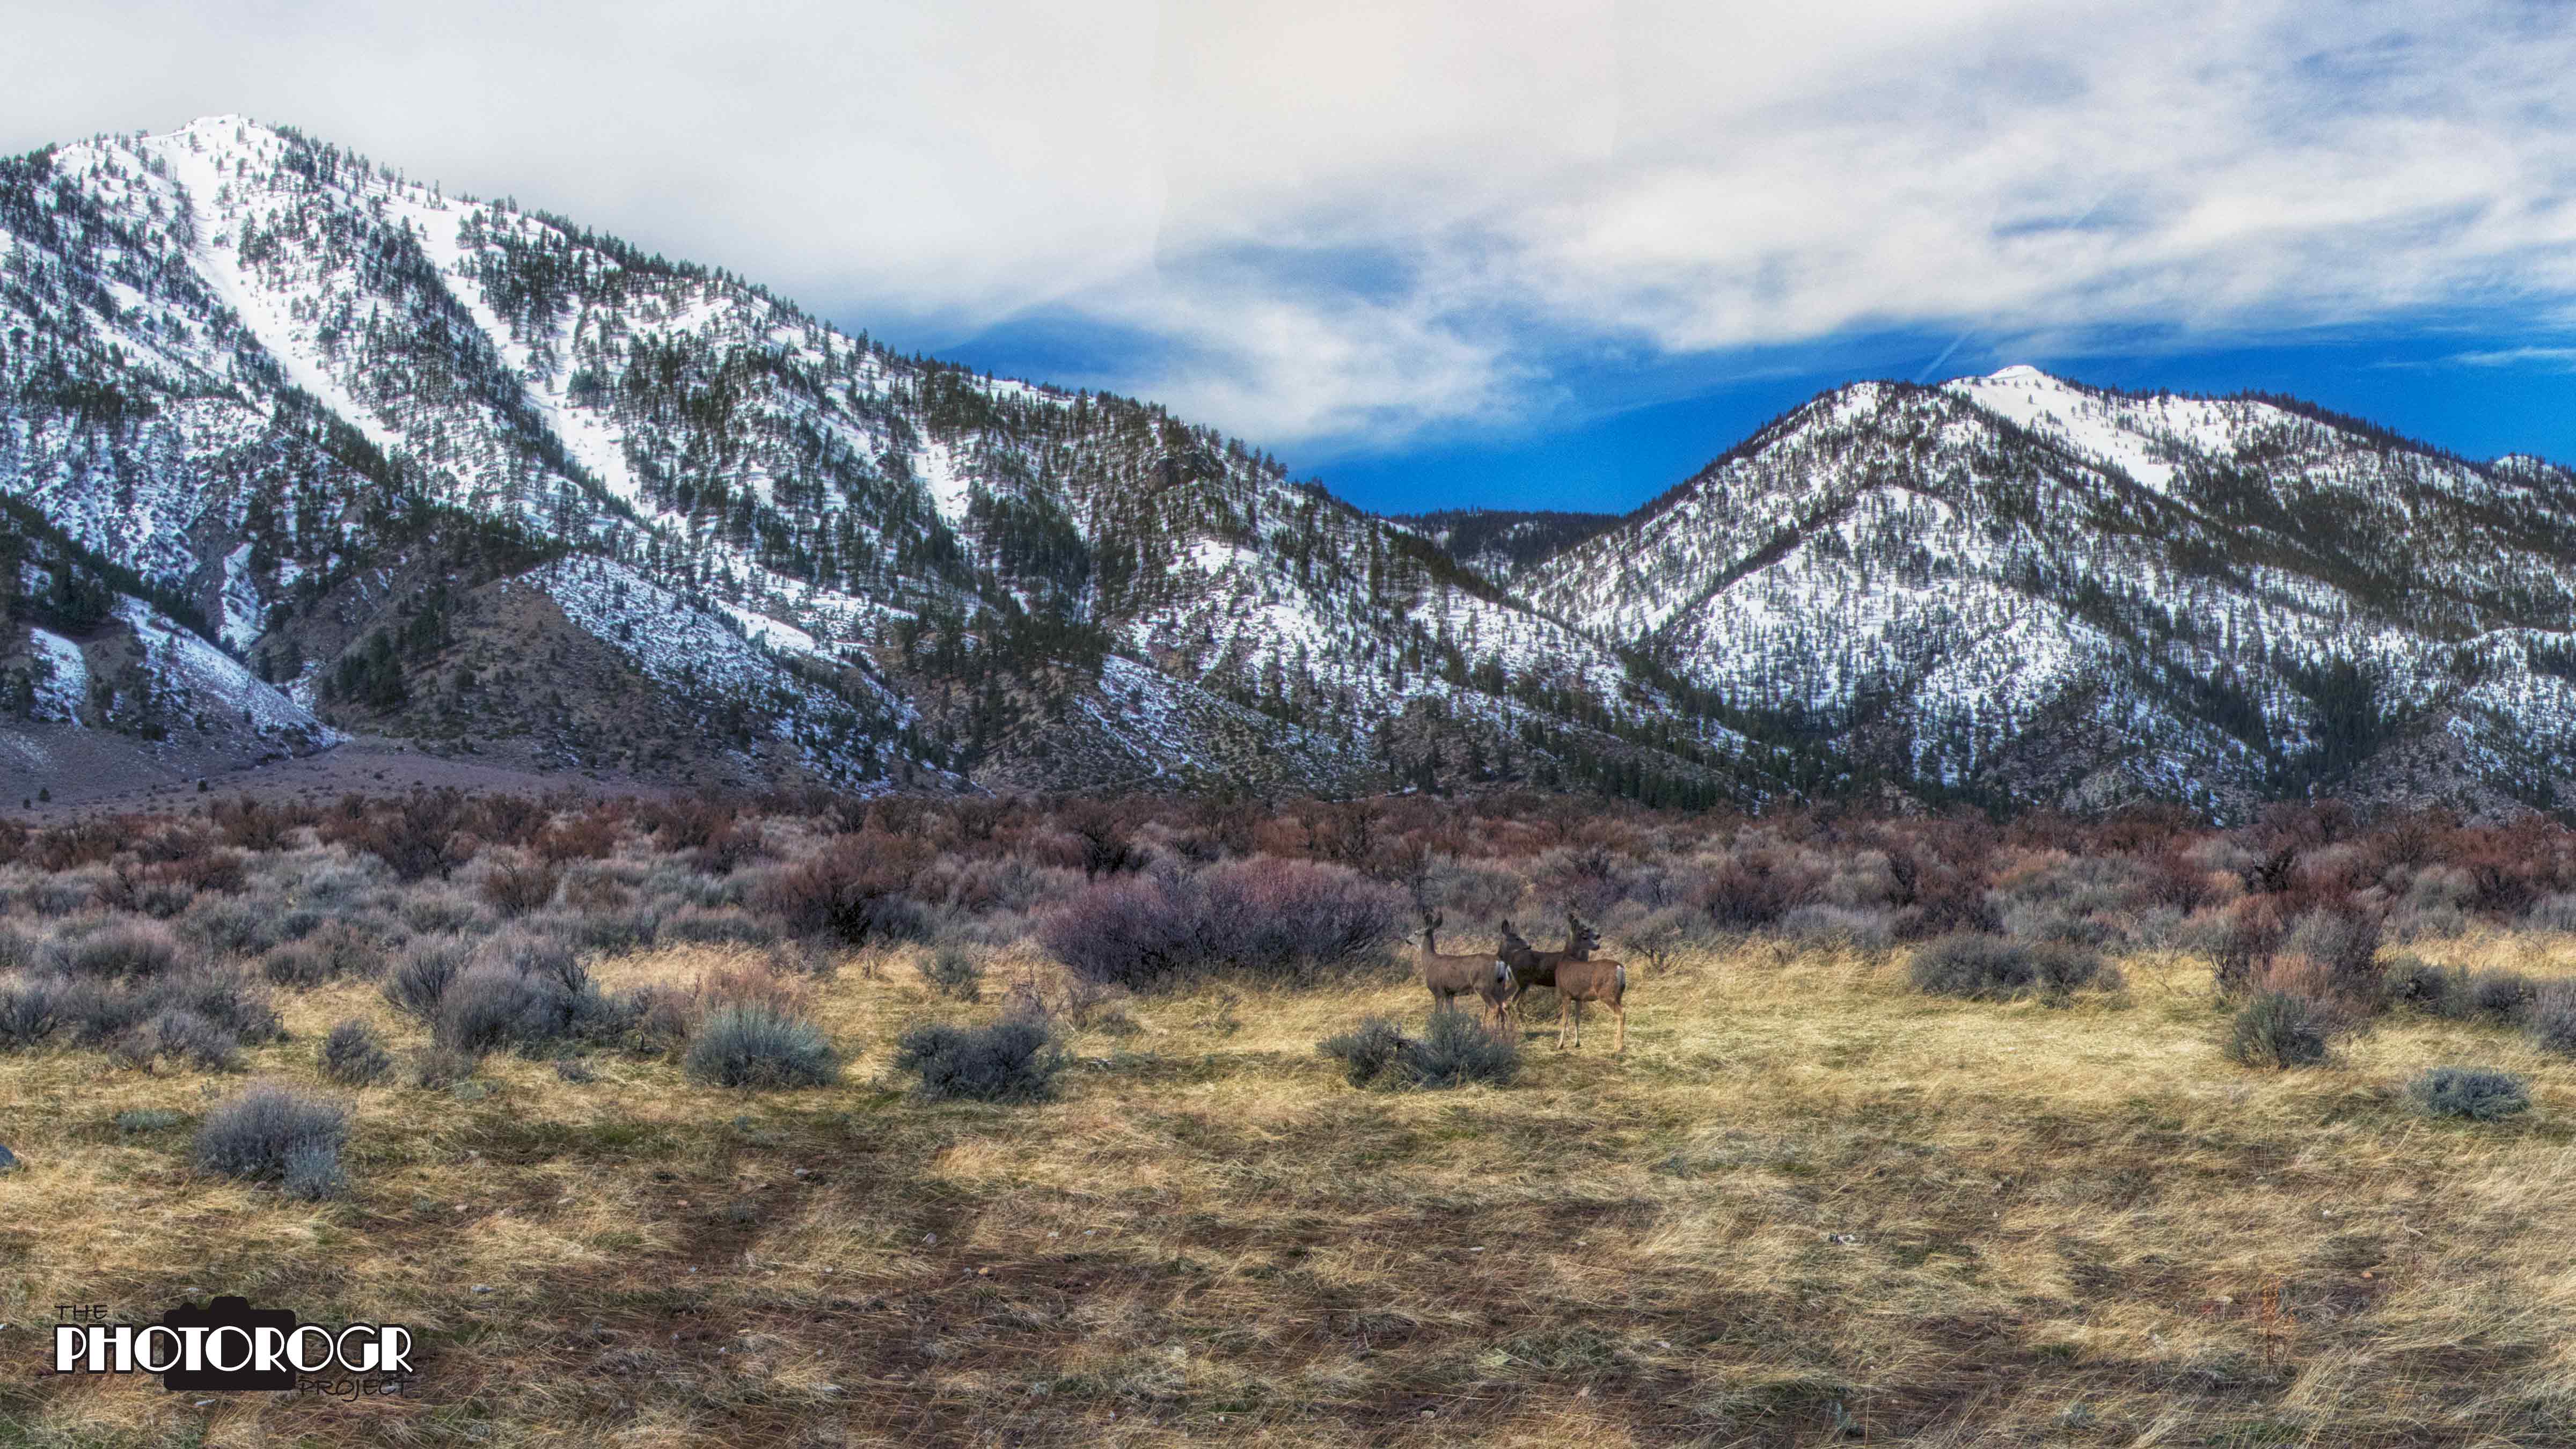
I had the opportunity to try a new technique I saw in Outdoor Photographer magazine – the wildlife panorama. I usually try to get my wildlife images as close and detailed as possible, but I love the concept of combining wildlife and landscape photography. Watch for more images like this.

I found these 4 another day, but they moved into a grove of trees as I approached. New challenge to get a good shot through the trees. This one moved in and stopped, not exposing more head for me. Changing my position wouldn’t have helped, as other trees blocked the view.

Spring is here – evidenced by the blossoms on some of our fruit trees. These are from the Flowering Plum in the corner of the backyard.

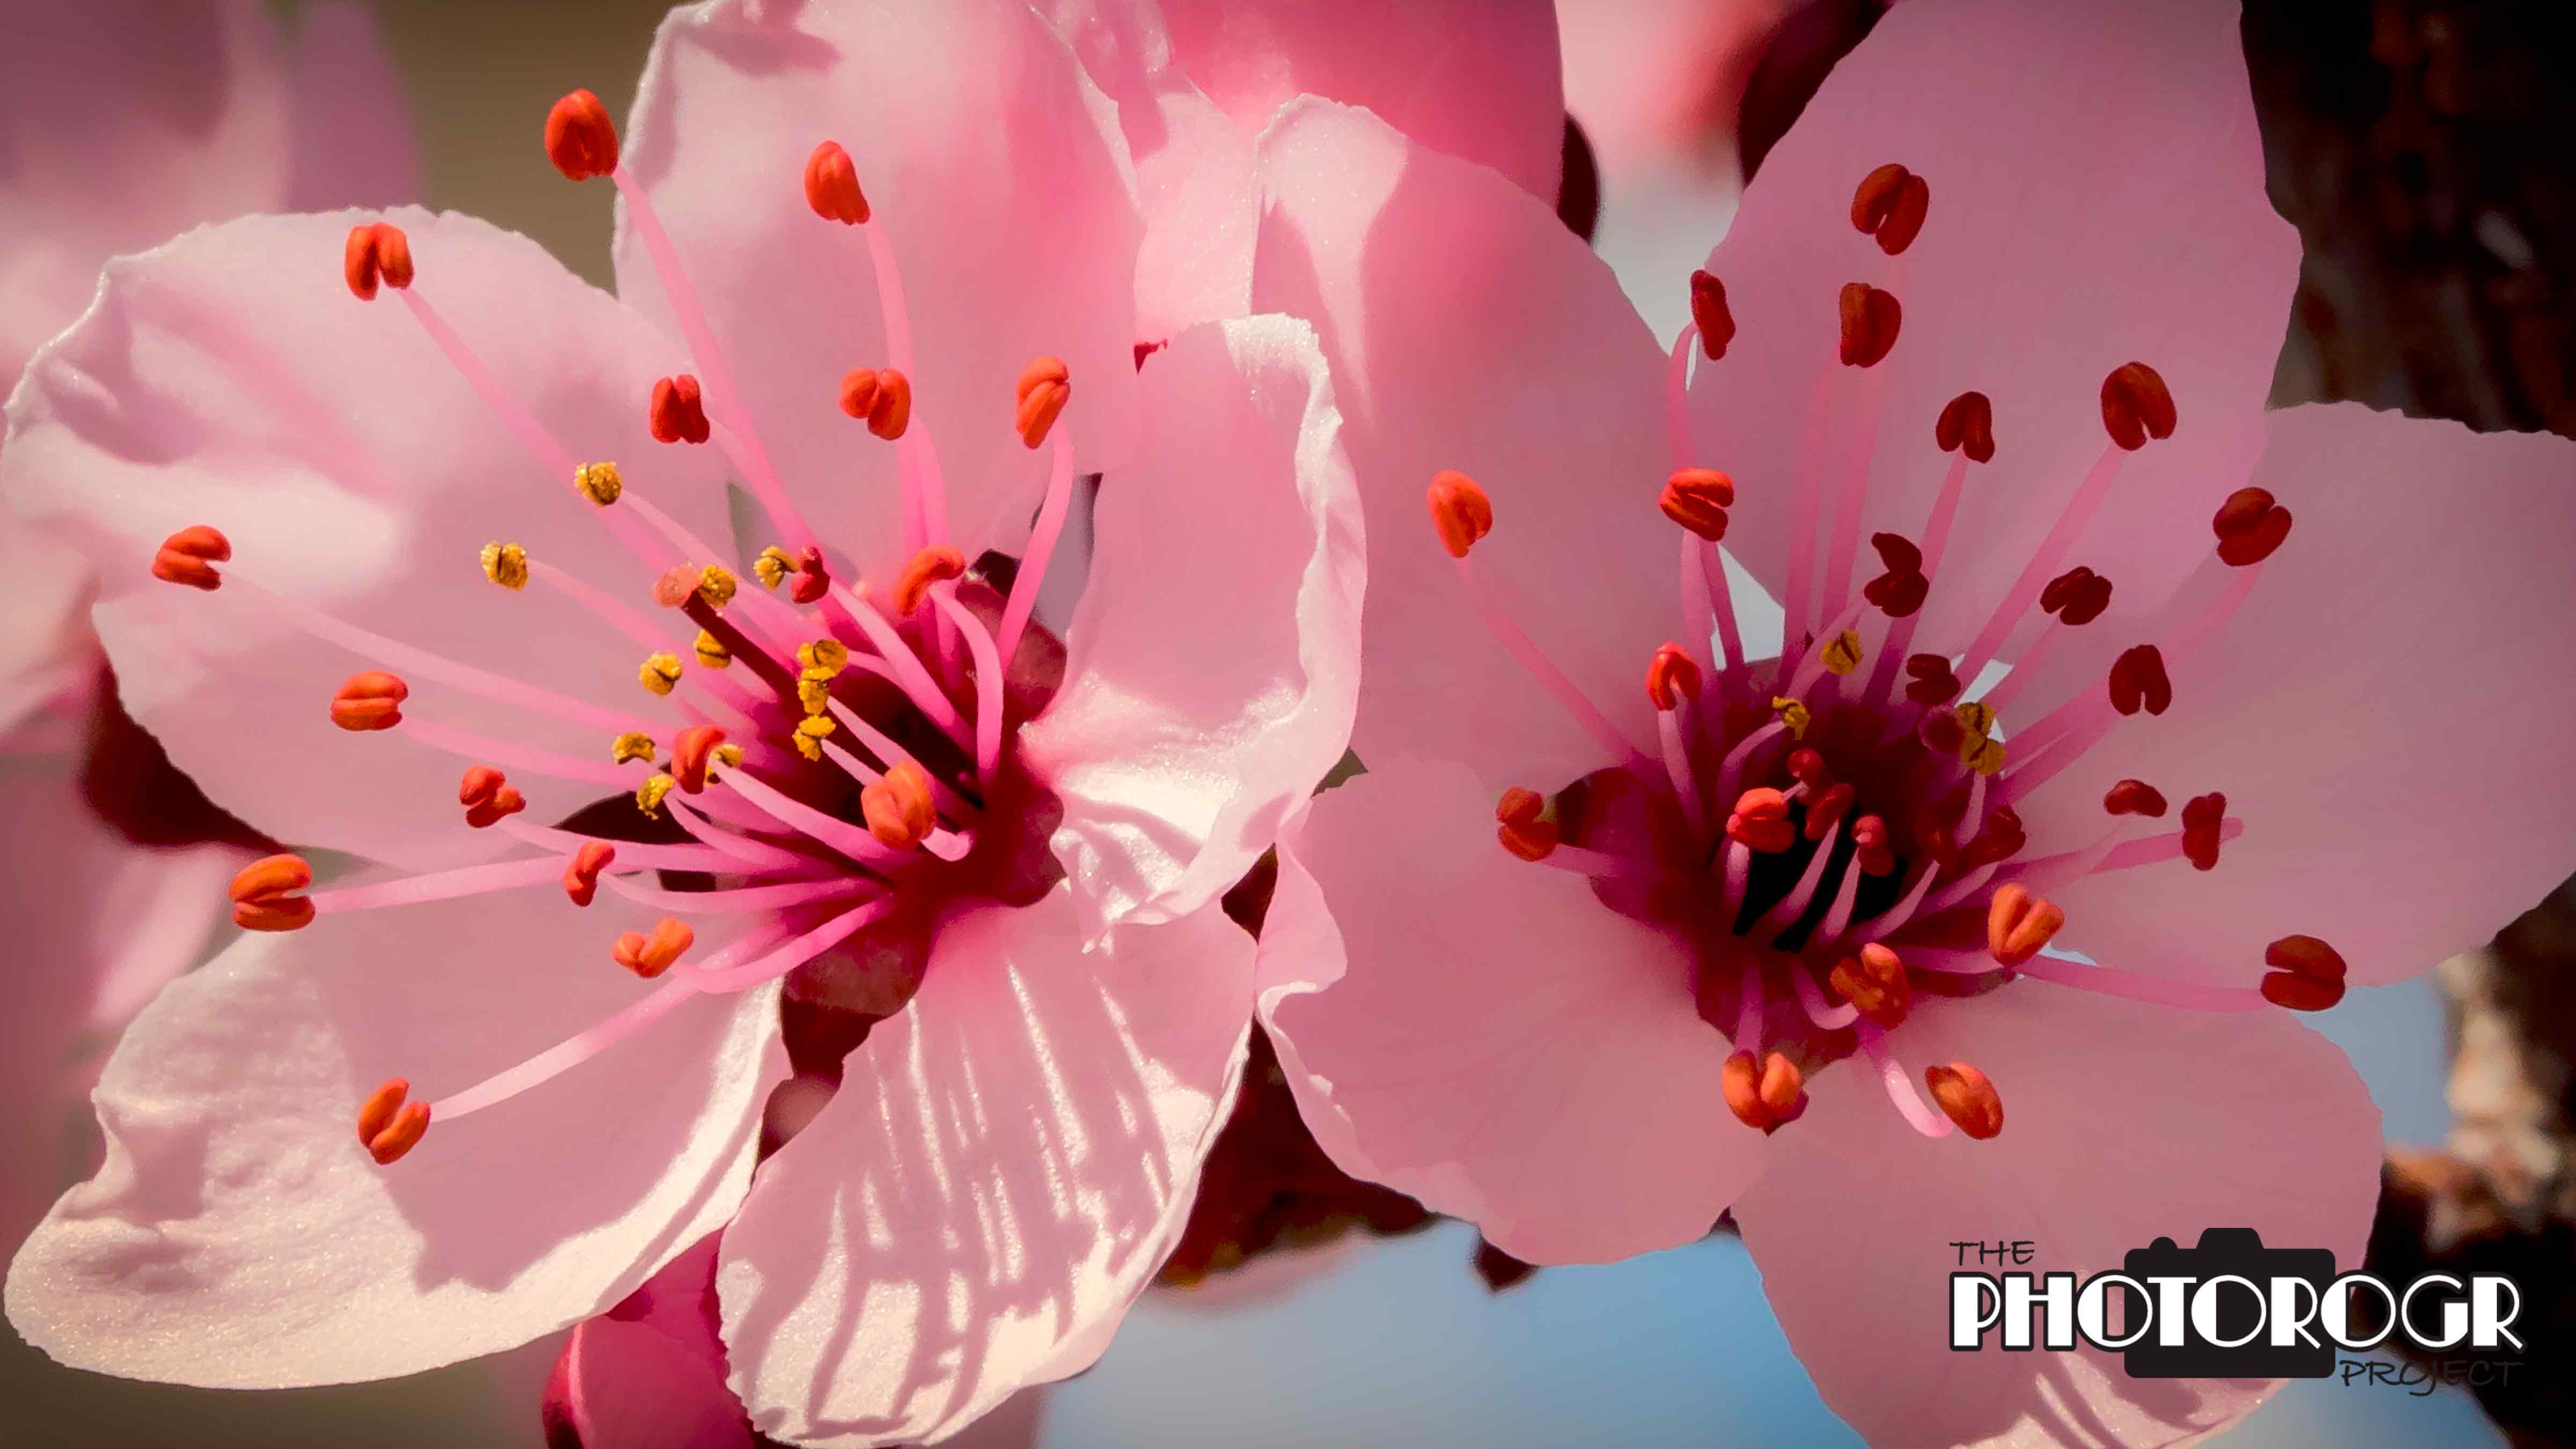
First close up of the year – almost a macro. Each blossom is only 3/4″ in diameter. As more flowers bloom, I’ll shoot more macros. Hopefully, the wet winter will cause the desert to bloom, and not delay too much the mountain meadows blooming.

Welcome Spring and the changes it brings. Thanks for reading this blog!

Enjoy – PHOTOROGR

“It’s not what you look at that matters, it’s what you see.”

So, there I was, reading the March/April 2017 issue of Popular Photography magazine (specifically an article by Glen Van Slooten on ‘seeing the trees for the forest’) which included this quote from Henry David Thoreau.  The words resonated deep inside me.  A few days later, I was reading about the cover shot for the March 2017 issue of Outdoor Photographer magazine.  In his own words to describe the picture and his process for making it, the photographer, Robert Glenn Ketchum, said this, “…As you look at this image, I want to call your attention to an “old school” idea about taking pictures: The camera doesn’t matter; it’s what you see that’s important…”  My technically oriented engineer’s brain almost exploded.  I called one of my photo mentors to discuss this interesting concept.  He laughed and said something like, ‘why yes, and that’s the subject of a presentation I’m making next week.’  (Though I didn’t hear it specifically, I’m sure that he covered the telephone and said something like ‘he FINALLY gets it!!’)

As I thought about the quotes and my mentor and his presentation, I realized that I have been subconsciously wrestling with the concept for some time.  When I look at something, what am I actually seeing?  I had always wondered why people making images from the same place and time that I was were making better images.  In many instances, they could see an image that I didn’t.

What does it mean?  Simply, there’s one more item on my list of things to learn about photography.  This one, however, is not a setting on the camera – it’s consciously looking at an item, animal, or scene and visualizing the image it could be, or taking an idea and making it into a reality.  We’ll all see if I can actually do it – the challenge is there.

I had the opportunity to go inside the Nevada State Railroad Museum in Carson City before it re-opened last weekend.  The Museum suffered damage from flooding last January and has been closed for repairs and cleanup.  I’m happy to report that the Museum staff and volunteers did an excellent job and the displays and exhibits are in excellent shape.  Here are some images from my visit.

This is the Glenbrook. I made this image from three exposures processed in Photomatix, a High Dynamic Range (HDR) software, and finished as a monochrome image.  HDR utilizes multiple images made at different exposures to bring out the best highlights and details in the shadows.  (I discuss HDR in more detail in this post, https://photorogr.com/2016/03/29/an-amazing-week-for-me/ – go take a look!)

Same image as above, but rendered in color.

The drive wheels on the Inyo. Note the reflection in the floors – Museum staff thinks the floors look better than ever and I agree!

If you think the names on cars are obtrusive, take a look at this! We can clearly see that the Inyo was built by the Baldwin Locomotive Works in Philadelphia. This decoration/advertisement is displayed between the drive wheels and can be seen in the previous image.

I’ve got to learn the names of the things that make these beautiful machines run.  This is an HDR image.

The firebox and surrounding area of the Glenbrook, processed as an HDR image.

As you can see, I worked on my HDR skills.  I also tried a new technique that I’ve been exploring – focus stacking.  In focus stacking, images are made at different focal planes and then blended together to achieve deep focus in subjects.  The Museum was probably not the best place to work this technique as many of the subjects have curved surfaces, making focus stacking a challenge.  I did it, however, and learned lots about the technique and its challenges.

One of the drive wheels on an engine. I focused on the face of the bolt (at left center), the washer, the face of the drive shaft, the bolt heads on top of the drive shaft, the wheel spokes, and the machinery behind the wheel. The light was at the top of the drive shaft, so everything below was in shadow. I liked the composition.

Inside the cab of one of the engines, a focus stacked image (8 focal planes).

Same image as above, rendered in monochrome.

I was intrigued by this control lever, and made a focus stack using 8 focal planes along the length of the lever. This wouldn’t be possible in a single image, even at a small aperture maximizing depth of field.

The spherical object on the right presented the greatest focus stack challenge, as the gauges were all on the same focal plane.

This is the entire apparatus, 7 focal planes. I worked the image to bring out the patina of the brass as well as the deep focus.

This is a shot from inside the passenger car. I loved how the old glass caused the somewhat rippled appearance of the Inyo cab, against the straight and in focus wood paneling. This was made from two exposures and focal planes, one for the interior and one for the Inyo.

This is the ceiling of the passenger car. The artwork is amazing and the lamps are just gorgeous. I used 8 focal planes to make the image in focus from the front lamp to the wooden header behind the far lamp. As I refine my focus stacking technique, I will use more focal planes for better quality images.

I love focus stacking, and am happy to add it to my photography toolbox.  Just like everything else in my toolbox, its best use is a work in progress.  I hope you enjoyed my revelation and my trip to the Railroad Museum.  A big thanks to the staff for allowing me to visit.

Enjoy – PHOTOROGR

Night Skies – Before and After…

In my last post, I shared pictures from my recent trip to Sedona, Arizona, for a Night Skies Photography Workshop.  When one drives over 700 miles (one way) for something like this, one often plans little side trips to make the trip more worthwhile.  This post is about the drive down and back.  I hope you enjoy my trip as much as I did!

I left home on a nice Sunday morning and drove to Boulder City, Nevada.  My goal was to get past Las Vegas and avoid the traffic on Monday morning.  I got up early on Monday and drove south on US 95 to an ‘oasis in the desert’ named Nelson, Nevada.  Situated about 21 miles from Boulder City (10 miles on US 95 and another 11 miles on SR 165) in the Eldorado Canyon, Nelson (http://www.ghosttowns.com/states/nv/nelson.html) is the home of the notorious Techatticup Mine, where millions of dollars in gold, silver, copper and lead were mined from about 1858 until 1945.  The town is now host to cactus, snakes, tourists, and photographers wanting to see life in those times.

rogr3899-a-z-w

A couple of the buildings and vehicles.

rogr3904-e1b-z-w

The water tower…not sure if it’s still functional.

rogr3905-e1-w

This water truck under the water tower is definitely not functional, but the controlled decay makes for a fun picture.

pmx3912-4_painterly-w

Another of the wonderful photographic subjects around the town.

pmx3928-30_painterly-w

Colors and textures abound…with some very fun antiques.

ps3941-2-e4-w

This is not a very impressive subject – I would never try to sell this image. The process for making the image is worth discussing, however. Getting a single exposure that shows the shaded subjects inside the structure while viewing the sunlit mountains through the window is impossible. This image becomes possible by using a tripod to hold the camera in position and then making multiple images at different exposures, then combining the images in a high dynamic range (HDR) software. I recently saw a new technique that does not require HDR software. Using the underexposed image (for the mountains in the window), I made a copy of the mountains in the window and overlaid it onto the normal exposed image (covering the overexposed mountains) to create this image. Well, I did a little creative editing after the merge.  A fun technique and worth the time to explore!

After spending some time taking pictures in Nelson, I continued south on US 95 to Laughlin, Nevada, where I made a quick stop at the Big Bend of the Colorado River State Park and stamped my Nevada State Parks Passport.  Big Bend is at the southern tip of Nevada and I don’t expect to get back there anytime soon.  From there, I headed for Grand Canyon National Park.  I drove on I-40 to Williams, Arizona, and headed north on AZ Highway 64 to Mather Point on the South Rim of the Grand Canyon.

grand-canyon-panorama1-2016-12-05-e2-w

A Grand Canyon panorama…

grand-canyon_panorama2-2016-12-05-e1-z-w

Another Grand Canyon panorama…note the tourists on the lookout on the left…

rogr3947-a-z-w

This is not a panorama, it is a single image cropped to near panorama proportions. I’ve talked about the ongoing ‘to pano or not to pano’ question before. Still a pretty shot!

rogr3973-w

I couldn’t resist including my ‘selfie’ from the Grand Canyon. It’s my new profile picture on Facebook, so many of you have seen it before. One of my friends told me it’s not a real selfie, but I disagree.

As I headed south from the Grand Canyon, I saw a band of Pronghorn Antelope hanging out by the side of the road.  I pulled over and snapped a few pictures.

rogr1301-e1a-z-w

I processed this image in warm tones just for fun!

rogr1288-e1-d-w

I’m very familiar with Pronghorn, as they are very prolific in my home state of Wyoming. I was excited that these animals were so unconcerned about my presence. The Pronghorn back home don’t tolerate people and most of my images from home are Pronghorn butt as they run away.

I arrived in Sedona in the dark of late evening, so I didn’t see the landscape until the next morning.

wp_20161206_001

I grabbed this picture with my cell phone on my way to breakfast. As you saw in my last blog, this doesn’t do Sedona justice in any way!

Since the Night Skies Workshop didn’t start until Tuesday afternoon, I made a quick trip to Clarkdale, Arizona, to visit the Tuzigoot National Monument.  Tuzigoot is an Anasazi ruin, and was definitely worth the trip.

tuzigoot_panorama1-2016-12-06-e2a-z-w

From the ruins near the top, I made this panorama. I wish I had increased the height of the tripod to minimize the wall in the foreground.

pmx4028-30_fall-color1-a-z-w

I liked how the ruins in the foreground followed the lines of the mountains in the background. This image was taken in the morning with the wall in shadow. I might have had better light in the afternoon, but then I would have lost the helpful impact from the shadows.

rogr4006-e1-w

This is the Visitor’s Center. It’s a beautiful structure and fits the environment well.

rogr4032-w

This is the view from the very top of the ruins, looking to the southeast and down the mountain. Can you imagine living in this community, climbing ladders to reach your living space?

When the workshop was over mid-morning on Wednesday, I began my trip home.  I had been fighting a cold or some type of crud from the time I left home, so my goal of getting to Las Vegas was fairly modest – only 250 miles or so.  When I crossed the Tillman-O’Callahan Bridge into Nevada, I was feeling a little better and decided to drive up the west side of Lake Mead.  I stopped in the Lake Mead National Recreation Area Visitor Center, stamped my National Parks Passport, and headed north towards Overton, Nevada.  I made a couple stops on the way to take some pictures, but the water level in Lake Mead is so low that I didn’t get near the water.

lake-mead_panorama1-2016-12-07-e2-w

You can see the ‘bathtub ring’ in this panorama of Lake Mead. I saw a few wild horses in the desert, but did not see any Desert Bighorns (darn it all).

When I exited Lake Mead’s north entrance, I came on the Valley of Fire State Park East Entrance.  The sun was going down, but I paid my entry fee, stamped my State Parks Passport, and ventured into the Park.  The light was fading and my sinuses were regretting my decision to make this side trip, but I found some pretty rocks and stopped for a couple sets of pictures.

vof_panorama1-2016-12-07-e2a-z-w

The setting sun was behind me as I shot this panorama. I love the sky behind these rocks.

pmx4341-7-mixed-e1a-z-w

I cranked the tripod head 180 degrees and shot into the sunset. Yes, it’s a very over-processed image, and I won’t get into the details of what I did. Pretty sunset, and not a bad foreground.

I got a good night’s rest that night, and made it home safe and sound.  The trip was fast (5 days) and I put about 1,800 miles on my Expedition.  I picked up 3 stamps in my National Parks Passport, 2 stamps in my State Parks Passport and, of course, lots of images of Nevada and Arizona.

Since I’ve been home, I’ve been in the field a couple times checking out the local Raptor scene.  The Bald Eagles are starting to return to the area.  I leave you with this image from Diamond Valley, south of the Carson Valley just over the California line, from a couple days ago.  Thanks for reading my blog.  Merry Christmas!

Enjoy – PHOTOROGR

rogr4537-a-z-w

…I’m at a creative crossroads…

When people embark on a journey, they plan their itinerary in great detail.  Hotels, fuel stops, meals, sightseeing and other tourist stops are set with a timetable and destination in  mind.  If one is on a journey of discovery, however, there is minimal planning – because it’s all about the journey.  A couple years (and lots of posts, don’t forget!!) ago, I started a journey in creative photography.  My only plan was to learn how to make better images.  This blog has been my vehicle to document and share my journey.

In the last few weeks, I realized that I was approaching a creative crossroads.  There are two roads for me; the first continues on the path to making purely photographic images, while the other heads toward more artistic images.  I never thought about the differences until I visited one of my photo mentors to learn about his workflow to process landscape images.  He opened my eyes to editing techniques that I never imagined, so I’ve been experimenting with new and old images.  When an artist takes a new direction or pushes the creative envelope, there is always a period when the work may be considered ‘overdone’ as the artist tries to find a balance – it’s just part of the journey.

I won’t get into detail about the editing for the following images.  I think I’ll let them speak for themselves.  Let’s start with a few landscapes.

rogr2053-1-e1a-z-w

I made this image at the Eden Vale Inn near Placerville CA (a wonderful ‘b n b’ – we highly recommend it!).  I’m not satisfied with the sky, but I love the rest of the image.

pmx2728-30_fall-color1-a-z-w

These fall colors can be found along SR 207, Kingsbury Grade, between the Carson Valley and the Lake Tahoe Basin.

pmx2732-4_fall-color1-a-z-w

After I made the above image, I turned and saw this view into the Carson Valley. It was a beautiful stormy day, as you can see.

rogr2798-e2-w

I made this image yesterday morning. The Carson River as it approaches SR 88, just south of Minden. The sun was just coming up behind the clouds.

tahoe_panorama2-2016-10-27-e2a-z-w

This is the south shore of Lake Tahoe. I visited the lake last week, on a stormy day. I’ve never seen the weather cover the mountains so completely. I stitched together 10 images to make this panorama.

sierra_panorama1-2016-10-24-f-e2-f-b-z-w

The recent storms gave us wonderful skies and light. This a Jobs Peak (the snow covered peak partially hidden by clouds on the left) on a wonderfully stormy day!

Here’s some new Raptor images.

rogr2180-e2a-z-w

I just love this Great Horned Owl!

rogr2681-e1-w

I used the same filter on this Hawk image.

rogr2720-e1-w

It was raining when I made this image. This Hawk was focused on a potential meal.  This image was selected as the ‘image of the week’ by one of the photography froups on Facebook.

rogr2670-e2-w

I got a little aggressive with this image. The dark streak in the background is actually a branch.

rogr2670-e3-w

Same picture, but with an added twist in editing. A little more detail in the chest feathers.  I love this, but it doesn’t look like a photograph to me.

rogr2554-a-z-w

This Hawk was hunting along an irrigation ditch.

rogr2554-e2-w

A little extra during processing, and the image has a completely different feel.

photorogr9978-bald-eagle-on-fence-post-w

I made this image last February. I struggled with the background.

photorogr9978-e3-w

New editing knowledge – new look for the image.

I hope you understand better my dilemma at the creative crossroads.  I think my best direction is to assess each image independently and make the edits that bring out the best in every one.  The journey continues – as does the fun for me!  Using the digital medium, sometimes I will be a photographer and sometimes I will be a ‘cutting edge’ artist.

There’s much more on the way for this exploration.  Enjoy – PHOTOROGR

Photo Fun in the Benson Sculpture Garden…

A couple months ago, my lovely bride and I loaded up and headed home to Wyoming to join family in celebrating my Dad’s 85th birthday!  While we were there, we also celebrated Mom and Dad’s 65th wedding anniversary.  (The anniversary actually happens in November, but we celebrated while we were all there!)  I just realized that I haven’t shared our family portrait from the party.

rogr9639-a-z-w

The Van Alyne Family – August 2016

My lovely bride flew home the day after the party, so I was on my own for the drive home.  The first photo stop on my trip home was going to be Rocky Mountain National Park, so I reserved a hotel room in Loveland CO (just downhill from Estes Park, the Gateway to RMNP, and about 1/3 of the price of a room up the hill).  As I was driving to the hotel, I passed a brown road sign advertising the Benson Sculpture Gardens.  While I was eating dinner, I looked up the Benson Sculpture Garden on my phone (yes, I know a little about technology) and decided to check it out.  The Garden is a huge park full of huge sculptures.

I arrived at the Garden in late evening, so the light was a little dicey.  Although the sun was nearly down, the sky was a bright white and the sculptures were in various stages of shadow.  Knowing I was in trouble from a lighting perspective, I decided to experiment with a process called ‘light painting.’  In his book Night & Low Light Photography, David Taylor describes light painting as, “…the technique of lighting a subject during a long exposure. This can be achieved by using a handheld flash or with a suitably powerful flashlight.”

I chose handheld flash, and found myself popping the flash from different angles and sides to see what the result would be.  I had to work around all the people in the park – hundreds of them – all walking around looking at their phones.  The Pokemon craze had just hit and it seemed that Loveland’s populace had embraced it fully – at least those who were in the Benson Sculpture Garden that evening!

I’ve taken a very long time to finish these pictures.  Sometimes, we try things in camera that yield good results easily, but some of them take more work.  I look at this as a wonderful learning process.  I need to push the limits of my equipment, but I also need to push the limits of my knowledge of photography and image editing.  I succeeded in pushing the limits.  Using these images made in camera, I learned a lot about editing images using multiple software packages and filters.

A BIG THANKS to all the artists who created these fantastic sculptures and put them on display, and to the City of Loveland for assembling them in this beautiful setting.

I think you’ll like the results, so let’s get to the pictures!

rogr9672-e1-w

One of the first sculptures I saw – Shakespeare. I tried to frame the sculpture with the tree in the background, but the sky still made this a challenge. I introduced a light vignette to bring the sky down a little.

rogr9670-e2-w

Probably not the best angle of this Eagle, but it’s the one I chose. I used a little fill flash underneath to negate the shadows.

pmx9666-8_fused-a-z-w

This sculpture is called ‘The Potato Man.’ It is one of my favorite sculptures in the Benson Sculpture Garden. I combined three images to bring out the colors and the details.

pmx9662-3_fused-w

I made two images of this sculpture, using flash on both sides of the head. I then combined the two images in Photomatix to get this result.

pmx9695-8_tonemapped-color-e1a-z-w

This is an HDR image, using 4 images with different exposures and flash placement.

pmx9695-8_tonemapped-bw-e1a-z-w

I applied a black and white filter and adjusted the contrast a little to make this version of the image. I like them both!

rogr9689-w

This sculpture was in shadow as the sun was setting behind and to the left. A little fill flash made the image work.

rogr9699-e1-w

I loved this statue of a musical trio. There is so much going on that picking a spot to shoot was difficult. I explored the black and white presets in Nik Silver Efex, and liked this one.  I need to remove the car on the left side of the picture, but it’s a Mustang.  Hmmmmm…what a dilemma…

pmx9700-2_smooth-2-e1a-z-w

This is a close up of the saxophone player. I combined three images in Photomatix to make this image.

pmx9700-2_smooth-2-e2-w

I applied a preset filter in Nik Silver Efex to make this image.

pmx9709_painterly-e1-w

Some people would say, ‘…make it stop!’ Filters can be overused, but I had to share one more using this preset from Nik Silver Efex. This is the drummer from the other side of the musical trio statue.

rogr9727-w

Ah, the fun of being young! My Mom has a Christmas ornament based on this sculpture.

rogr9710-w

And then there’s the really interesting sculptures. I tried to capture the setting sun in the background…

pmx9736-8_fused-e1a-z-w

This sculpture is in a beautiful and natural-looking setting. I removed the concrete pedestal to improve the natural look.

rogr9688-w

Another of my favorites. I used a fill flash to make this side of the sculpture visible.

pmx9682-4_vibrant-a-z-w

A couple of bucks running through the woods! There are visual treasures at every turn!

pmx9718-20_smooth-2-e1a-z-w

These kids were really enjoying the park. This is a composite of three exposures.

So, there you have it.  These are but a few of the sculptures in the Benson Sculpture Garden.  I’ll return another day, armed with better knowledge of photography, to make more images of this wonderful place.  If you’re planning a trip to this area, this is a must see.  If you’re on a journey in creative photography (like I am), this is a great place to learn your craft!

I hope you enjoyed these images.  Thanks for joining me on my journey!  Enjoy – PHOTOROGR

Photo Editing Software…and Rocky Mountain National Park!

In previous blogs, I’ve talked about the ways photography has changed due to the transition from film to digital photography.  The basic principles of controlling and recording light have not changed, but editing processes have changed dramatically.  Like many photographers, I work to get the best possible image in camera but further processing on the computer is essential to my success as a photographer.  Thankfully, there are really smart people who have developed great software to make this part of photography easier.  I use Adobe’s Photoshop (PS) CC (Creative Cloud – yes, I pay my access fee every month!) and Camera RAW (ACR) as my primary software.  I also purchased Corel’s Paint Shop Pro X7 when it was cheap (PSP X8 had just come out) and work it every now and then, but PS and ACR remain my go to software.

As those smart guys at Adobe make their products better and easier to use, and I learn how to use the features I have along with the new stuff, I try to produce better images.  Recently, the Adobe CC guys announced a new feature in Lightroom (LR), a sister software to PS.  As background, I prefer PS to LR because I can use layers in PS.  ACR and LR use similar menus and controls for processing, so I’m not missing out on those features.  LR manages files which PS does not do, however, I use Adobe Bridge for my file management.

Back to the cool new tool in LR – Boundary Warp.  If I create a panorama in LR, Boundary Warp allows me to adjust the image without having to crop and lose content.  Regardless of how well I shoot a series of images to merge into a panorama, there is always inconsistency in the edges requiring cropping and/or filling.  Boundary Warp minimizes data loss and is very cool, from my perspective.  I processed several panoramas using both PS and LR to determine if one is preferable to the other, but I’ll let you be the judge in the images below.

Oh yeah, LR now has a High Dynamic Range (HDR) feature in PhotoMerge, but I prefer PhotoMatix Pro for my HDR images.

Today’s images come from the day I spent in Rocky Mountain National Park (RMNP), located in north central Colorado, last month.  I entered RMNP from the east side (US Highway 36 from Estes Park CO).  After a quick stop in the Beaver Meadows Visitor Center for some shopping and a stamp in my national parks passport book, I proceeded into RMNP and that portion of US 34 known as Trail Ridge Road.  Trail Ridge Road is only open in the summer months, as its 12,000 foot (+/-) elevation makes for a very snowy road in the winter months.

I came across a flock of turkeys, but failed to get a decent image of them.  I drove by this beautiful vista.

RMNP-Pano1-2016-08-16-LR-a-z-z

I believe the peaks to be (left to right) Mt. Wuh, Stones Peak, and Terra Tomah Mtn, with Tombstone Ridge in the middle ground.  This panorama was created and edited in Lightroom, using the Boundary Warp feature.

RMNP_Panorama2-e1a-f-z-w

Here’s the same view processed in Photoshop.

The differences in brightness, contrast, and color are my adjustments and experimentation.  I manually cropped the LR version to a standard 5:1 ratio panorama, the same as the PS version.  What’s important to note is that there doesn’t appear to be geometric distortion from the Boundary Warp, however, there is more foreground in the PS version (check the tree line) which indicates a larger availability of data in the LR image.  Based on my totally non-scientific experiment, I opine that the use of PS versus LR for panoramas is a matter of personal preference at the moment.

Back to pictures.

RMNP_Panorama3-f-e1a-z-w

I believe these peaks to be Mt. Chiquita (l) and Mt. Chapin. This is a panorama merged in PS.

ROGR9794-w

For comparison, I shot this image using a wide angle lens. For this view, either shooting method works fine.

RMNP-Pano6-LR-2016-08-16-a-z-w

This is a panorama of Sundance Mtn. While I was at this location, I visited with a very nice young lady who was shooting with her Canon T2i and a Canon 100-400 zoom lens. We had a nice discussion about lenses and photography.

PMX9881-4_Interior-3-z-w

One of my favorite shots on the day. This is an HDR. When I shot this, the flowers in the foreground were in deep shadow and HDR allowed me to bring them into the light, so to speak. The wind was blowing at 12,000 feet, as you might imagine, so there is a touch of movement in the flowers. A few minutes later, the clouds moved off but the wind came up. The flowers in the full light images were blurry due to the wind.

ROGR1041-w

If you’re an Elk in the mountains on a hot summer day, how do you keep cool? They’re on a snow bank enjoying the cool. They were probably 1/2-3/4 mile away.

ROGR1023-a-z-w

And these Elk were using the trees to keep cool, again, 1/2-3/4 mile away.

RMNP_Panorama7-2016-08-16-e1a-z-f-w

I believe these peaks to be (l-r) Stones Peak (the sharp pointed one), Sprague Mtn, Nakai Peak, Mt Julian, and Terra Tomah Mtn. This is a panorama merged in PS.

ROGR0953-a-z-w

I came around a corner with lots of people looking up a hill, watching this Bear. He was a couple hundred feet away and cared less about the crowd at the bottom of the hill. I parked and came back for this shot, the best of what he gave us before disappearing behind the trees.

ROGR0988-w

When he disappeared, the crowd dissipated. I hung around to see if he would make another appearance, and made a few images of the flowers and landscape.

RMNP_Panorama11-2016-08-16-e1a-z-f-w

Beautiful mountain flowers.

LUMIA-20160816-011-a-z-w

I made this image with my trusty mobile phone. Every now and then, it makes a nice image. Note the wildlife.

RMNP-Pano9-LR-2016-08-16-a-z-w

I believe the center mountain to be Terra Tomah Mtn, with Jackstraw Mtn on the immediate right. This is another panorama merged in LR using Boundary Warp.

RMNP_Panorama9-2016-08-16-e1a-z-f-w

Same view from a PS merge.  I see a subtle difference in the foreground, especially on the right side, but not enough to conclusively say one is better than the other.  Both images are stunning!  oh yeah, the LR image is cropped to 5:1 ratio and the PS is at 3:1.

ROGR9994-a-z-w

I was making a series of images for a panorama when I caught movement out of the bottom corner of my eye. This Marmot, also called a Rock Chuck, was very busy and unfazed by all the people just 30 feet away.

ROGR1065-w

The rocks were alive with these North American Pika. About the size of a Guinea Pig, these little fuzzballs were busy working on nests for the coming winter.

I have established a page dedicated to Rocky Mountain National Park.  Visit the page to see more images from this part of my trip.

Since I got home, I’ve spent some time in the yard with my flowers, so I’ll close with them.  Enjoy – PHOTOROGR

PMX0225-8_Natural-a-z-w

One of the Rose blooms in the backyard.

PMX0186-7_Interior-3-a-z-w

My favorite Candy Tuft. The sun was going down and lighting up the side of the bloom.

Up Close and Personal…

ROGR8039-a-w

Desert flower!

Well, my exploration into Close Up and Macro Photography has begun in a big way!  Sorry, I couldn’t resist the pun!

Rob Sheppard begins his book on Macro Photography this way, “…This truly is a different world for most people and most photographers.  When you and your camera get in close to things, what you discover can be amazing, unique, and remarkable.  We simply don’t usually spend time looking at most things around us with a close-up point of view.”  A few pages later, Rob describes this paradox, “By going small, you can go big, very big.  How is that possible?  By getting in close to the small things, that smaller majority, we actually see more of the beauty of the world.  The world becomes a bigger place!”

Not only am I developing a new view of the world, I’m developing a new set of photography skills as well.  Depth of field (DOF) is very different when you’re working in close.  Shoot a landscape at a small aperture opening and DOF goes for miles.  Shoot a flower at a small aperture and DOF is measured in centimeters and fractions of inches.  Hand held shooting is possible, but keep your expectations low.  The definition of ‘good light’ takes on a whole new meaning, however.  For example, mid-day light is very harsh and unforgiving to the landscape photographer and gives me fits when shooting wildlife.  Go for the small subjects, and mid-day light can be your friend.  For me, Macro and Close Up brings a new set of challenges, but it reinforces the same basic photography concepts by forcing me to use them in a different way.

Enough technical talk for now – let’s get to some pictures!

ROGR8465-a-10x15-z-w

I found this little fella’ working our new Catmint in the backyard.

ROGR8465-a-6x9-z-w

My lovely bride likes it cropped a lot closer…thoughts?

ROGR8585-a-12x12-z-w

This is a Macro of a Rose in our backyard. I gotta say, I’m putting fewer miles on the PHOTORANGER since the flowers in the yard are blooming!

ROGR8576-a-12x12-z-w

Red Hot Poker just starting to bloom. When it’s fully bloomed, the tips are red and the rest of the bloom is yellow. This is one of my favorite plants!

ROGR8439XL-a-w

We found this California Poppy at Topaz Lake. One of my few successful hand held macro shots!

ROGR8220-w

On the Thornless Hawthorne in our backyard. These flowers are gone now.

ROGR8031XL-a-z-w

When I started being serious about Macro, I rented a Macro lens and went looking for subjects. I drove Monitor Pass and found these beautiful flowers. Don’t ask me what they are – they’re just pretty!

PMX8560-Balanced-a-8x12-z-w

This is a Peony from our back yard. I made multiple exposures and merged them in Photomatix. With our flowers, that’s always dangerous because the wind moves everything. I got lucky this time!

ROGR8427XL-8x12-z-w

I found this Peony at the Dangberg Home Ranch Historic Park.

PMX8542-4-Surreal-e1a-w

Not a Macro – a Close Up! This is a headlight on a 1927 Willys Knight that I saw at a car show over the weekend. This is an HDR image processed in Photomatix.

Well, it hasn’t all been Macros and Close Ups.  I took a ride with my old retired guy ATV group the other day.  We drove east of Carson City to Silver Springs, then south towards Fort Churchill.  Just south of Buckland Station, we turned left into the high desert and unloaded the ATVs.  A short 11 miles later, we arrived at Hooten Well and took a break.

ROGR-Cleaver-Peak-pano1-2016-06-02-w

This is a panorama looking west towards Cleaver Peak. The desert is green, but it was a very hot and dusty ride!

ROGR8482-w

Cleaver Peak with remains of one of the stone structures in the foreground.

Our ultimate destination was Salt Cave.  Native Americans used them for shelter and decorated the ceilings.

ROGR8496_1-w

…and I had to shoot them in Macro…yes, I need to work on my DOF and focusing…

My plan is to continue to be up close and personal for a while, with the occasional landscape and panorama.  HDR is a great tool, and I’m getting more comfortable with it.

For my LinkedIn friends, please consider endorsing me for Digital Photography.  Thanks in advance!

Until next time – Enjoy!  PHOTOROGR

I’ve slowed down a little – could you tell?

There’s nothing like a three week break between posts to demonstrate how much I’ve slowed down in my shooting.  Just to be clear, though, it’s only my shooting that has slowed down!  I’m spending more time studying new techniques and continuing work with those I’ve already added to my ‘toolkit.’  Also, it is Spring so I have to spend a little more time at home working on the yard and taking care of business in general.

I’ve continued my exploration of in-camera High Dynamic Range (HDR), as you will see below.  As explained in a previous post, HDR is the process of combining multiple exposures to utilize the best parts of each image for best detail from shadows and highlights.  After figuring out the settings, it works much better than I originally thought.  I noted an interesting part of the in-camera process the other day.  While reviewing several sets of exposures, I saw that the camera floated the ISO setting to obtain the underexposed image.  When I manually create multiple exposures, I usually float my shutter speed to create the over- and under-exposures.  I never adjust the aperture because of the impact to depth of field.  In addition, I’ve been exploring the Nik Efex filters and the variety of options available in Photomatix Pro.  I made these pictures at the Dangberg Home Ranch Historic Park, with the Sierras as the background.  They will demonstrate better than words.

7DHDR7908-w

In-camera HDR with minor adjustments in Adobe Camera Raw (ACR). Another problem with in-camera HDR is that the file is in JPEG format, which limits post-processing options.

NIK7908-w

This image was made from the same set of exposures as the one above. I combined the exposures in Photomatix Pro with additional processing in Nik. I received feedback from another photographer, telling me I needed to change my camera settings to minimize noise and also be careful of chromatic aberration. I’ll discuss these topics in future posts.

ROGR7944-w

This in-camera HDR was processed in ACR.

ROGR7904-w

Also in-camera and processed in ACR.

ROGR7880-w

I should have shifted a touch to the left to keep Jobs Peak from hiding behind the wheel spoke.

My lovely bride and I are members of the Friends of Dangberg Home Ranch, and I’ve been working with the Curator on some note cards for them to sell.  Here’s a couple of the options we are discussing.

ROGR4429-2-A9-w

I took this image several years ago when I didn’t know what I was doing photographically. There are those who will argue that I still don’t know what I’m doing, but I’ll leave that alone for now. This image was shot in low resolution JPEG format at the wrong time of day, but I was able to work it enough to make this image – formatted for a large note card.

A9-ROGR4429-1-w

Just for grins, I made it monochrome and applied a sepia filter. This will probably not make the cut for the final note cards.

ROGR7309-A9-w

Better light and better angle. Jobs Peak is visible in the left side of the picture.  This one will be on the note cards.

The Dangberg Home Ranch Historic Park teamed up with the Carson Valley Arts Council for an event called Something in the Wind.  A kite group from Oregon came down and put on a wonderful event.  The wind cooperated, sometimes just a little too much.  Here’s a little of the color from the two day event.

ROGR7400-w

These spinners were on poles – very fun and beautiful.

ROGR7377-w

Can you tell we had good wind? The spinners came down soon after I made this image.

ROGR7359-w

Lots of colorful flags, too!

ROGR7756

And then there were the kite fliers – all shapes and sizes! This little guy worked his kite pretty hard.

ROGR7699

The bubbles were quite the hit on Sunday!

ROGR7487

Kites are very beautiful these days!  A far cry from newspaper and sticks that we used.

ROGR7450

The kite folks put these in the air and tethered them, and they flew all day!

ROGR7417

This young man walked by my booth and proudly announced that he just turned 7 and he got this box kite for his birthday! I enjoyed seeing a father and son spending time together.

I stopped by my favorite Owl venue and captured this Barn Owl!

ROGR7795-w

Looks like a young one by the puffy feathers. I shot this handheld, so it’s not the best focus (camera shake from me and my hands – the low light and long shutter speed also contributed).  A cutie nonetheless.

The nice wet winter brought lots of flowers to the desert.

ROGR7147-a-w

This is the introduction for my next shooting technique – Macro Photography! Stay tuned!

ROGR7839-w

The mountains west of the Carson Valley.

ROGR7853-w

Shot from the road, looking up hill. But the flowers are gorgeous!

I’m really looking forward to my exploration into the world of Close-up and Macro Photography.  Thanks for looking at this blog.

Enjoy – PHOTOROGR

An AMAZING Week for Me!

I have had an absolutely amazing week since my last post.  First, I won both categories of the Eagles & Agriculture Photo Contest this year!

ROGR6924-a-w

This Eagle eating a rabbit won ‘Best Birding’ photo. I made this image in December, when my lovely bride and I drove up on this scene just a few blocks from our home.

PHOTOROGR7934-Cattle-Drive-on-Genoa-Lane-w

Last May, I was invited to join other photographers to record this group of cowgirls moving a herd along Genoa Lane.  This image won the ‘Best Agriculture/Wildlife’ category.

I am both honored and humbled to win.  I stopped by the Carson Valley Chamber of Commerce offices to see the other images.  Holy Cow!!!  What a great group of submissions this year.

My exploration into long exposures of water expanded a little, with the addition of some new software called Photomatix Pro.  This software uses bracketed exposures to produce High Dynamic Range (HDR) images.  In my last blog, I discussed exposure (controlling the light striking the sensor in the camera body).  ‘Bracketing exposure’ means finding the right exposure for a given image and making additional images of the same scene by overexposing and underexposing.  HDR software then combines the different exposures by selecting the best parts of each to create an exciting photograph.  For example, in a landscape, the underexposed images give the best skies but renders the shadow areas black and without detail.  Conversely, the overexposed images give great detail in the shadows but loses detail in the highlights.  HDR allows the pixelist (see how I got my title in here!!!) to use the best light to make a great image.  Some cameras will make the HDR image for you, or you can combine them using HDR software on the computer.

ROGR-PM-0231-w

Here’s a landscape that I shot a couple years ago near Kernville CA. I used three images at different exposures to make this one. Set exposure to capture the sky and you don’t see the rich color in the rocks. Set exposure for the rocks and you see a bright white sky with no detail in the clouds.

ROGR-PM-0236-e1-w

Another HDR near Kernville. Yes, it was chilly and we got wet a couple times that day!

ROGR-PM-0376-w

A waterfall on the Kern River in HDR.

ROGR-PM-3607-w

This image of the Church at Bodie CA was made from two exposures, merged in Photomatix.  I need to go back to Bodie so I can get  shot that doesn’t cut off the steeple, and to make other images, too.

Learning this new software has been a lot of fun.  As you might imagine, I can get a little crazy in the processing.

ROGR0365-e4a-w

I made this image of a wagon on one of the local ranches in January. I’ve been trying to process the image to fit my vision for a couple months. This is nice, but it doesn’t convey the feeling I wanted to share.

ROGR0370-Painterly-4-a-w

When I processed the image in Photomatix, I found what I was looking for. One of my photo mentors thinks it’s over done, and I respect that. My lovely bride thinks I should crop it differently. Bottom line – there’s no right or wrong. What’s that old saying? Beauty is in the eye of the beholder.

ROGR2514-e1a-w

Please recall this image from last Fall. I photographed this bird condo in Walker CA.

ROGR2512-Surreal-1-w

I revisited the image to explore the boundaries and capabilities of Photomatix. The result is over done, but kind of fun. Again – the eye of the beholder.

ROGR3387-hdr-a-w

West Fork of the Carson River in Hope Valley. This HDR image was made from 5 exposures, and is a traditional processing.

ROGR3387-fused-w

The same HDR image, with a little fun. I went here because I was struggling with ‘ghosting,’ a problem when the images don’t align exactly (like the wind blowing the tree branches). The processing I chose here masks the ghosting a little. It’s a fun interpretation of the scene.

ROGR3367-hdr-w

Simple HDR from 3 exposures. With this image, I was more about the flowing water. I gotta say, however, that I hope there’s still water flowing when the vegetation leafs out to add a little color.

ROGR3367-hdr-bw-a-w

I processed this image in HDR, then decided to play with monochrome. Absent color from the vegetation, I like the effect.

ROGR3292-pmx-w

The HDR in this image is right on the edge of going too far, but I like it.

And I haven’t been on the edge all week.  We had a nice sunny day, and the birds and bees were visiting the yard.

ROGR3459-1-e2a-w

This Lesser Goldfinch Hen challenged my very limited identification skills.

ROGR3426-a-w

I was in the backyard enjoying the warm when I spied this butterfly on our Flowering Plum tree. I got the camera and made a few shots, but couldn’t help noticing the buzzing sounds…

ROGR3444-a-w

…and several of these guys were working their magic. They’re harder to take pictures of than I thought.

ROGR3434-a-w

My favorite image from the day. A large aperture opening gave a very shallow depth of field (the flowers in the foreground are blurry as are those in the background). The black and yellow against the vivid pink just hit the spot for me!

Well, that’s it for this week.  As you can see, it really was an amazing week!  Until next time – Enjoy!  PHOTOROGR