All my life, I’ve used catch-phrases. During my brief law enforcement career, we all said, ‘Felons are inherently stupid!’ In my military career, I said , ‘Leadership is not a popularity contest!’ (Okay, I also used that one in my civilian work, too!) But now I have a new catch-phrase.
A few days ago, a good friend sent me some pictures of wildlife that were in his backyard. He commented that they weren’t like my pictures. His comment got me to thinking about how to respond. I came up with, ‘Don’t judge your photography using other people’s pictures!’
Then my mind exploded! I’ve avoided anything even remotely profound for many years and here I was. My mind is thinking – that’s good advice outside the photography world, too. Live your life and don’t use other people to determine your self-worth.
DON’T JUDGE YOUR PHOTOGRAPHY USING OTHER PEOPLE’S PICTURES!
With that said, here’s a few pictures from the past couple months. The first set is the result of chasing the Big Boy Locomotive around northern California earlier this month.
This is the Big Boy as it approached the Clio Grade Crossing!Our next contact was the Williams Loop!We hadn’t planned on this being our final contact as the Big Boy was between tunnels exiting the Keddie Wye, but traffic and construction zones had other plans!A family of Great Horned Owls visited our neighborhood every evening for a couple weeks. It’s nice when the wildlife comes to you for a change!I spent a few days in southern Oregon and northern California taking pictures of waterfalls!I made some new friends and had a wonderful time!We got up early and visited the Hot Air for Hope Balloon Festival!But we went out for breakfast with friends after the balloons took flight!A friend and I found some young Yellow Bellied Marmots who were very accommodating!And I’ll finish up with a few wildflowers from the nearby mountains!It was a hike that day, but what a glorious day!
For me, there are three kinds of Eagle pictures: Portrait, Interesting, and Action.
Portraits are an Eagle perched in a tree or on a fence post, sitting in the traditional regal pose with wings folded and beak raised slightly, head not quite in silhouette. This pose tells the world that they are the masters of the air.
An interesting picture is one where the Eagle cocks his head, looks down to survey its hunting ground, maybe some preening or flexing wings a little. The Eagle is on its perch but not assuming the regal pose described above.
Action photos speak for themselves. My action photos tend to be the moment of liftoff from a perch, possibly a couple more frames depending on the direction the Eagle takes. Sometimes, I can capture an Eagle in flight – generally tail feathers as they fly away (laughing all the way). Simply put, action photos imply movement and this post is about Eagles in motion! Now you understand the title of the post.
I have been fortunate to capture Eagles in flight at times, but never on the scale I’ve attained in this young Eagle Season (we’re just over halfway in!). I attribute my success to more patience while shooting, holding on a bit longer when photographing Eagle portraits and watching for the telltale signs that they Eagle might take flight. I also thank the Canon engineers for making their autofocus systems so much better so the camera holds focus on the subject in motion.
There are some challenges to making the liftoff pictures – let’s discuss them. Every decision in photography starts with the exposure triangle: aperture, shutter speed, and ISO.
Aperture is the opening that allows light onto the sensor. Large apertures allow more light but have a very short depth of field. Small apertures allow less light and have a deeper depth of field. Depth of field is the amount of the image that’s in focus, from near your camera to far away.
Shutter speed is the time the shutter is open. A fast shutter speed freezes motion and a slow shutter speed allows motion in a picture. A fast shutter speed keeps the detail in the Eagle in flight, and a slow shutter speed allows the wings to blur a bit.
ISO is the level of sensitivity in the camera’s sensor. A high ISO allows for taking pictures in lower light but introduces noise in the image. Modern camera systems are getting better every day in minimizing noise.
That’s not a detailed discussion of the elements of the exposure triangle, but it defines the terms enough for our discussion. One of the biggest challenges to Eagle photography is the color of the Eagles. Golden Eagles have dark brown feathers. Adult Bald Eagles have white heads and dark brown body feathers. Juvenile Bald Eagles have a mix of colors as they mature. The human eye can easily discern the difference in these colors, but cameras can not interpret the same tonal ranges. This makes proper exposure critical.
What is proper exposure? That depends on a multitude of other factors not directly related to the camera. Golden Eagle? Bald Eagle? Adult or Juvenile? Bright sun or shadow? My perfect conditions for Eagles is a slightly overcast sky that soften the sunlight, regardless of subject or surrounding area. I don’t get that often, so I have to make my settings match the light.
Then there’s the optics. I take pictures of Eagles using long focal length lenses, an 800 mm lens and a 100-500 mm lens. I also use a device called a teleconverter that magnifies what the camera sees. Remember my brief discussion on depth of field above? It gets more complicated because the longer the focal length on the lens, the depth of field compresses (becomes shorter). The longer the focal length, the less light can enter the camera body and hit the sensor. The best solution is higher ISO, but that introduces noise. Thank the engineers for making denoise software that corrects for that in the digital darkroom.
So that’s basic considerations. If your subject is in good, even light, shooting would be easy. But I want to be ready for the eventual liftoff so that’s where my settings are. I have my cameras set to shutter priority (Canon labels it Tv), 1/2000 second to freeze motion. At the focal length of my lenses, I let the camera pick. The cameras choices are limited however, so the piece of the exposure triangle that floats is the ISO. I set my cameras to Auto ISO, but I have a limit of 12,800 so I limit noise somewhat. Those settings generally serve me well, except in very low light (like an Eagle that has flown into a pine tree in a shadowy section).
Enough tech talk – let’s get into the pictures! All these images have been made in the last 2 months. Some of them have been on social media. Enjoy – PHOTOROGR
This is my new favorite Eagle image. I saw him in a tree along a Creek where I’d never seen an Eagle before, but I drive by very slowly these days just in case!
My lovely bride and I visited Yosemite National Park in August 2017. The schedule was driven by a night photography workshop in which I participated. We decided to spend a week there and had a wonderful time. In one of the gift shops, we found a poster with ‘Orland’s Penultimate Compendium of Photographic Truths’. It hangs in a frame in my Study, just to the left of the Digital Darkroom (aka my computer desk). The Compendium is a list of mostly humorous statements:
“The best scenic turnouts are clearly designated by highway signs reading NO STOPPING ANYTIME.”
“Falling cameras are attracted to rocks.”
“At critical moments your camera will alert you to amazing photographic scenes by flashing the words WARNING: LOW BATTERY”
In the tiniest of fonts near the bottom of the poster is this statement: “The First Rule of Photography: BE THERE!”
Those two words have so much meaning. They describe a concept so simple, yet so true. BE THERE! One cannot make an image of the Grand Canyon, or Old Faithful, or a steam locomotive, or an Eagle flying along a river without being there. For the travel photographer and tourist, landscape scenes are done by simply being there (even though one must be there when the light is best for truly great pictures, but that’s a whole different post).
For the wildlife photographer, life is a bit different. Sadly, critters have their own schedule and their own view of the world. I’ve said it many times, critters don’t take direction! They won’t tip their head or turn their bodies when one asks them to. They arrive and depart on their schedule, with little to no regard for the person standing there with a camera. How rude! And ask them to sign a model release. Forget it!
A couple days ago, I was out looking for Eagles in an area that I know they hunt. The roads go up mountain passes and have closures during the winter for obvious reasons. I had just driven along a stretch of river and reached the closed gates. Preparing to turn around, I saw this Eagle fly up from the direction I had just driven. He landed in a tree and gave me a look that seemed to say, “Well, you didn’t stop for pictures before so here I am now!” I obliged and got some fantastic images, and I gave thanks to that Eagle and the Photo Gods for sending him to me.
I’m not always fortunate to find exactly what I’m looking for, so I take pictures of the wildlife I find and frequently of the gorgeous scenery I’m passing through. This post is about the wildlife I’ve been finding while out looking for Eagles this season.
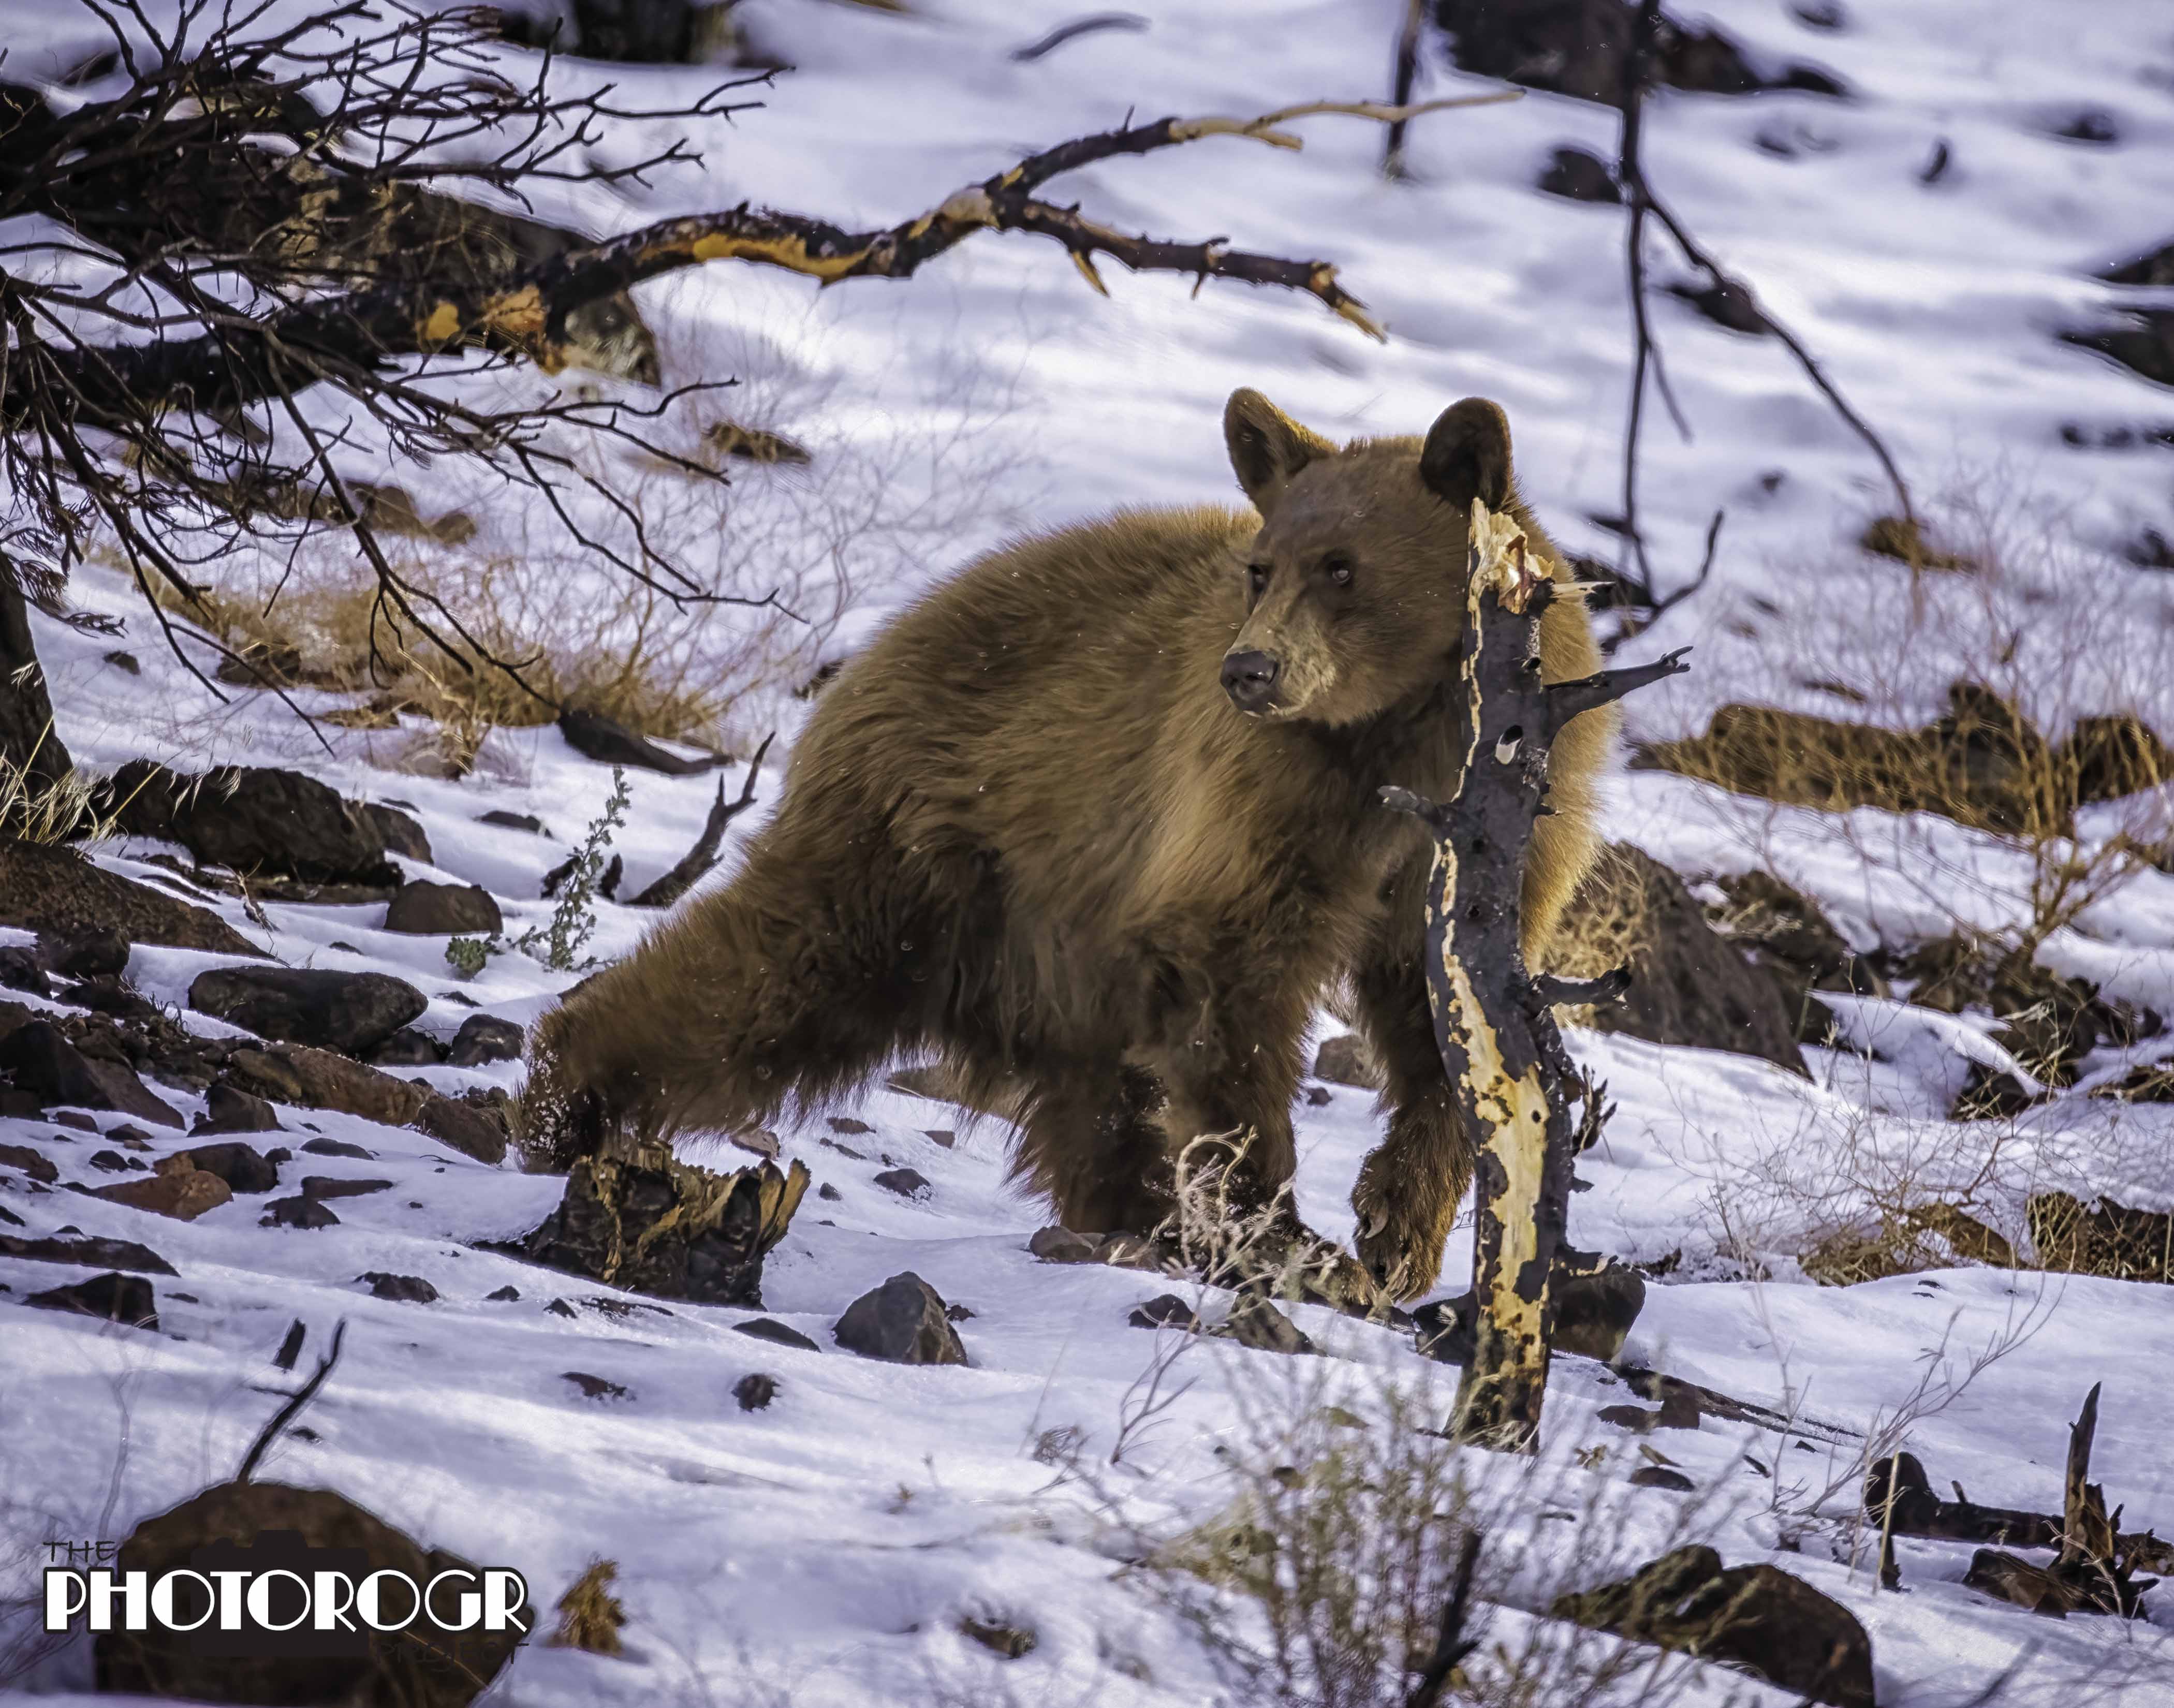
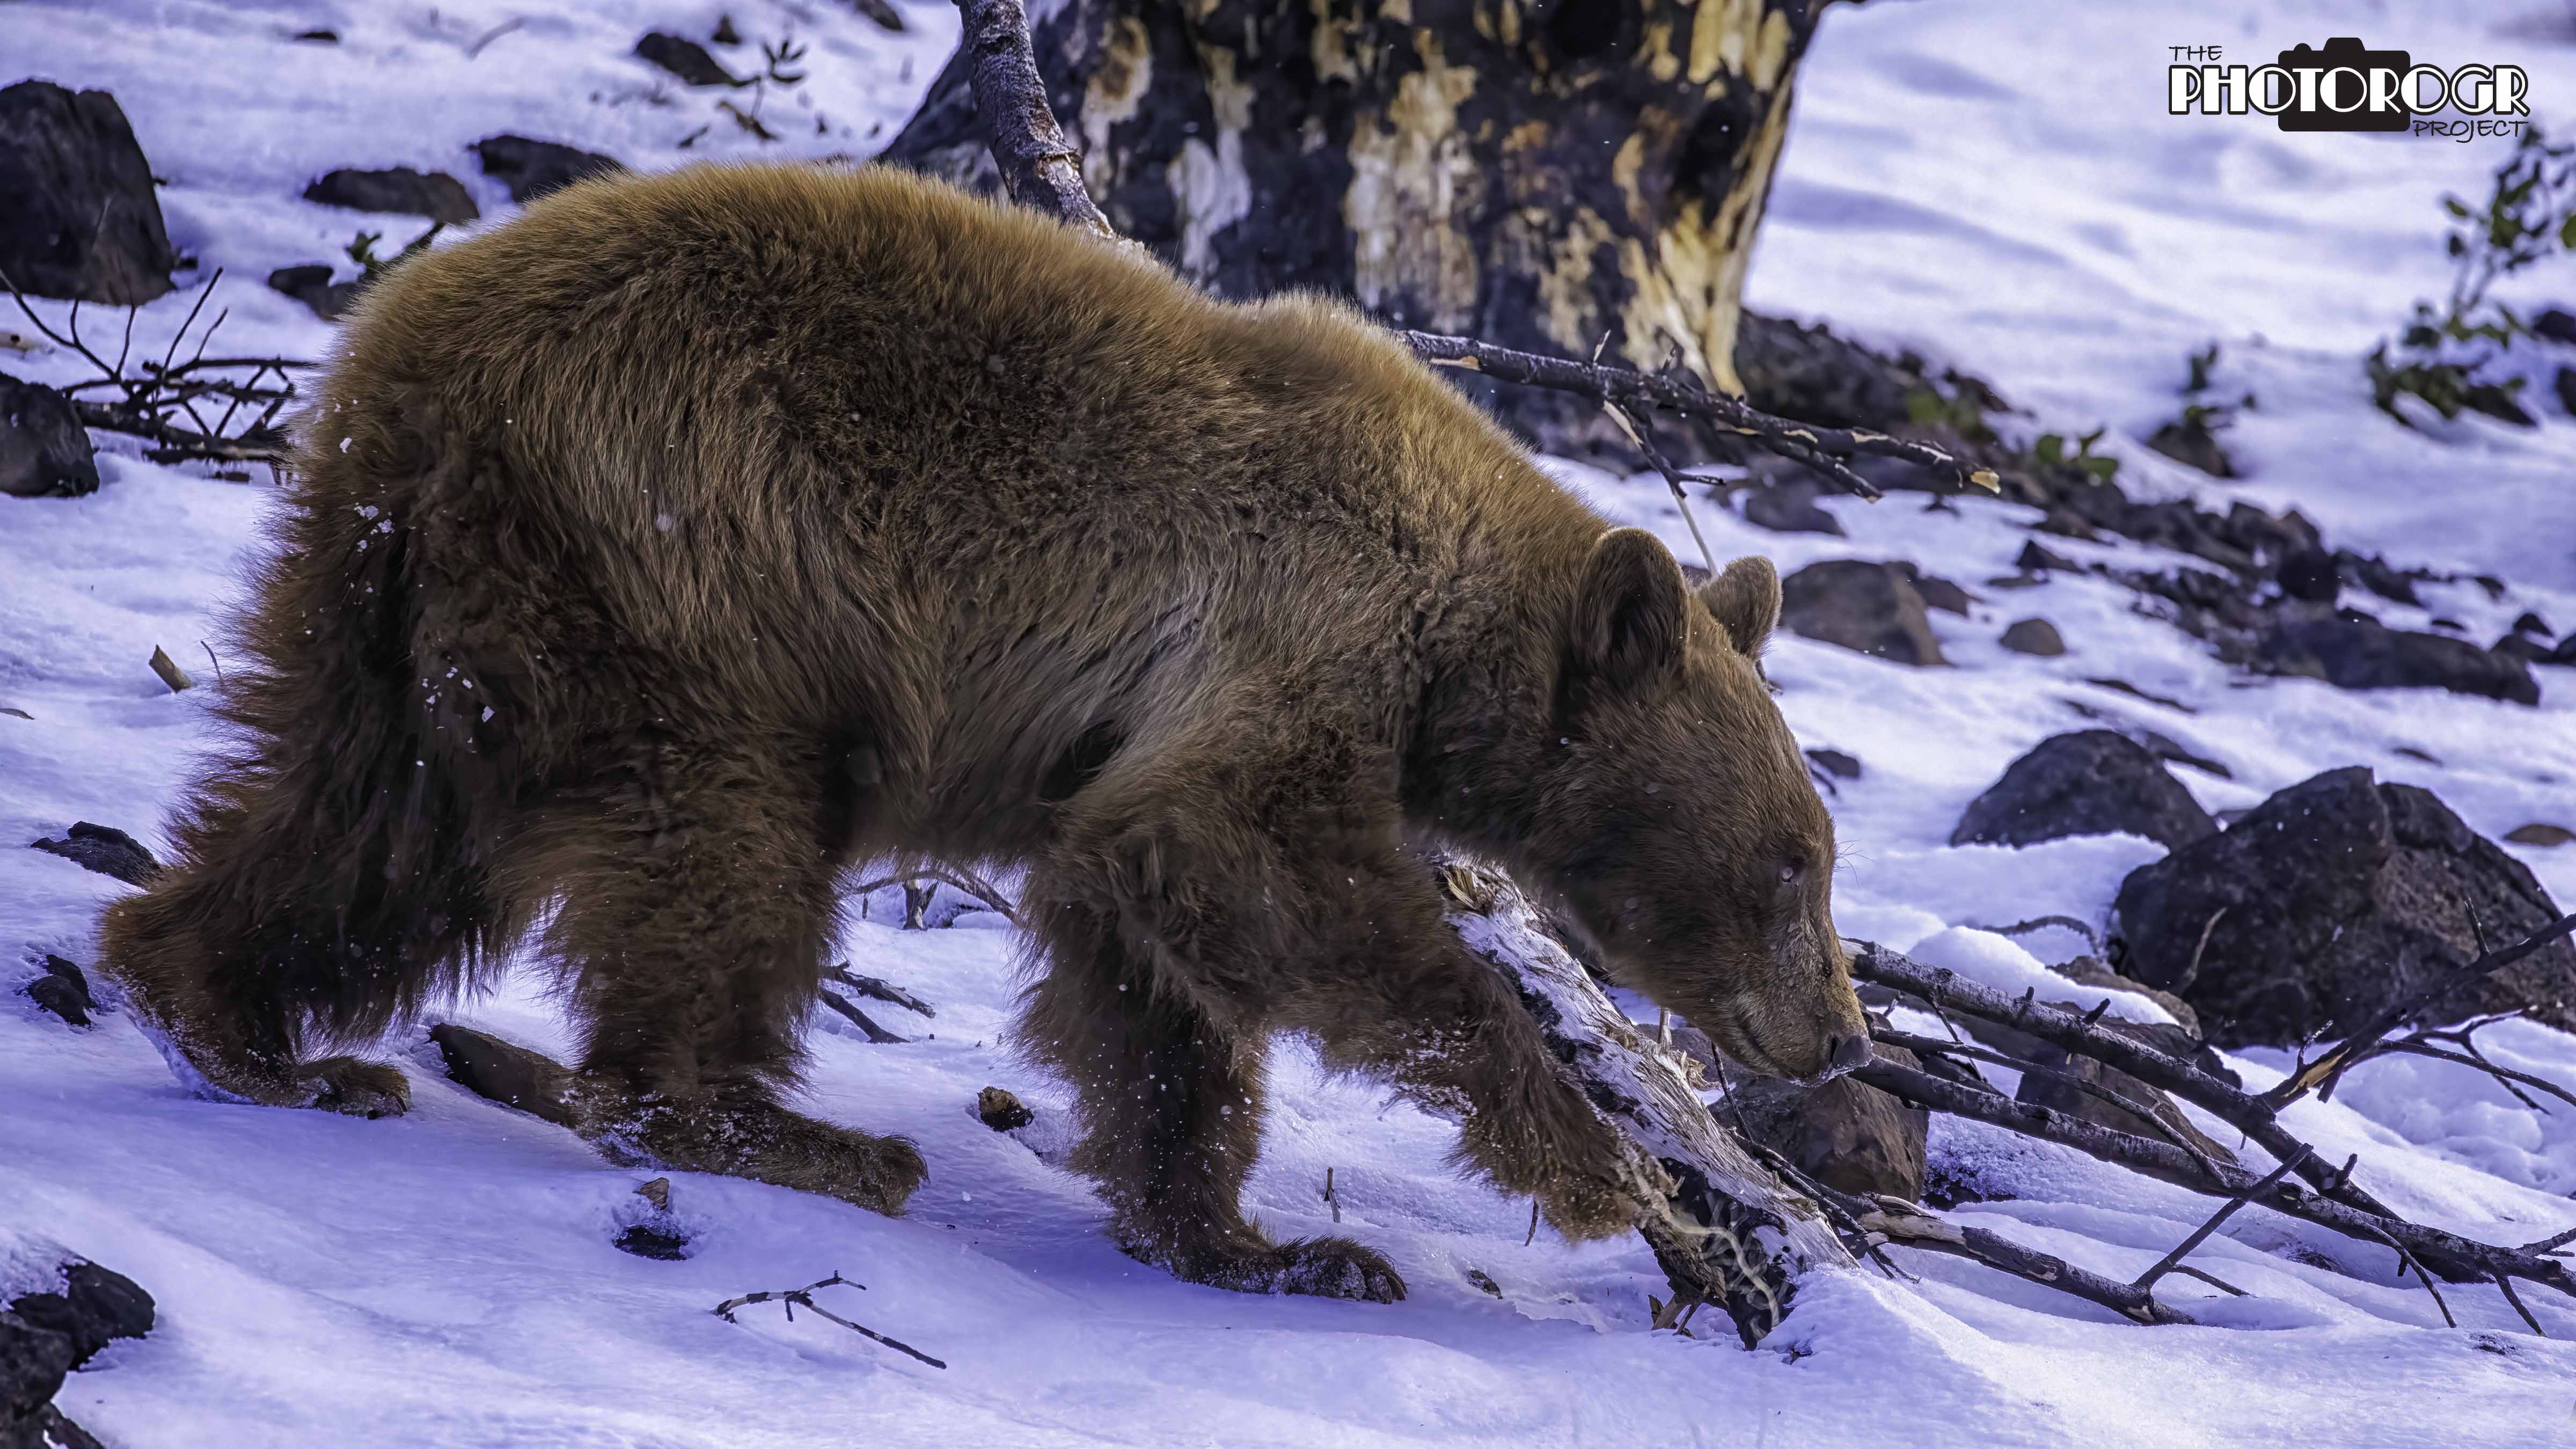
A couple weeks ago, my scheduled spotter canceled at the last minute so my lovely bride came with me. We were driving to the Eagle area when she suddenly says, “There’s a Bear!” Sure enough, this handsome critter was about 20 yards off the road and allowed me to grab a few shots.
Sometimes, the predator is a bit smaller. Like this character.
I was hiking the road behind the closed gates when I saw this Coyote near the river. I tracked him through the brush, across the road, and up the hill.
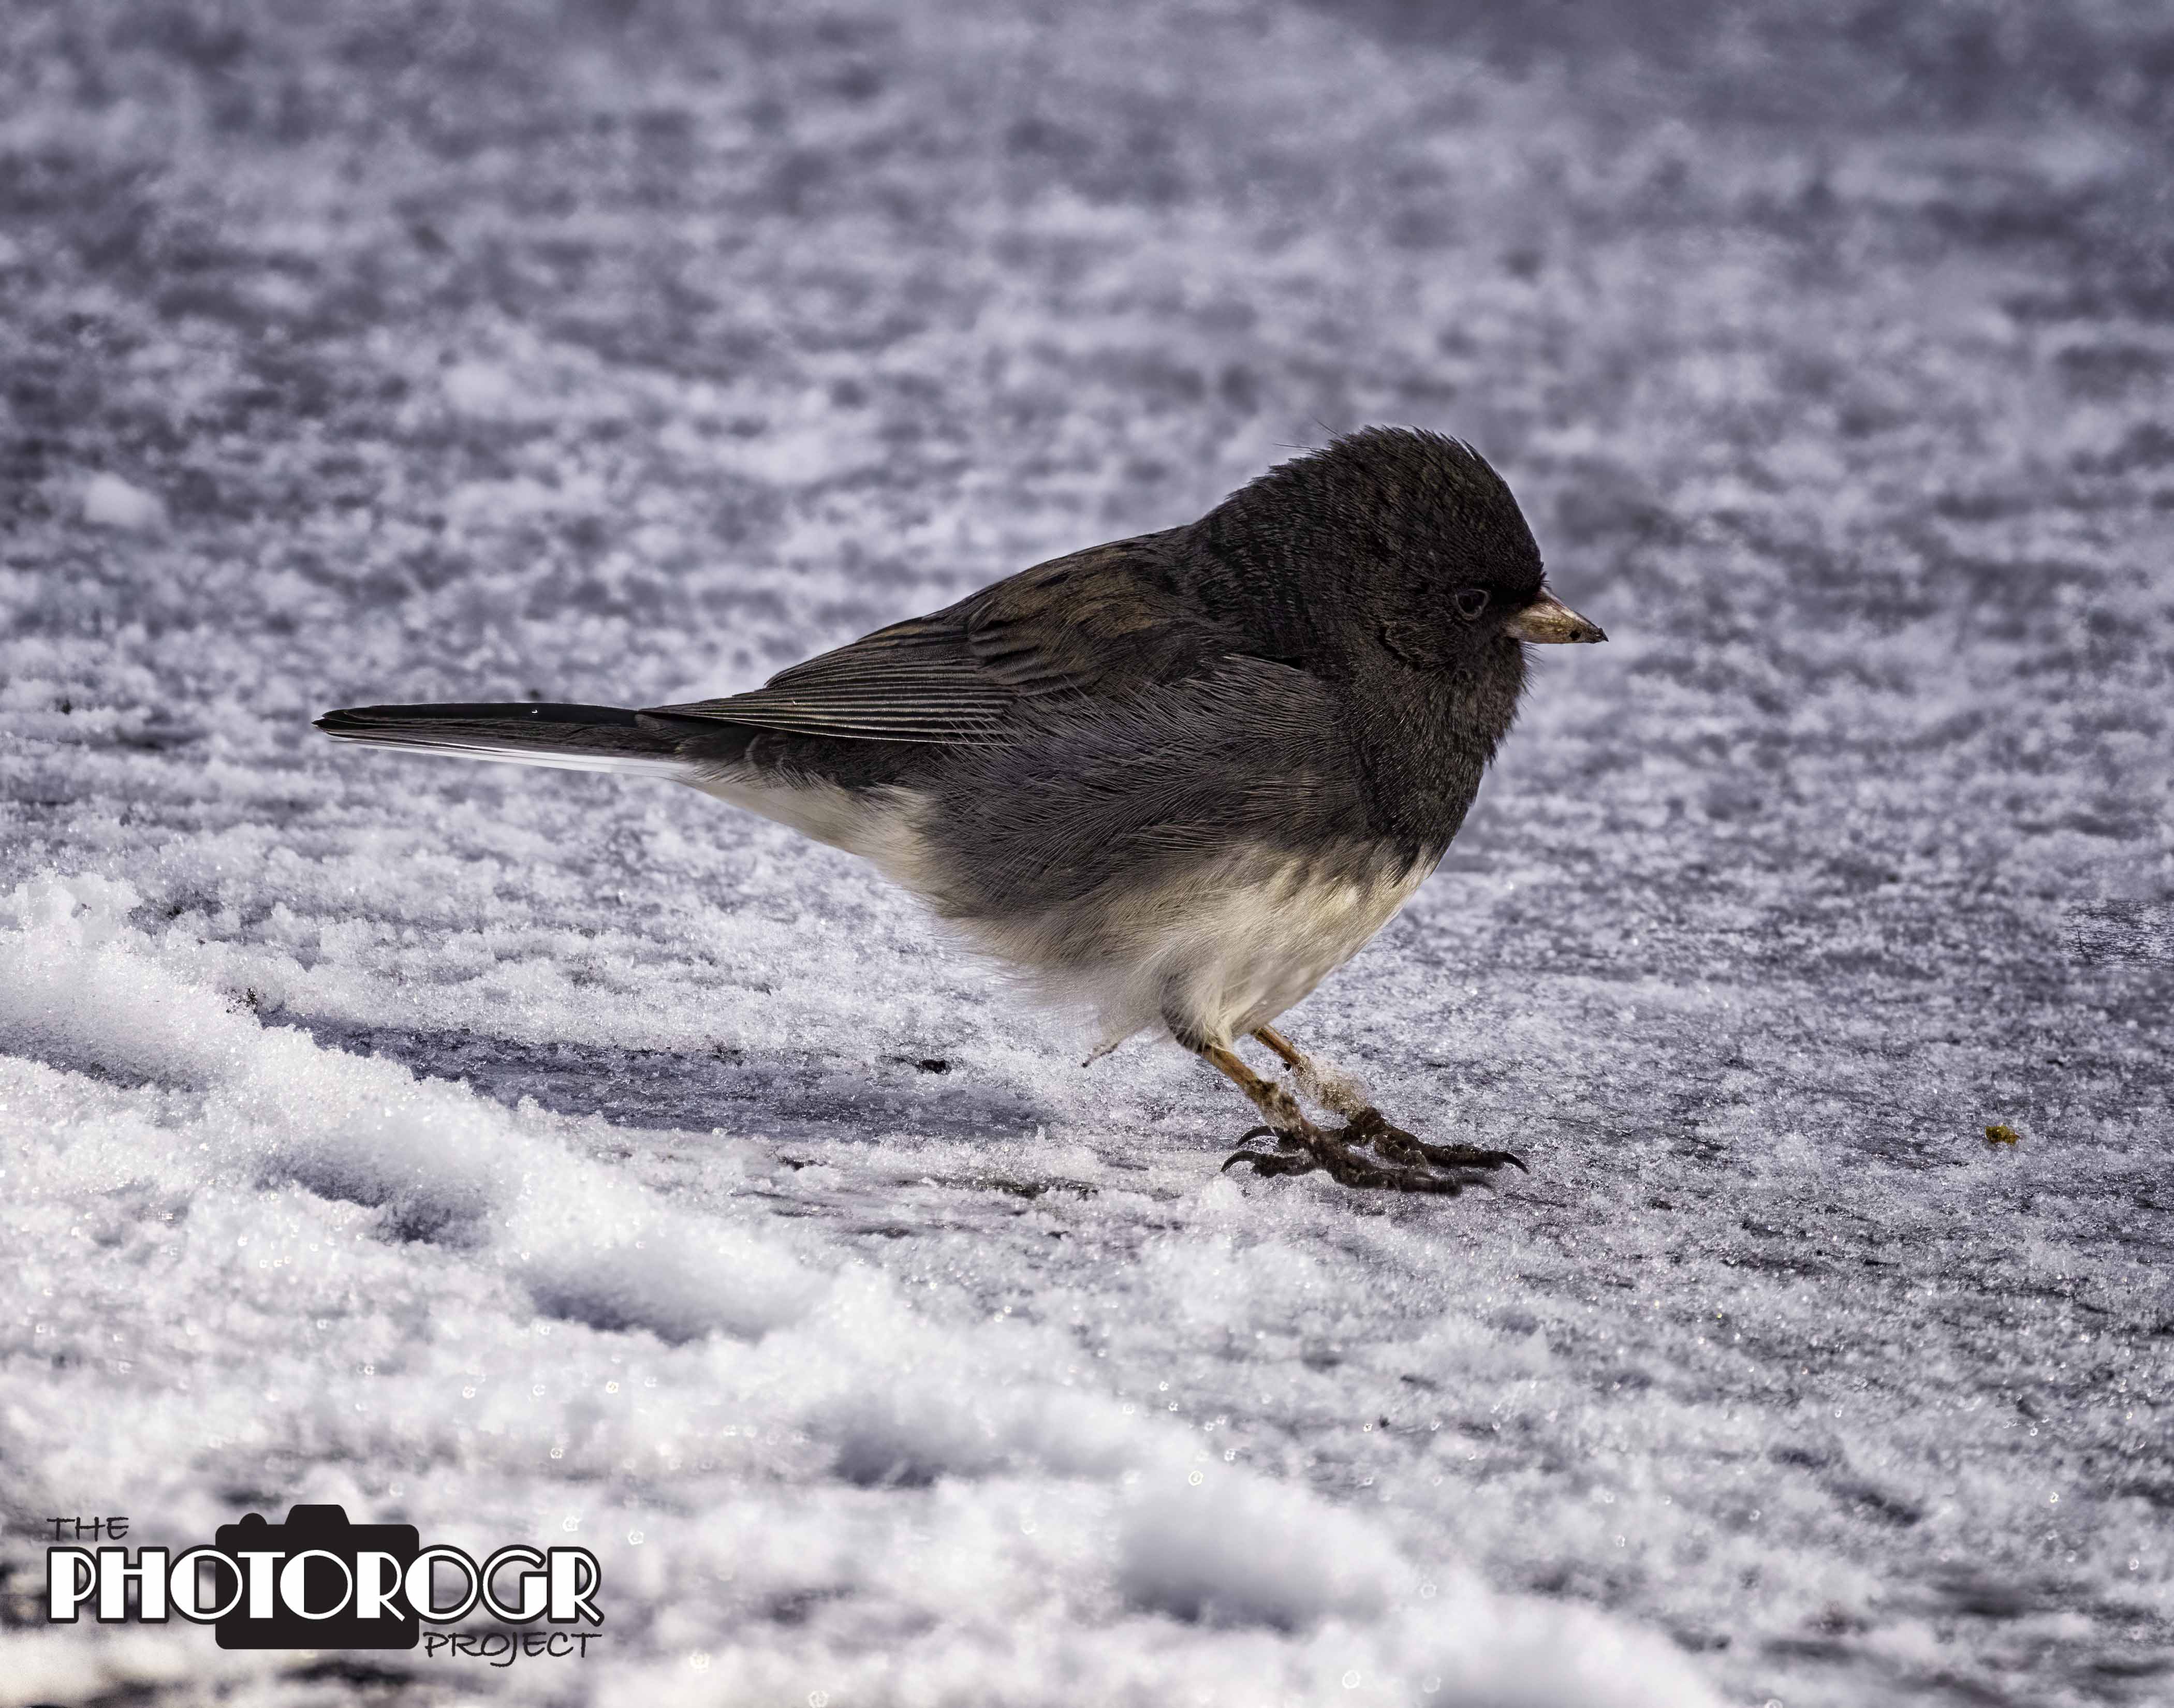
Sometimes the subject is small, like this little Junco who was hopping the snowy road while I was hiking. He was not concerned about me until I knelt down to get a better angle, then he took flight. Darn it!
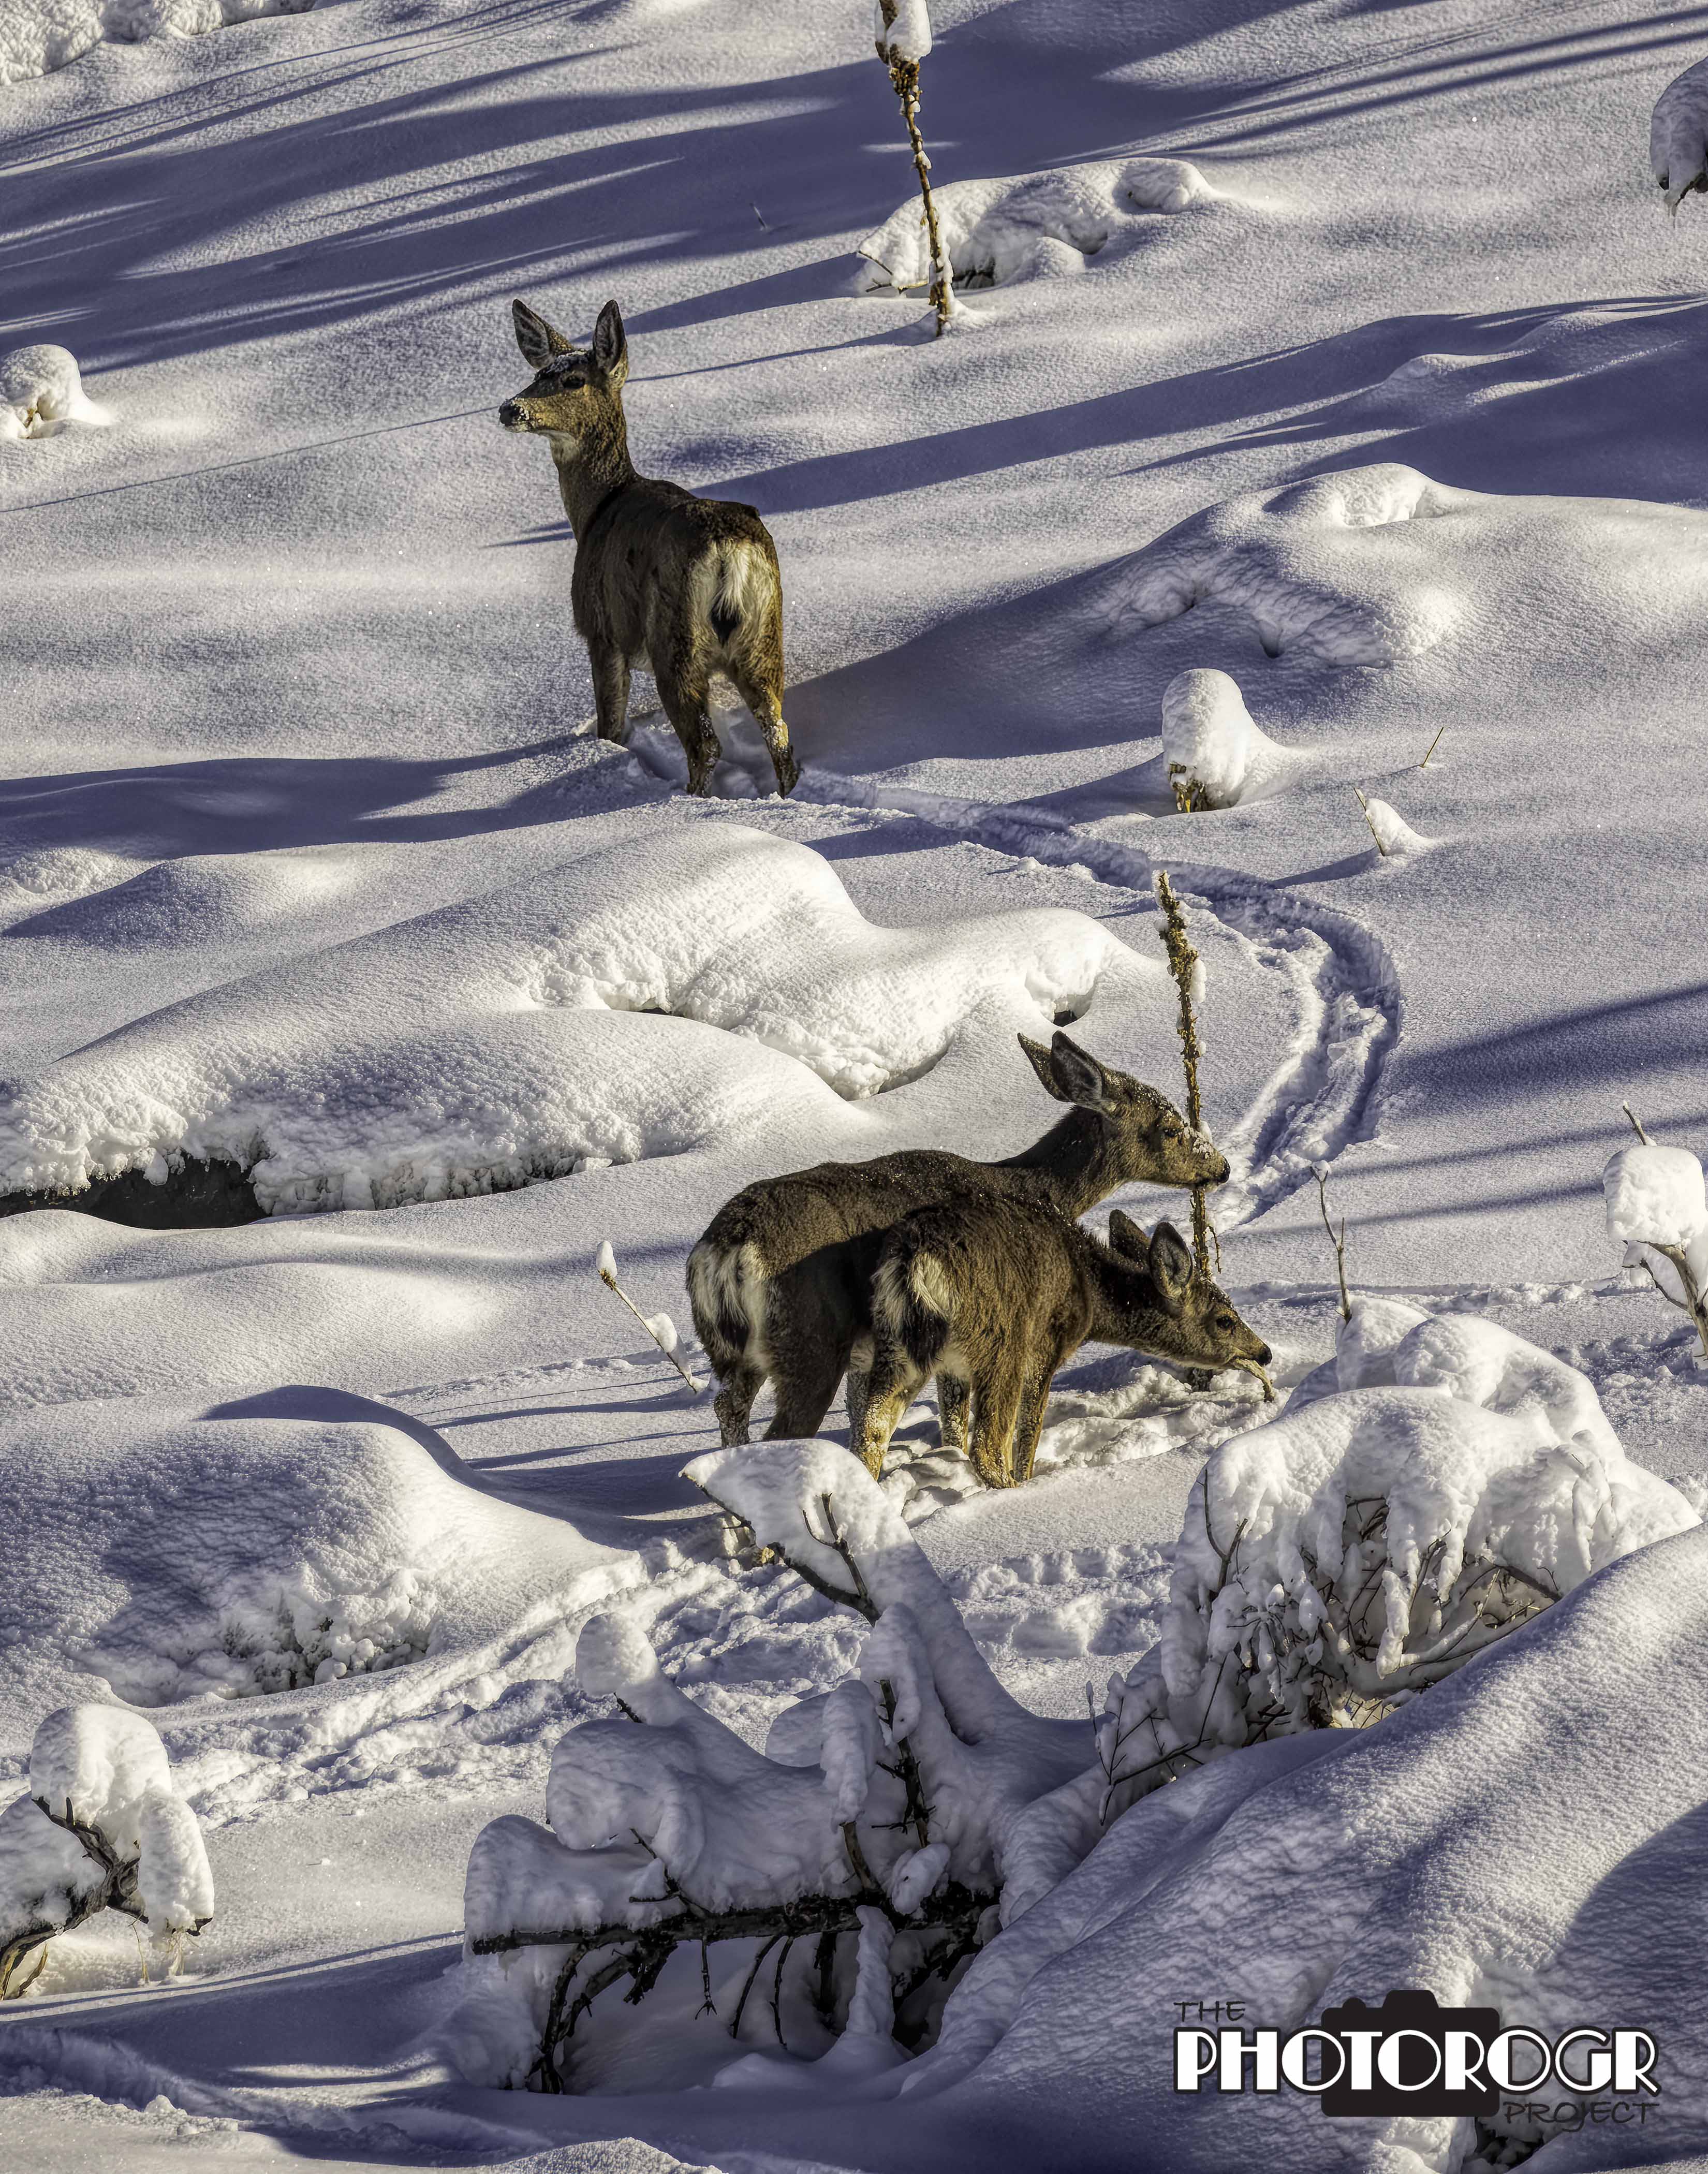
Occasionally, I get a real treat. I had seen their tracks in many places along the road, but I came over a small rise and these three ladies were in the road. They quickly went up the hill, but stopped to let me get several images. This one is my favorite.
If I hadn’t been there – even though I was there for a different purpose – I wouldn’t have gotten these images! These two words have become my new photographic mantra – BE THERE! But watch for rocks under your feet and keep your batteries charged! I love what I do, and hope that you do, too.
Well, the Eagles and the Photography Gods have been very good to me in this young Eagle Season! I started heading to my regular area in early November and was not disappointed. I have not come up empty for Eagles this year (knock on wood!). I don’t always get pictures, but I see them. This Season has also provided some bonus pictures. Read on!
I have been most fortunate with my action shots this Season. I’ve had my camera up and ready when they take off!
I amazed myself with this one! I haven’t had luck in the past ‘getting glass on’ a flying subject, much less getting a usable image.
One of the greatest challenges with Eagles is getting proper exposure, especially in full sun. Their bodies are dark brown and their heads are white (I know, that’s obvious!), so how does one get an exposure that works? Well, I generally underexpose the keep the head from being ‘blown out’ (meaning totally white with no detail and no recoverable data) because software is much better at recovering detail in the shadows (darker areas of an image). The key is to watch the histogram while shooting to ensure that there will be usable data.
This guy was out on a blustery day. Note the feathers being moved around by the wind. He doesn’t look happy, but Eagles always look like that. They’re just serious.
I can’t help but think about vampires when I look at this picture. But I know he doesn’t want to drink my blood!
Another thing that amazes me about Eagles is the position of their wings in flight. A fully mature Eagle’s wingspan extends over 6 feet – wider than most people are tall! And yet, they are so graceful in flight.
While this Eagle appears to be out of control, he was just taking flight.
Here’s the bonus content!
Kingfishers are small and fast, and very camera shy! I saw this guy across the river and was able to capture him in pixels before he took flight!
When I’m in the ‘hot zone’ in the area I look for Eagles, I usually drive at about 10-20 mph (but I keep an eye on my mirrors to ensure I’m not blocking traffic). I call this ‘slow rolling.’ While slow rolling one day, this shy guy was on the road and quickly jumped into the brush. I was able to get this image before he disappeared.
And the ultimate bonus prize this year was this youngster. I was slow rolling around a corner and there he was in the middle of the road. He looked up and saw me, and bounded up the hill! I quickly parked and got out of the F-150 to see if he would be visible, and there he was up the hill. My RF 800 lens used every millimeter of focal length to get this image.
And so, I’m off to a good start this year. I have a bunch of pictures of Eagles sitting in the trees, but I wanted to share the action shots. Stay tuned – there will be more in the coming weeks!
When I began blogging almost 6 years ago (has it really been that long?), my blogs were all about the fun new things I was learning about photography. This blog is trying to get back to that kind of sharing.
During the recent madness, I’ve found myself staying closer to home. Because of that, I’ve actually come close to getting my money’s worth from the several photography training subscription sites to which I belong, and I’ve tried out a few new ones.
Recently, I watched a webcast about a technique called Intentional Camera Movement (ICM). Simply put, the concept involves the use of long exposure techniques to capture movement in an image. There are two main methods of creating movement: manipulating the camera or allowing an outside influence, wind for example, to create movement. Long exposures can be created by several means, but the simplest for me is to use neutral density (ND) filters to limit the amount of light passing through the lens and striking the sensor in the camera body.
Until this webcast, my use of ND filters has been limited to smoothing water to create a pleasing image. This image is one of my favorites.
This is not my first attempt at creating movement in an image. Several years ago, I participated in a weekly photography challenge, where I tried different photo techniques each week. One of those techniques involved changing the focal length on a zoom lens with the shutter open. Here was my top image from that week’s challenge.
And then there was that day several years ago when I was out looking for fall colors. I found some, jumped out of the truck, and began shooting. Thankfully, I checked my camera after a couple shots and realized that several of my camera settings had changed. I fixed the settings, but have these two interesting images as a result. I call the technique ‘Accidental Camera Movement.’
With that background information, here we are in present day. I took a drive into the Sierra Nevada Mountains yesterday to play with a new lens. I found some flowers and got a few shots, but the wind was bouncing the flowers around so I grabbed my ND filters and tried the wind movement technique. My Canon 6D Mk II was mounted on the tripod and the filters were in place. I stacked my filters to reduce light by 16 stops, which gave me a comfortable exposure 3-4 seconds. This was just right for the experiment.
Very fine art and very fun! I continued my adventure and found other subjects – including a nice waterfall – and then found a subject for trying actual camera movement. I first tried the camera on tripod, but didn’t get enough movement to make me happy. I moved to handheld and exaggerated the movement even more. Voila! (That’s my high school French kicking in!)
Yes, this is a very overdone composition, but we all have to start somewhere. This is just the beginning into this fun technique. Stay tuned to see where it takes me.
In my last post, I talked about the Digital Darkroom (or Double D) and the fun I was having while exploring the application of creative filters. For today’s post, I used an image made with my PowerShot G9X Mk II point and shoot camera (hence the PS Challenge piece of the title).
I don’t remember where I was going last week, but I remember that the light on the Sierra Nevadas was gorgeous. I pulled over and got out of the truck, grabbing my trusty PowerShot, and began clicking. I always bracket exposures for my landscape shots to decide during post processing what I am going to do. I bracket up and down one stop with this camera. I used all 3 exposures to merge them into an HDR in Adobe Camera Raw, then applied filters using Topaz Studio.
Just for fun, I processed this using three different filters.
“Owing to an inherently mechanical nature, a camera (be it film or digital) essentially produces raw images that, on their own, are rarely able to adequately communicate the enigmatic complexities and expressive nuances of a subsequently crafted fine art photograph. Post-camera image manipulation has always been a basic tenant of the photography process.”
That’s how Huntington Witherill started his article ‘Beyond the Camera’ in the November 2018 issue of Outdoor Photographer magazine. It caught my attention immediately! I enjoy reading Outdoor Photographer and have used information from its wonderful articles in previous posts. In the article, Witherill describes the time he got to visually inspect an original 8 x 10 inch negative produced by Edward Weston circa 1930. The negative had “…what appeared to be a considerable amount of pencil scrawling on the emulsion side …” Kim Weston, Edward’s grandson, explained that “…Edward had often used very soft pencils (and a small light-table…) in order to build density in chosen areas of his negatives…” After this experience, Witherill realized that what he refers to as ‘post-camera image management techniques’ “…comprise not only a significant part of the overall photographic process but also, in many respects, the very essence of photography technique.” He continued, “…post-camera image management techniques are a necessary and integral part of the overall photography process.”
Witherill talks about having a strong foundation in “…photography technique and craft…” to take what one sees, combined with knowledge of what a camera can record, and create a finished visual record. His process begins with knowing your equipment so you can start with a strong foundation (what I would call the best exposure) to build on using post-camera tools and techniques. The article talks about artistic expression and making the image say what the photographer wants it to say.
In the several years since I’ve been pursuing photography seriously, I’ve had similar discussions with my friends and mentors. Many of my friends have backgrounds in photojournalism which doesn’t allow for manipulation, save for minor dodging and burning (darkening or lightening) areas of an image. Other friends document events for clients, where the volume of images made does not allow time for post processing.
I consider myself an artist. I am not documenting, rather I am recording for artistic purposes. I have always favored manipulating my images, and have worked to make the subjects closely resemble the moment as I remembered it. After reading this article, however, I decided to pursue more artistic interpretations, depending on the subject.
I think it’s gonna be a lot of fun! And so, how much is too much? Only time – and future images – will tell.
With this new creative process, I have been playing with some images. The images below show a ‘straight’ version compared to what I call a ‘more radical’ interpretation. As always, feedback is appreciated.
Enjoy – PHOTOROGR
This is an American Kestrel, processed to highlight the details of the raptor.
Same image, a little softer.
The beautiful Sierra Nevada Mountains. I used a Topaz filter to make the composition a little bit abstract. I think this filter minimizes the foreground, accentuates the sky, and maintains the integrity of the beauty of the mountains.
The same image with a Nik filter to maintain the details but give more depth to the colors.
From January to the end of June, I was in Wyoming with my Dad as he transitioned to life without my Mom. I had a birthday while I was there, and my lovely bride sent me a book titled zen camera creative awakening with a daily practice in photography by David Ulrich. The book has been an enjoyable read, providing insight into the creative process instead of technical information. In the last couple days, I read a section titled ‘Beginner’s Mind.’ Two paragraphs in, the author says, “Always be a beginner.” The discussion then focuses on past experiences coloring what one does and thinks, and transitions into a discussion of why photography can change the pattern.
“Photography is an ideal entry to the beginner’s mind. It invites fresh seeing. It enlivens the commonplace, and can radically open your mind to what is. Since the world is always new – no moment ever repeats itself – you must flexibly adapt behind a camera.” (emphasis added)
The format of the book is discussion followed by practical exercises, identified by the title ‘TRY:’ In the ‘TRY: Cultivate Beginner’s Mind’ section, Ulrich writes, “Artists and photographers often engage the unending search for what is new and fresh. They shake things up from time to time, trying to break free of well-worn grooves of thought and expression. They resolve not to solely rely on past accomplishments. Innovation looks toward the future. However, newness for its own sake is a double edged sword. It can lead to gimmicks or forced behavior just to be different. I prefer the word freshness, like ripe fruit before it stales.”
As I read the book, I reflected on my photographic journey – the excitement of learning a new technique, trying new camera settings, seeing a different perspective of a longer lens or shorter lens. I appreciated the information provided by the author as much of my passion for photography and excitement to continue comes from the freshness of these new or different concepts. For some time, I realized that my view of the world has changed. I look at the light and the contrast the light creates. I evaluate all that I see with an eye to composing an image and then consider how I would record it. In some ways,
In some ways, I have gotten complacent. I know what I like (and don’t like) in an image of a raptor. I have my workflow for shooting a landscape and processing the image on the computer. I’ll heed Ulrich’s advice, however, and try to look at the world anew, with a fresh eye.
Recall that during last year’s fall colors, I was on the road working for FEMA and missed it. I’ve made up for it a little this year, catching color in Colorado and Nevada.
Enjoy – PHOTOROGR
The Colorado Rocky Mountains south of Avon CO.
This was mid-September. They had color much earlier than we did in the Sierras.
But the Colorado Rockies are a little bit higher.
A view along US Highway 24.
Echo Lake, on the way to Mt. Evans.
Along US 24, just downhill from Camp Hale.
I took a drive up CA Highway 4 to Ebbetts Pass.
The colors did not disappoint.
And the skies cooperated as well.
A wonderful shooting day.
I put on my hiking boots and headed up the Pacific Crest Trail from Carson Pass on CA Highway 88. Not much color up there, but some beautiful photo opportunities nonetheless.
Downhill from Carson Pass is Red Lake. I found this scene on a back road nearby.
I am very excited to have four of my pictures featured in the Carson Valley Chamber of Commerce 2018 Calendar. This is the fourth year the Chamber has featured my images in their calendar.
Contact the Chamber at http://www.carsonvalleynv.org/ or by calling 775-782-9490 if you want to purchase a copy.
I submitted 12 images this year.
This view of Jobs Peak was taken just south of Mottsville Lane.
I was out one snowy morning and made this image of the historic buildings in Genoa. This image is featured on our Christmas cards this year.
These horses on Waterloo Lane have become a favorite subject. When I arrived the day I made the image, the horses were scattered about their pasture, but these two walked up to each other as if to say, ‘Do you think he has something for us to eat?’
Spring was still young when I made this image along the Carson River Trail.
The main building in Mormon Station State Park on a snowy day.
I shot from a low angle for this view of Jake’s Wetlands in Minden.
A storm was approaching over the Sierra Nevada Mountains in this image made from Foothill Road.
Jobs Peak as seen from the Dangberg Home Ranch Historic Park on a summer day.
And the winners are:
JUNE: The Dangberg Home Ranch Historic Park at the end of the rainbow. I checked – no gold!
JULY: the Waterloo Lane horses on a nicer day.
AUGUST: The Carson River as seen from the Carson River Trail.
DECEMBER: I found these four deer along Foothill Road near Jacks Valley and made this wildlife panorama.
Today’s PS Challenge image comes from Sonora Pass, a little over 9,000 feet elevation. My friend, Larry Burton, and I drove CA 108 to check on the fall colors the day before the snow flew and closed the road. We were amazed by the number of waterfalls still flowing and how green the vegetation still was. We also found flowers a little higher in elevation!
I like this color version of the image…
…but I was feeling my inner Ansel Adams as I was editing…
This Stemless Goldenweed is under several feet of snow now. I’m glad we got there when we did!